
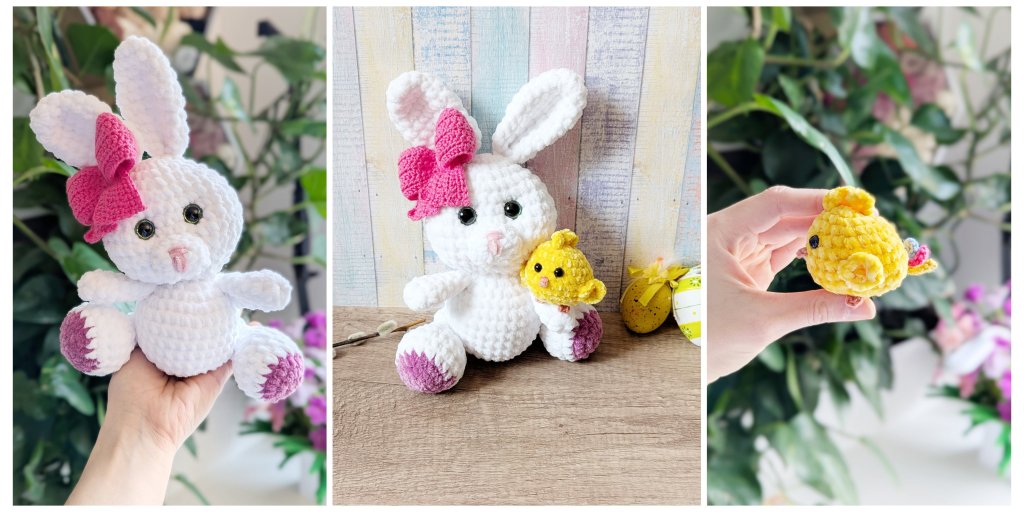
Easter is just around the corner – the perfect time to create small, heartfelt handmade gifts. Here you’ll find free easter patterns for two adorable crochet animals that complement each other beautifully and make any Easter basket extra special: Bunny Tilli and Chick Pipa.
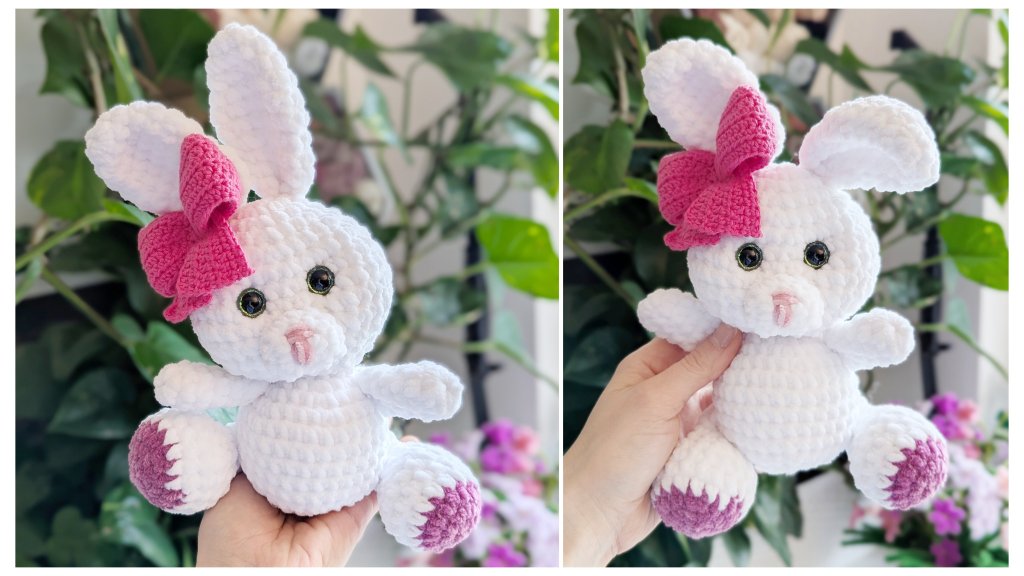
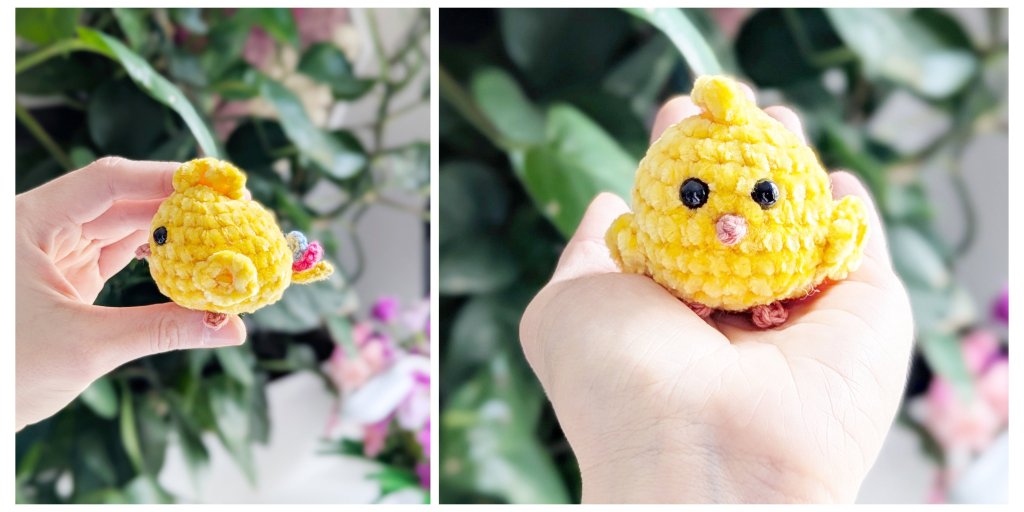
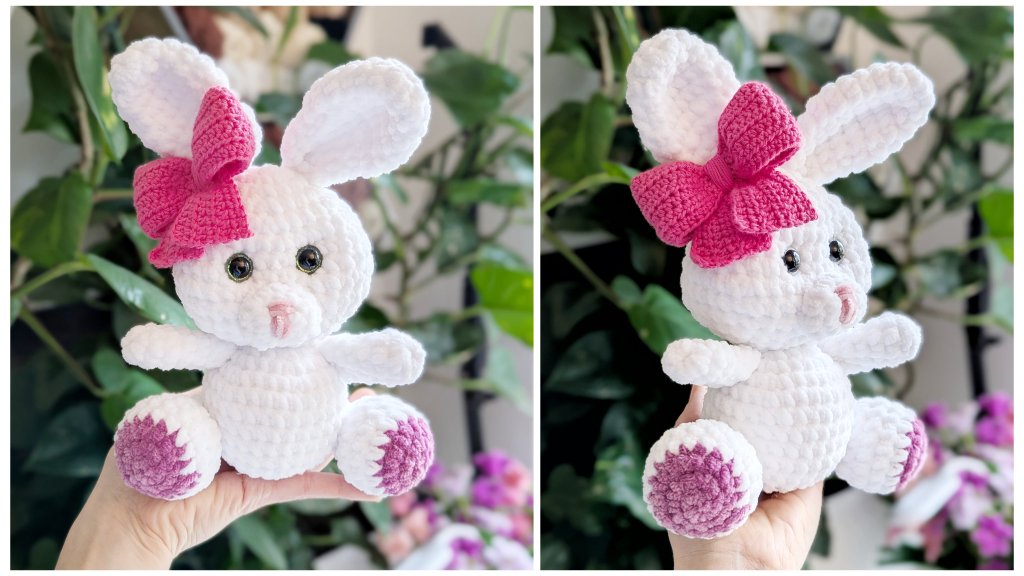
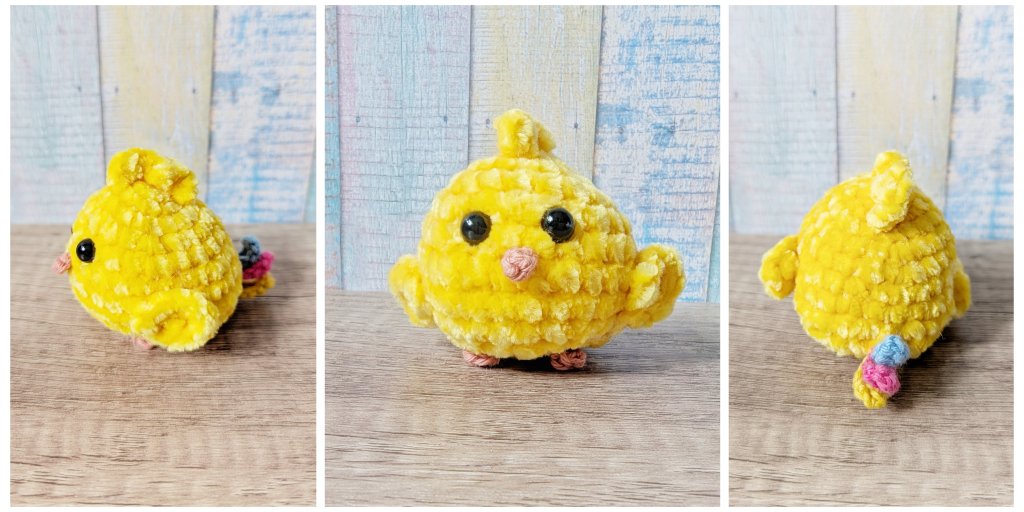
Bunny Tilli, measuring about 27 cm (10.5 inches), is a cuddly plush toy made with soft, fluffy yarn. This makes it especially gentle to the touch and perfect as a sweet Easter gift for little ones. By Tilli’s side is tiny Chick Pipa – at only about 6 cm (2.5 inches), it’s perfectly sized for hiding during an Easter egg hunt. A special highlight is its colorful tail feathers, giving it a cheerful and playful personality.
Together, Tilli and Pipa make a thoughtfully coordinated duo – a larger cuddly toy paired with a small surprise to discover. The result is a personal Easter gift that brings joy both when giving and when hunting.
Happy Easter with these free easter crochet patterns!
Size
Bunny: appr. 27 cm
Chick: appr. 6 cm
What do you need
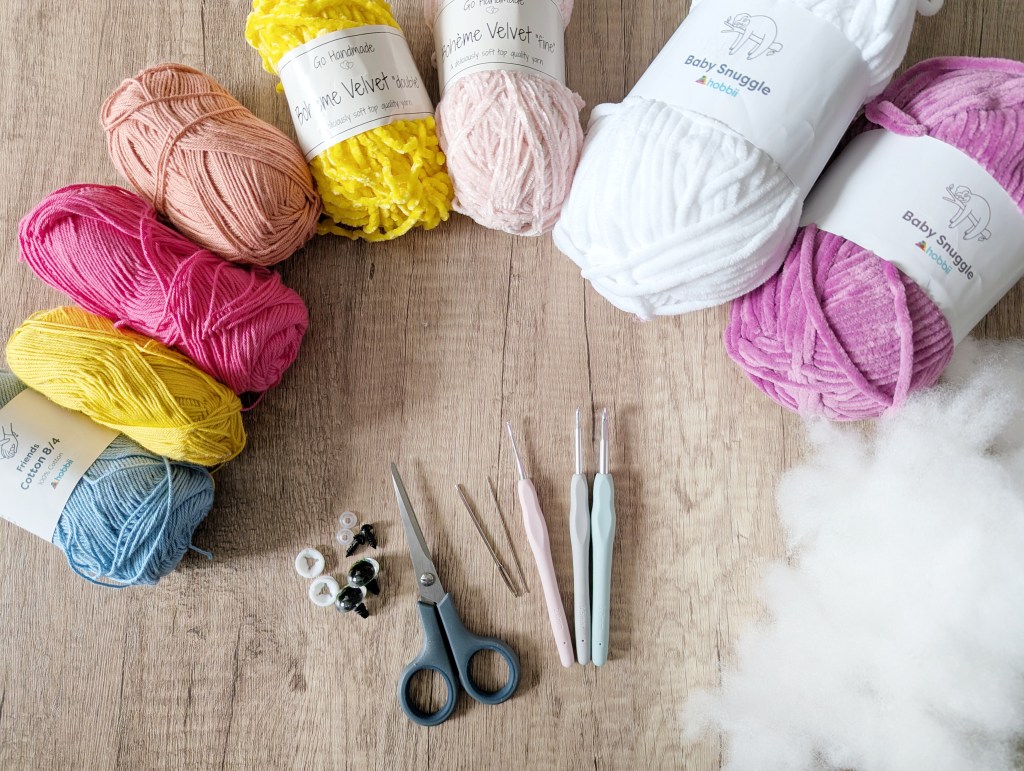
- For the bunny: super bulky chenille yarn in white (appr. 60 m) and darkpink (appr. 10 m) and super fine cotton yarn in pink for the ribbon. Yarn used:
- Baby Snuggle Solid (from Hobbii) in White (01) and Orchid (32) (Gauge: 10 × 10 cm = 9 sts × 18 rows) and
- Friends Cotton 8/4 (from Hobbii) in Pink (47) (Gauge: 10 × 10 cm = 26 sts × 36 rows)
- crochet hook size 5.0 mm and 2.0 mm
- For the chick: medium velvet yarn in yellow (appr. 40 m) and super fine cotton yarn in several colors (up to 20 m)
- Bohème Velvet Double (from Go Handmade) in Giraffe Yellow (17673) (Gauge: 10 × 10 cm = 18 sts × 18 rows)
- Friends Cotton 8/4 (from Hobbii) in Lemon (23), Pink (47), Cornflower (83), Warm Coral (126) (Gauge: 10 × 10 cm = 26 sts × 36 rows)
- crochet hook size 3.0 mm and 2.0 mm
- yarn needle
- scissors
- fiberfill
- safety eyes
Abbreviations
sc = single crochet | hdc = half double crochet | dc = double crochet | tr = treble crochet | sl st = slip stitch(es) | ch = chain(s) | st(s) = stitch(es) | rnd = round | row = row | sc2tog = single crochet 2 stitches together (decrease stitch count by 1) | blo = back-loops only | flo = front-loops only
How to read the pattern
The pattern is written in US crochet terminology.
- 1 sc x k – 1 single crochet in the next k stitches (k)
- 1 sc-blo x k – 1 single crochet in the next k stitches working in the back-loops only (k)
- 2 sc – 2 single crochet in the next st (2)
- 2 sc x k – 2 single crochet in the next k stitches (2*k)
- sc2tog x k – crochet next k stitch-pairs in a single crochet together (k)
Crochet Pattern for the Bunny Tilli
The photos for the pattern can be found at the end of the pattern.
Head & Body
Use white yarn color. We start with the head and work our way down.
Ch 2.
1. Rd: 6 sc in 2nd ch from hook (6)
2. Rd: 2 sc x 6 (12)
3. Rd: (1 sc, 2 sc) x 6 (18)
4. Rd: (1 sc x 2, 2 sc) x 6 (24)
5. Rd: (1 sc x 3, 2 sc) x 6 (30)
6. Rd: (1 sc x 4, 2 sc) x 6 (36)
7. + 8. Rd: 1 sc x 36 (2 rounds)
9. Rd: (1 sc x 5, 2 sc) x 6 (42)
10. Rd: (1 sc x 5, sc2tog) x 6 (36)
11. Rd: (1 sc x 4, sc2tog) x 6 (30)
12. Rd: (1 sc x 3, sc2tog) x 6 (24)
13. Rd: (1 sc x 2, sc2tog) x 6 (18)
Now insert the safety eyes between Rounds 7 and 8, spacing them 5 stitches apart. The safety eyes should span approximately 2 rounds in height.
Stuff the inside with fiberfill.
14. Rd: (1 sc, sc2tog) x 6 (12)
15. Rd (Hals): 1 sc x 12 (1 round)
Continue with the body:
16. Rd: (1 sc, 2 sc) x 6 (18)
17. Rd: (1 sc x 2, 2 sc) x 6 (24)
18. Rd: (1 sc x 3, 2 sc) x 6 (30)
19. – 23. Rd: 1 sc x 30 (5 rounds)
24. Rd: (1 sc x 3, sc2tog) x 6 (24)
25. Rd: (1 sc x 2, sc2tog) x 6 (18)
26. Rd: (1 sc, sc2tog) x 6 (12)
27. Rd: sc2tog x 6 (6)
Close the opening by threading the yarn end through the front loops with a yarn needle, then pull tight to close. Weave in the end.
Optional: further shape the face.
Snout
Use white yarn color.
Ch 2.
1. Rd: 6 sc in 2nd ch from hook (6)
2. Rd: 2 sc x 6 (12)
3. Rd: 1 sc x 12 (1 round)
Finish with 1 sl st and leave a long yarn end for sewing.
Using the yarn end and a yarn needle, sew the snout centered directly below the eyes, between Rounds 8 and 11 of the head. Using pink yarn, embroider the nose in a “T” shape (first a horizontal line, then a vertical line placed directly above the center of the horizontal line).
Ears (2x)
Use white yarn color.
Ch 2.
1. Rd: 6 sc in 2nd ch from hook (6)
2. Rd: 2 sc x 6 (12)
3. Rd: 1 sc x 12 (1 round)
4. Rd: (1 sc, 2 sc) x 6 (18)
5. + 6. Rd: 1 sc x 18 (2 rounds)
7. Rd: (1 sc, sc2tog) x 6 (12)
8. + 9. Rd: 1 sc x 12 (2 rounds)
10. Rd: (1 sc x 4, sc2tog) x 2 (10)
11. Rd: 1 sc x 10 (1 round)
Fold the opening closed and crochet it shut with 4 sc. Fasten off, leaving a long yarn end.
Fold the bottom edge from the left tip to the right tip and sew it closed with a few stitches.
Repeat for the second ear.
Sew the ears between Rounds 2 and 3. To prevent them from folding forward or backward, secure the base from both the front and the back over 2 stitches.
Tail
Use white yarn color.
Ch 2.
1. Rd: 6 sc in 2nd ch from hook (6)
2. Rd: 2 sc x 6 (12)
3. + 4. Rd: 1 sc x 12 (2 rounds)
Finish with 1 sl st and leave a long yarn end.
Sew the tail to the back of the body between Rounds 22–25, lightly stuffing it with fiberfill as you go.
Arms (2x)
Use white yarn color.
Ch 2.
1. Rd: 8 sc in 2nd ch from hook (8)
2. – 6. Rd: 1 sc x 8 (5 rounds)
7. Rd: (1 sc x 2, sc2tog) x 2 (6)
Finish with 1 sl st and leave a long yarn end.
Repeat for the second arm.
Sew the arms to the sides of the body, one row below the neck, aligning them over 2 rows, without stuffing them.
Legs (2x)
Start in dark pink yarn color.
Ch 2.
1. Rd: 6 sc in 2nd ch from hook (6)
2. Rd: 2 sc x 6 (12)
3. Rd: (1 sc, 2 sc) x 6, change color to white in last st (18)
4. – 6. Rd: 1 sc x 18 (3 rounds)
7. Rd: (1 sc, sc2tog) x 6 (12)
8. Rd: 1 sc x 12 (1 round)
Stuff the inside up to the 7. Rd with fiberfill.
9. Rd: (1 sc, sc2tog) x 4 (8)
10. + 11. Rd: 1 sc x 8 (2 rounds)
12. Rd: sc2tog x 4 (4)
Close the opening.
Repeat for the second leg.
Sew the 10th round of the legs to the body on the sides, in a diagonal about 1–3 stitches away from the tail. Also secure the legs further forward, around the 8th round, so that the legs do not sit too loosely.
Bow
Use dark pink yarn.
The bow consists of 3 parts: the main bow piece and 2 ties. All parts are worked in rows.
Part 1 – Main Bow Piece:
Ch 49 (= 48 ch + 1 turning ch). Start in the 2nd ch from hook.
1–7. R: 1 sl st, 1 sc x 2, 1 hdc x 17, 1 sc x 2, 1 sl st x 4, 1 sc x 2, 1 hdc x 17, 1 sc x 2, 1 sl st, ch 1 + turn (48) (7 rounds)
Fasten off and weave in ends.
Part 2 – Ties (make 2):
Ch 16 (= 14 ch + 2 turning ch). Start in the 3rd ch from hook.
1. R: 1 dc x 3, 1 hdc x 3, 1 sc x 4, 1 sl st x 4, ch 1 + turn (14)
2. R: 1 sl st x 4, 1 sc x 4, 1 hdc x 3, 1 dc x 3, ch 1 + turn (14)
Repeat Rows 1–2 two more times (6 rows total).
Fasten off and weave in ends.
Assembly:
Sew the ties onto the center of the main bow piece so that they sit directly next to each other and are centered. Fold the outer edges of the main piece inward over the ties so that the edges meet, then sew them together at the front.
Wrap yarn several times around the center to shape the bow, then attach the bow to the base of one ear.
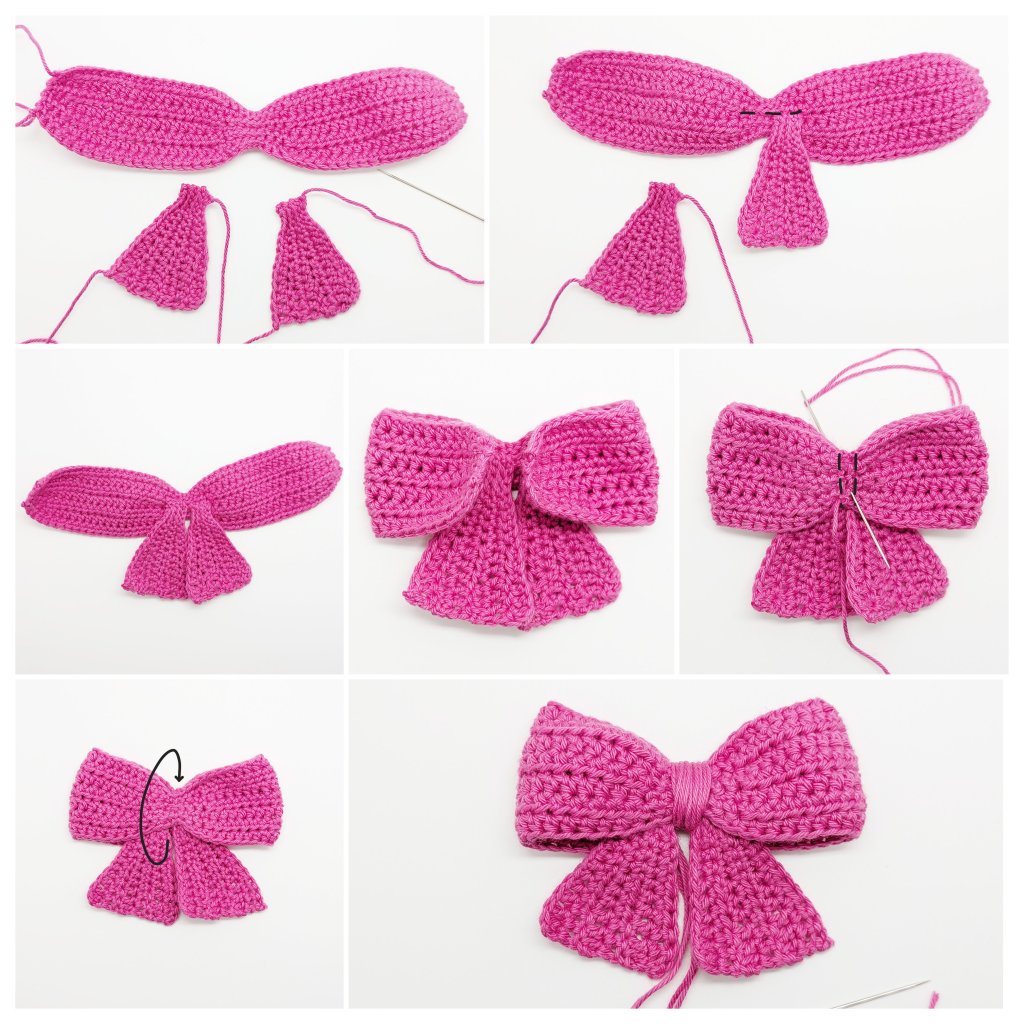

Your crochet bunny is finished!
Crochet Pattern for the Chick Pipa
The photos for the pattern can be found at the end of the pattern.
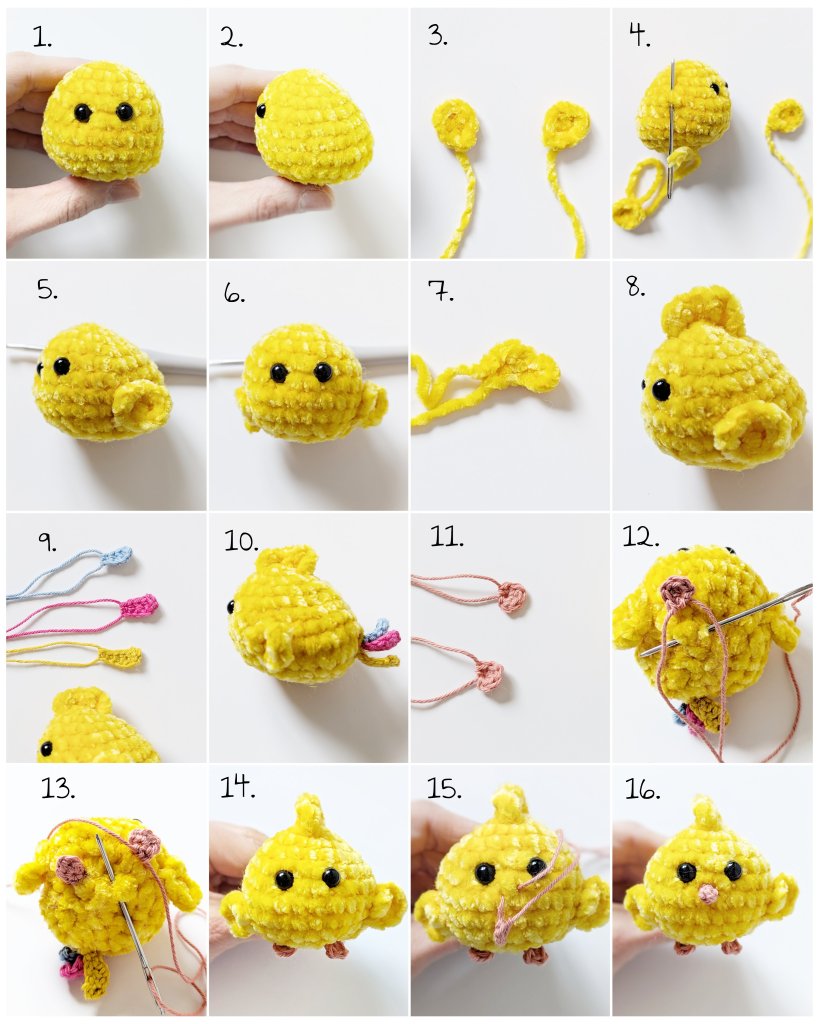
Head & Body
Use yellow yarn color. We start with the head.
Ch 2.
1. Rd: 6 sc in 2nd ch from hook (6)
2. Rd: 2 sc x 6 (12)
3. Rd: (1 sc, 2 sc) x 6 (18)
4. Rd: (1 sc x 5, 2 sc) x 3 (21)
5. Rd: (1 sc x 6, 2 sc) x 3 (24)
6. Rd: 1 sc x 6, 2 sc, 1 sc x 11, 2 sc, 1 sc x 5 (26)
7. Rd: 2 sc, 1 sc, 2 sc, 1 sc x 2, 2 sc, 1 sc x 14, 2 sc, 1 sc x 2, 2 sc, 1 sc, 2 sc (32) – the 2 single crochets at the beginning and end of the work form the back of the chick. This places the yarn end exactly in the center of the back.
8. Rd: (1 sc x 2, sc2tog) x 8 (24)
9. Rd: (1 sc x 2, sc2tog) x 6 (18)
Now insert the safety eyes between the 5th and 6th rounds, spaced 3 stitches apart.
Stuff the inside with fiberfill.
10. Rd: (1 sc, sc2tog) x 6 (12)
11. Rd: sc2tog x 6 (6)
Close the opening and weave the end in.
Wings (2x)
Ch 3 + 1 turning ch.
1. Rd: 1 hdc, 1 sc in next st, (1 sl st, ch 1, 1 sl st) in the same last st, continue on other side: 1 sc, 2 hdc in last st.
Finish the work with 1 slip stitch in the first stitch.
Repeat for the second wing.
Sew the wings on 3–4 rounds below the eyes (covering 3 rounds).
Comb
Ch 4 + 1 turning ch.
1. R: 1 hdc, 1 sl st, 1 dc, 1 sl st (4).
Sew the comb across the 1st and 2nd round of the body.
Tail Feathers
The feathers are crocheted in different colors of cotton yarn. Each feather is 1 chain (resp. 1 dc) longer than the previous one.
1st feather: Ch 4 + 1 turning chain. Starting in the 2nd chain from the hook, 1 dc × 2, 1 hdc, 1 sc in the last chain (4). Leave a long yarn end.
2nd feather: Ch 5 + 1 turning chain. Starting in the 2nd chain from the hook, 1 dc × 3, 1 hdc, 1 sc in the last chain (4). Leave a long yarn end.
3rd feather: Ch 6 + 2 turning chain. Starting in the 2nd chain from the hook, 1 tc, 1 dc × 2, 1 hdc, 1 sc, 1 sl st in the last chain (4). Leave a long yarn end.
Sew the feathers on top of each other through the same central stitch on the back, in ascending size order. You can additionally wrap the base with the body yarn to keep the feathers together more securely.
Legs (2x)
Use orange cotton yarn.
Ch 2.
1. Rd: work in the 2nd ch from hook: 1 sc, 1 hdc, 1 dc, 1 hdc, 1 sc. Leave a long yarn end for sewing.
Repeat for the second leg.
Sew the feet between the last and second-to-last round of the body (i.e., on the underside) so that the back of the stitches faces outward.
Snout
Use orange cotton yarn.
1. Rd: 4 sc in magic ring, 1 sl st in 1st sc. Leave along yarn end for sewing.
Sew the snout right below the eyes, thereby the backside of the stitches face upwards.
Your crochet chick is now finished too!
I hope you enjoyed crocheting along with the instructions and that your bunny Tilli and chick Pipa turned out just as well. Happy Easter!
)