

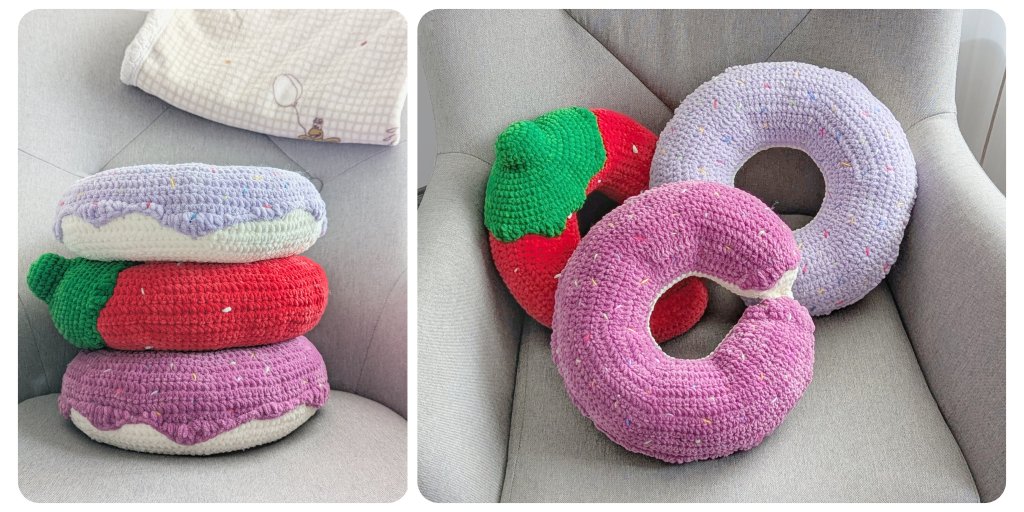
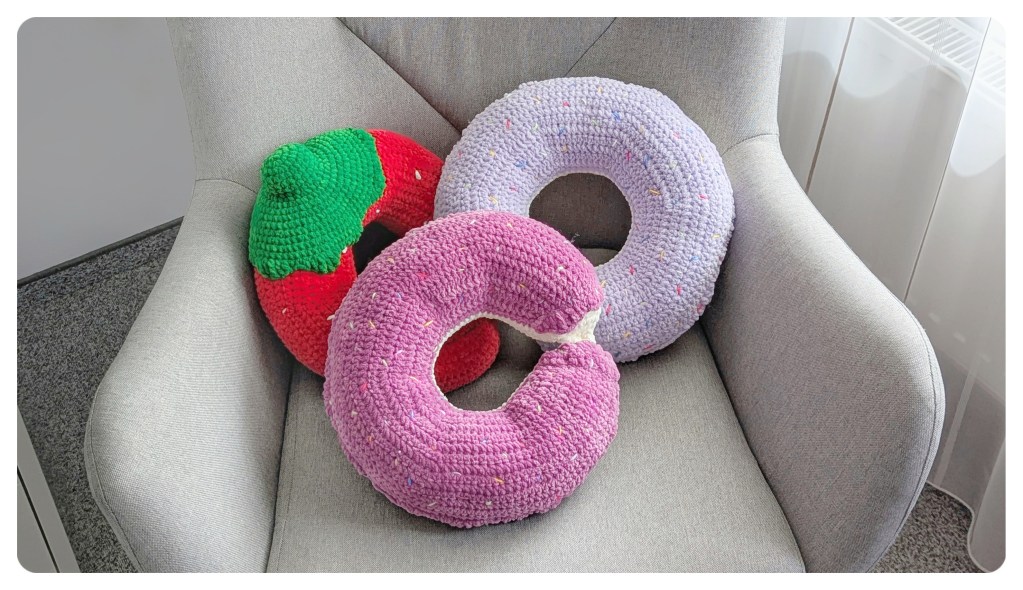
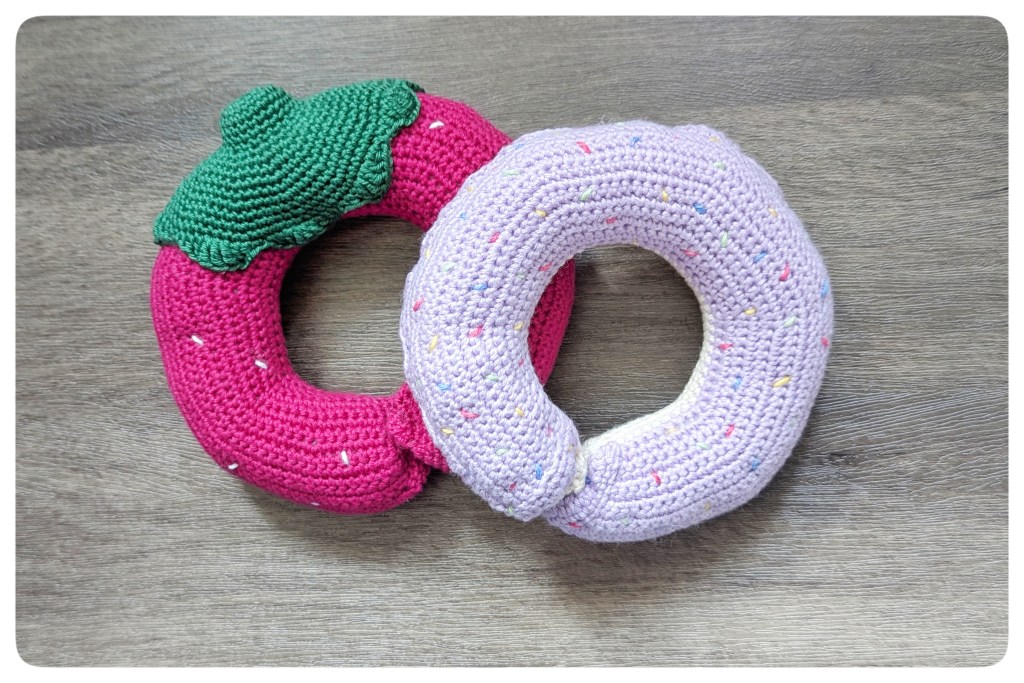
Practical, cute, and versatile – the perfect companion for travel: this Donut-shaped crochet travel neck pillow is not only a real eye-catcher, but also helps you arrive feeling relaxed, whether you’re traveling by car, train, or plane. Measuring approximately 30 × 30 × 10 cm, it’s ideal for children and teens, providing comfortable neck support without feeling too large or bulky. You’ll find the free pattern just below.
You can find the free pattern for the Strawberry Neck Pillow from the pictures here.
The pattern is easy to follow and guides you step by step through creating your own Donut pillow – making it a great choice for beginners. Even better: with just a few simple adjustments, you can easily customize the size. This way, the pillow can also be adapted for adults, with helpful tips included at the end of the pattern.
Whether as a reliable travel companion, a thoughtful gift, or a fun DIY project, this neck pillow adds comfort and a touch of joy to every journey. 🍩
Size
30 x 30 x 10 cm / approx. 11.8 × 11.8 × 3.9 inches (Length x Width x Depth)
What do you need
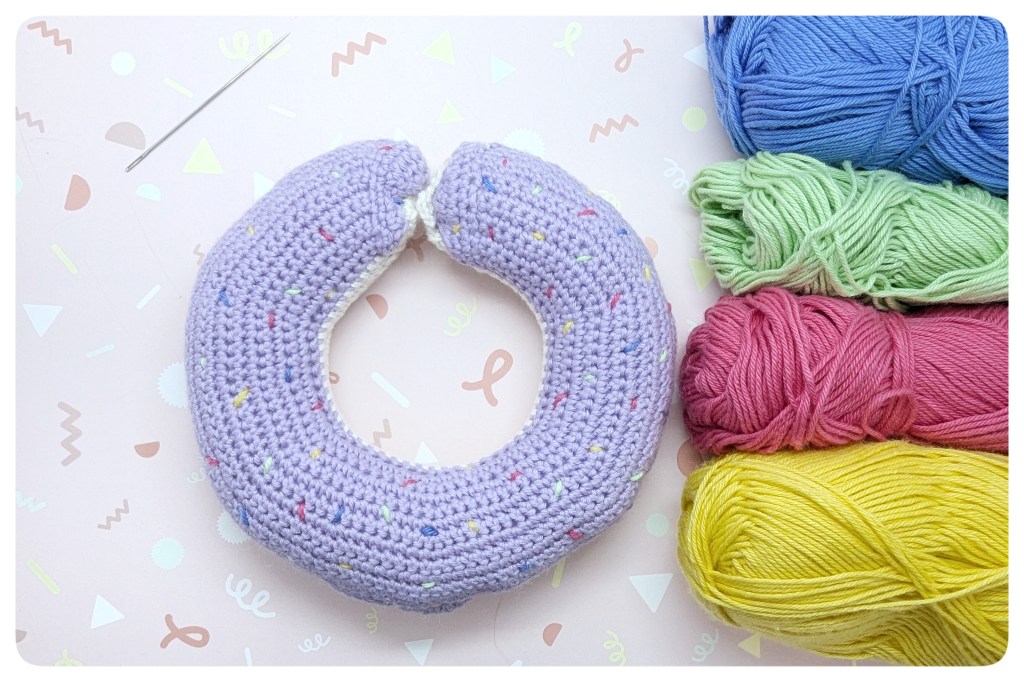
- super bulky chenille yarn in Cream (ca. 120 m), purple or dark pink (ca. 120 m)
- Yarn used for the original sample: Baby Snuggle Solid (by Hobbii) in the colors Cream (02) and Pastel Purple (04) or Orchid (32) (gauge: 4 × 4 inches = 9 sts × 18 rows)
- For better visibility, thinner cotton yarn was used in the photos
- super fine cotton yarn in different colors for the sprinkles
- Crochet hook
- Yarn needle
- Scissors
- Polyfill stuffing (approx. 9 oz)
- Red snap buttons

Abbreviations
sc = single crochet | hdc = half double crochet | dc = double crochet | tr = treble crochet | sl st = slip stitch(es) | ch = chain(s) | st(s) = stitch(es) | rnd = round | row = row | sc2tog = single crochet 2 stitches together (decrease stitch count by 1) | blo = back-loops only | flo = front-loops only
How to read the pattern
The pattern is written in US crochet terminology.
- 1 sc x k – 1 single crochet in the next k stitches (k)
- 1 sc-blo x k – 1 single crochet in the next k stitches working in the back-loops only (k)
- 2 sc – 2 single crochet in the next st (2)
- 2 sc x k – 2 single crochet in the next k stitches (2*k)
- sc2tog x k – crochet next k stitch-pairs in a single crochet together (k)
Crochet Pattern for Donut Travel Neck Pillow
Photos for each step are provided at the end of the corresponding section of the pattern.
Please note: for better visibility, fine cotton yarn was used in the photos instead of the chenille yarn shown in the cover image.
Body
Start in purple color.
Chain 48 + 1 turning ch (resp. a multiple of 6 sts + 1 turning ch).
1. R: (1 sc x 7, 2 sc) x 6, ch 1 + turn (54)
2. R: (1 sc x 8, 2 sc) x 6, ch 1 + turn (60)
3. R: (1 sc x 9, 2 sc) x 6, ch 1 + turn (66)
4. R: 1 sc x 5, 2 sc, (1 sc x 10, 2 sc) x 5, 1 sc x 5, ch 1 + turn (72)
5. R: (1 sc x 11, 2 sc) x 6, ch 1 + turn (78)
6. R: (1 sc x 12, 2 sc) x 6, ch 1 + turn (84)
7. R: (1 sc x 13, 2 sc) x 6, ch 1 + turn (90)
8. R: 1 sc x 7, 2 sc, (1 sc x 14, 2 sc) x 5, 1 sc x 7, ch 1 + turn (96)
9. R: (1 sc x 15, 2 sc) x 6, ch 1 + turn (102)
10. R: (1 sc x 16, 2 sc) x 6, ch 1 + turn (108)
11. R: (1 sc x 17, 2 sc) x 6, ch 1 + turn (114)
12. R: 1 sc x 9, 2 sc, (1 sc x 18, 2 sc) x 5, 1 sc x 9, ch 1 + turn (120)
13. + 14. R: 1 sc x 120, ch 1 + turn (2 rows)
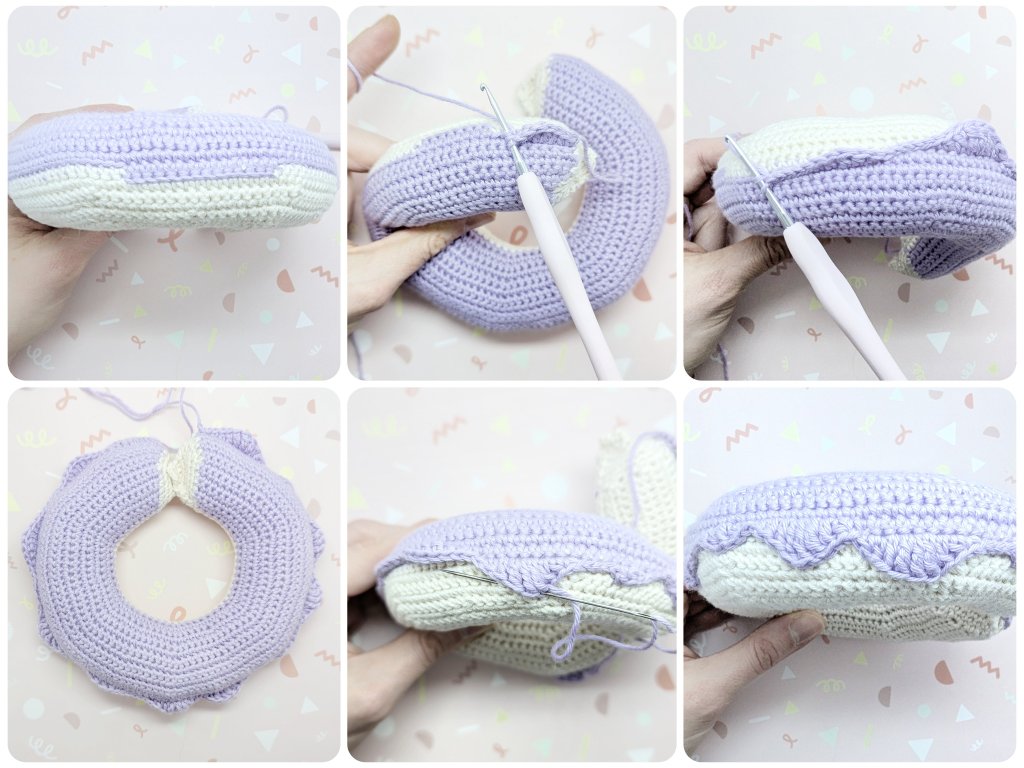
You have now completed half of the body. From here, you will work back across the piece:
In the last stitch of Row 14, change color to Cream. Do not cut the purple yarn yet, as you will switch colors several times in the next row. The stitches in Cream are worked in the front loops only (flo) (e.g., 1 sc-flo × 8), while the stitches in purple are worked through both loops as usual (e.g., 1 sc × 8).
- The outer loops will be used later to continue the “icing” detail.
- Use the tapestry crochet method for clean color changes: carry the unused yarn along the top as you crochet, working your stitches over it so it remains hidden inside the work.
15. R: 1 sc-flo in next 10 sts, change to purple in the 10th st, 1 sc in next 18 sts, change to Cream in the 18th st, 1 sc-flo in next 14 sts and change to purple, 1 sc in next 14 sts and change to Cream, 1 sc-flo in next 18 sts and change to purple, 1 sc in next 12 sts and change to Cream, 1 sc-flo in next 18 sts and change to purple, 1 sc in next 8 sts and change to Cream, 1 sc-flo in next 8 sts, ch 1 + turn (120 sts)
From here on, continue working in Cream only (cut the purple yarn). Work the stitches that go into the purple stitches of the previous row in the back loops only (blo):
16. R: 1 sc x 8, 1 sc-blo x 8, 1 sc x 18, 1 sc-blo x 12, 1 sc x 18, 1 sc-blo x 14, 1 sc x 14, 1 sc-blo x 18, 1 sc x 10, ch 1 + turn (120)
17. R: (1 sc x 18, sc2tog) x 6, ch 1 + turn (114)
18. R: (1 sc x 17, sc2tog) x 6, ch 1 + turn (108)
19. R: 1 sc x 8, sc2tog, (1 sc x 16, sc2tog) x 5, 1 sc x 8, ch 1 + turn (102)
20. R: (1 sc x 15, sc2tog) x 6, ch 1 + turn (96)
21. R: (1 sc x 14, sc2tog) x 6, ch 1 + turn (90)
22. R: (1 sc x 13, sc2tog) x 6, ch 1 + turn (84)
23. R: 1 sc x 6, sc2tog, (1 sc x 12, sc2tog) x 5, 1 sc x 6, ch 1 + turn (78)
24. R: (1 sc x 11, sc2tog) x 6, ch 1 + turn (72)
25. R: (1 sc x 10, sc2tog) x 6, ch 1 + turn (66)
26. R: (1 sc x 9, sc2tog) x 6, ch 1 + turn (60)
27. R: 1 sc x 4, sc2tog, (1 sc x 8, sc2tog) x 5, 1 sc x 4, ch 1 + turn (54)
28. R: (1 sc x 7, sc2tog) x 6, ch 1 + turn (48)
Using single crochet, join the last and first row together (48 sts), making sure the visible loops are facing inward (they will be turned outward later).
Do NOT fasten off.
Turn the piece inside out so the visible loops are on the outside again, then stuff the inside with fiberfill.

Now resume the working yarn: we will close both openings next. First, close the opening where your working yarn is attached. To do this, continue crocheting around the edge in continuous rounds, decreasing in each round:
1. Rd: ch 1, (1 sc x 8, sc2tog) x 2, 1 sc x 9 across the side (the last stitch is worked into the joining (closure) round) (27)
2. Rd: (1 sc x 7, sc2tog) x 3 (24)
3. Rd: (1 sc x 6, sc2tog) x 3 (21)
4. Rd: (1 sc, sc2tog) x 7 (14)
Stuff the interior firmly with fiberfill.
Work 2 more single crochets (1 sc in each of the next 2 stitches), then fold the rows flat and join the sides as follows:
1. R: 1 sc in 1. + 13. st, 1 sc in 2. + 12. st, 1 sc in 3. + 11. st, 1 sc in 4. + 10. st, 1 sc in 3. + 9. st, 1 sc in 4. + 8. st, 1 sc in 5. + 7. st, skip the 8. st (6)
2. R: 1 sc, sc2tog x 2, 1 sc (4)
3. R: sc2tog x 2 (2)
Fasten off and weave in the yarn end.
Repeat the same process for the other opening. Thereby start on the inside at the connection row.
The increase rounds form the top of the pillow, while the decrease rounds form the bottom.
Icing Edge
The icing edge is worked in purple yarn. Starting on the left side of the donut, insert your hook into the first front loop (flo) and work along the row of visible loops to the end on the right side of the donut. The loop row shifts up and down by one row, creating an intentionally uneven edge.
- The straight sections between these shifts are referred to as “sections” below.
Work into the front loops (flo) as follows:
- Ch 1, 1 sc in the same flo, 1 hdc in next flo, 1 dc in next flo, 2 tc in next flo, 1 tc in next flo, 1 dc, 1 hdc, 1 sc, continue with the next section:
- 1 sc in the first flo of the next section, 1 hdc, 1 dc, 2 tc, 1 tc, 1 dc, 1 hdc, 1 sc, continue with the next section:
- 1 sc in the first flo, 1 sl st in next 4 sts, 1 sc, 1 hdc, 1 dc, 2 tc, tc, 1 dc, 1 hdc, 1 sc, 1 sl st in next 2 sts, 1 sc in next 3 sts, continue with the next section:
- 1 sc in the first flo, 1 hdc, 1 dc, 2 tc, 1 tc, 1 dc, 1 hdc, 1 sc, 1 sl st in next 4 sts, continue with the next section:
- 1 sl st in the first flo, 1 sc, 1 hdc, 1 dc, 1 hdc, 1 sc, 1 sl st in next 5 sts, 1 sc, 1 hdc, 1 dc, 2 tc, 1 tc, 1 dc, 1 hdc, continue with the next section:
- 1 sl st in the first flo, 1 hdc, 1 dc, 2 tc, 1 tc, 1 dc, 1 hdc, 1 sc, 1 sl st in next 6 sts, continue with the next section:
- 1 sc, 1 hdc, 1 dc, 1 hdc, 1 sc, 1 sl st, 1 sc, 1 hdc, 1 dc, 2 tc, 1 tc, 1 dc, 1 hdc, 1 sc, continue with the next section:
- 1 sc, 1 hdc, 1 dc, 2 tc, 1 tc, 1 dc, 1 hdc, 1 sc, 1 sl st in next 4 sts, 1 sc, 2 hdc, 1 sc, sl st in next 3 sts, continue with the final section:
- 1 sc, 1 hdc, 1 dc, 2 tc, 1 tc, 1 dc, 1 hdc, 1 sc, 1 sl st in next 2 sts.
Fasten off, leaving a long yarn end.
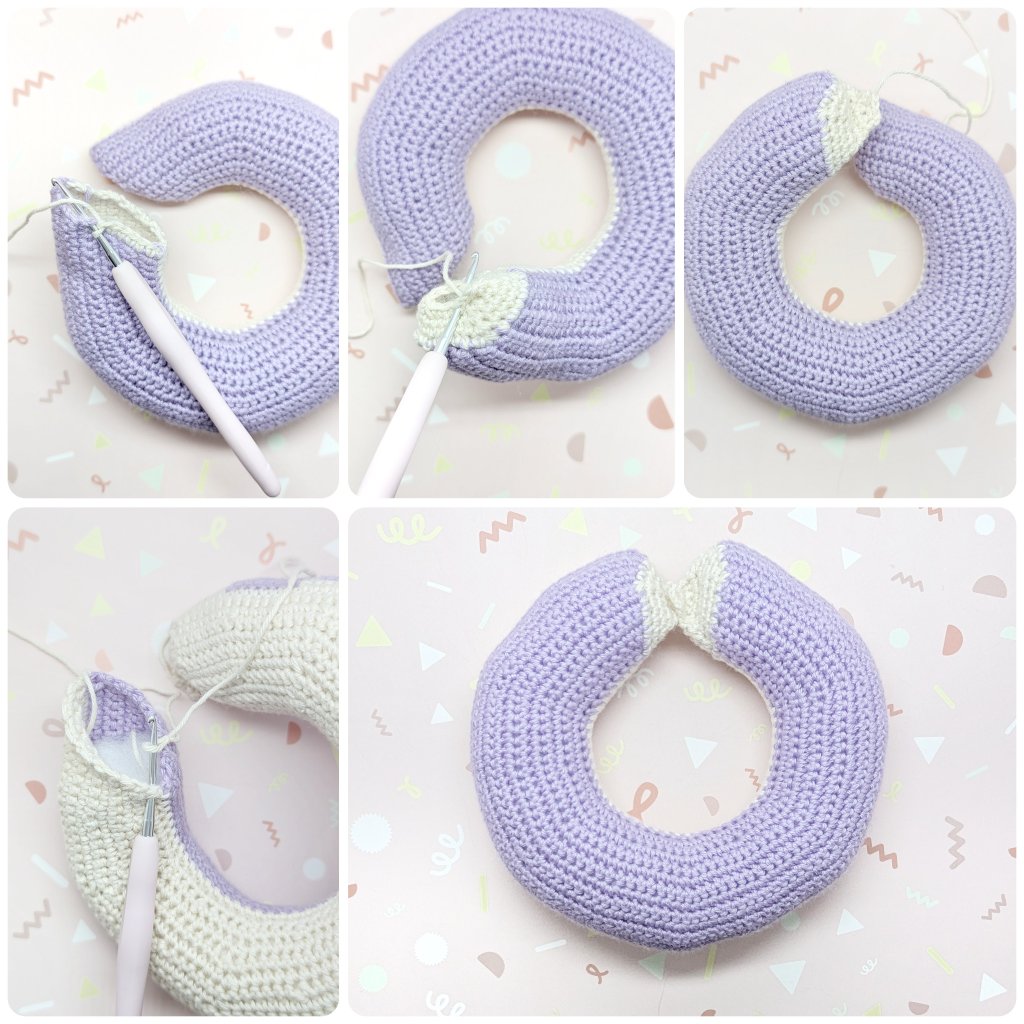
Using a yarn needle and the yarn end, sew the icing waves down onto the donut body so they lie flat and do not stick out.
Icing Extension:
Crochet a separate icing edge for the ends of the donut. Start with a new strand of purple yarn:
Ch 15 + 1 turning ch.
1. R: sc2tog, 1 sc in next 11 sts, sc2tog (13)
2. R: sc2tog, 1 hdc, 1 dc, 2 tc, 1 tc, 1 dc, 1 hdc, 1 sc, 1 sl st, 1 sc, 1 dc, 1 sl st (13)
Fasten off, leaving a long yarn end for sewing.
Repeat to make a total of 2 icing extensions.
Sew them onto the purple edge, continuing the icing pattern.

Sprinkles
Using different colors, embroider sprinkles loosely and randomly across the purple top.
Your donut travel pillow is now finished! 🍩
You can also add snap buttons to keep the pillow securely closed.
Tip for an Adult-Sized Travel Pillow
Size: appr. 33 x 35 x 10 cm
Start with 55 ch (54 ch + 1 turning ch), which adds about 2 in / 5 cm to the size. Begin the increases in every 9th stitch (i.e., (1 sc in next 8 sts, 2 sc in next st) repeat 6 times) and increase 6 times per round until Round 12 ((1 sc in next 19 sts, 2 sc in next st) repeat 6 times).
Crochet 6 rows of 1 sc each instead of 4, then begin decreasing in the same way: decrease initially every 20th stitch, working down to every 9th stitch.
