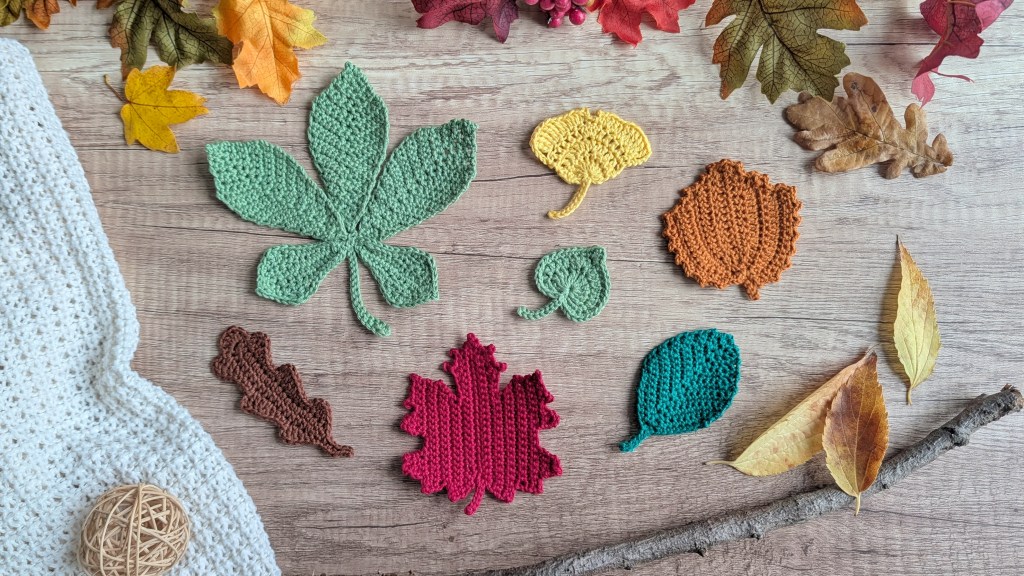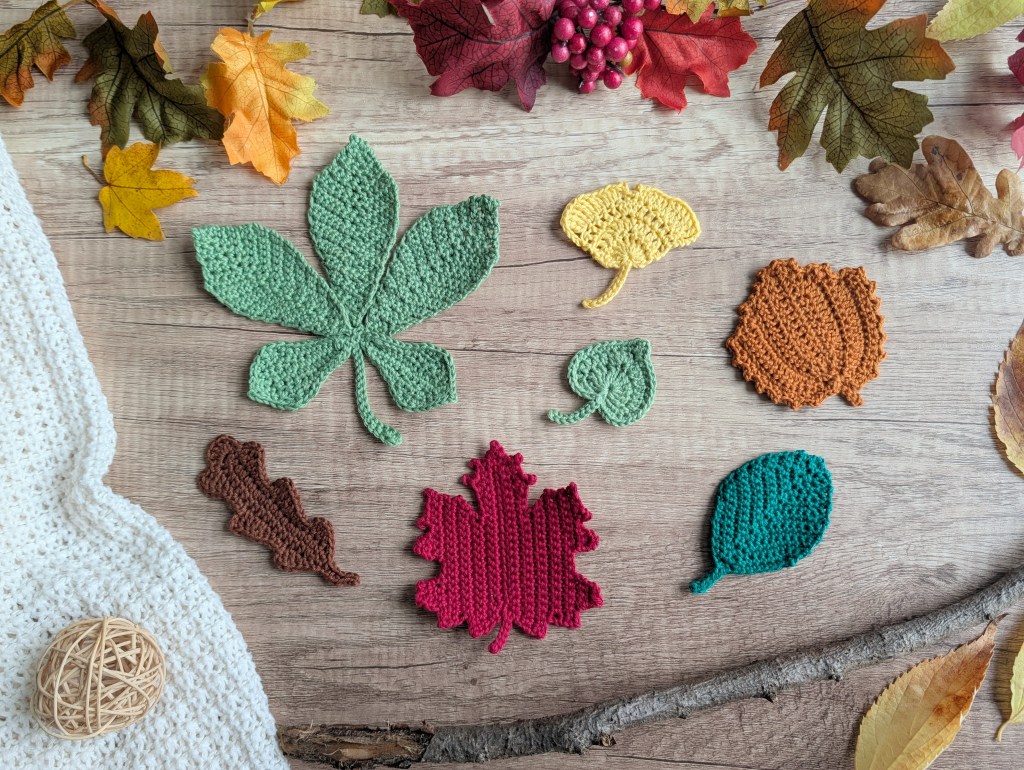
When the leaves turn into the most beautiful shades of fall and slowly begin to drift to the ground, autumn starts making its way into our home, too. We love collecting particularly pretty leaves, drying them, and using them to decorate our table or windowsills. The best part? If stored carefully, these dried leaves can even be reused the following year!
But finding the perfect autumn leaves isn’t always that easy. Often, the prettiest ones have torn edges from the wind, little holes from hungry insects, or other small imperfections.
Luckily, there’s a creative alternative: Why not crochet your own beautiful autumn leaves instead?
With these 7 free crochet patterns, you can recreate some of the most recognizable fall leaves in gorgeous seasonal colors – from golden yellow and warm orange to vibrant red and soft shades of brown. Each leaf comes with written instructions, a crochet chart, and a photo showing what the finished leaf looks like.
Whether you turn them into a colorful garland for your window, a charming hanging decoration for your door, or a lovely little accent for your fall table setting, these crocheted leaves offer endless decorating possibilities. And the best part? They’ll keep their beautiful colors and shape, ready to bring a touch of autumn into your home year after year.
So many little leaves, such a lovely effect – have fun crocheting!
Materials
- Yarn of your choice, preferably 100% mercerized, gassed cotton. This type of yarn creates a smooth, even stitch definition and helps bring out the delicate details of each leaf.
- Crochet hook: Ideally, choose a hook about 0.5 mm smaller than the recommended size for your yarn. This creates tighter stitches and helps the leaves hold their shape.
- Scissors
- Yarn needle for weaving in ends
- Optional: Clear-drying craft glue to stiffen and shape your crocheted leaves and branches.
Abbreviations (US Crochet Terms)
st(s) = stitch(es)sl st = slip stitchch = chainsc = single crochethdc = half double crochetdc = double crochettc = treble crochetch-sp = chain space (space created by a chain or chain sequence)dec = decrease (work stitches together to reduce the stitch count)FLO = front loop onlyBLO = back loop onlyRd = roundR = rowprev row = previous rowrep = repeat
Crochet Chart Symbols
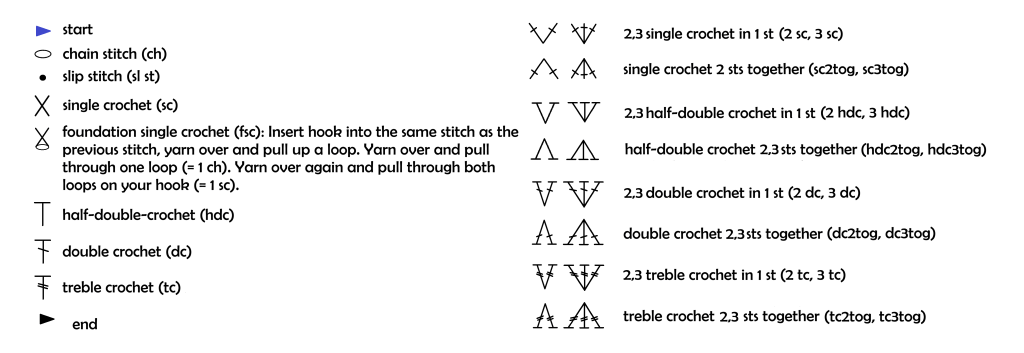
All crochet charts below use the same symbols. The following key will help you identify the different stitches and read the charts correctly.
Crochet Patterns
Maple Leaf
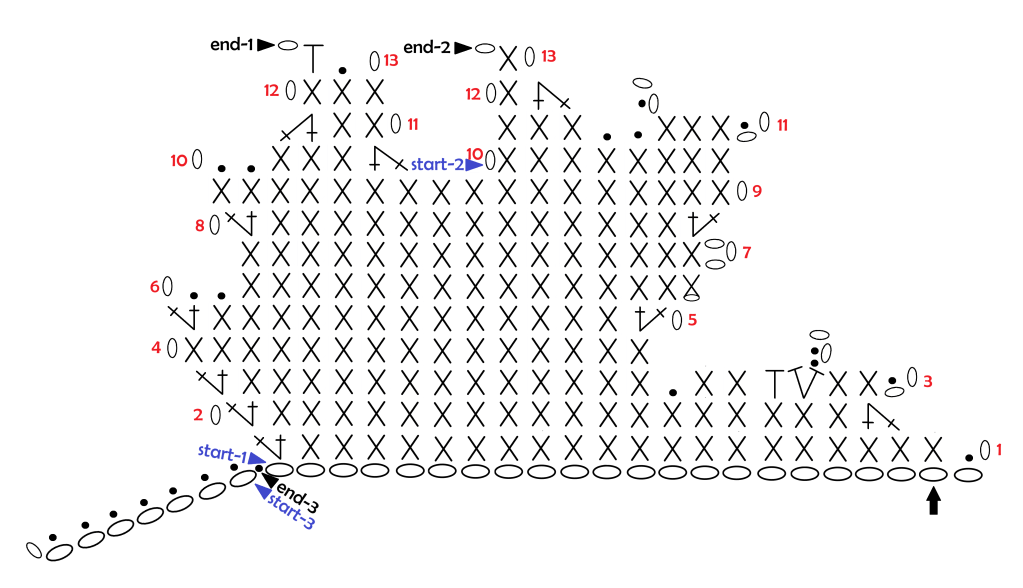
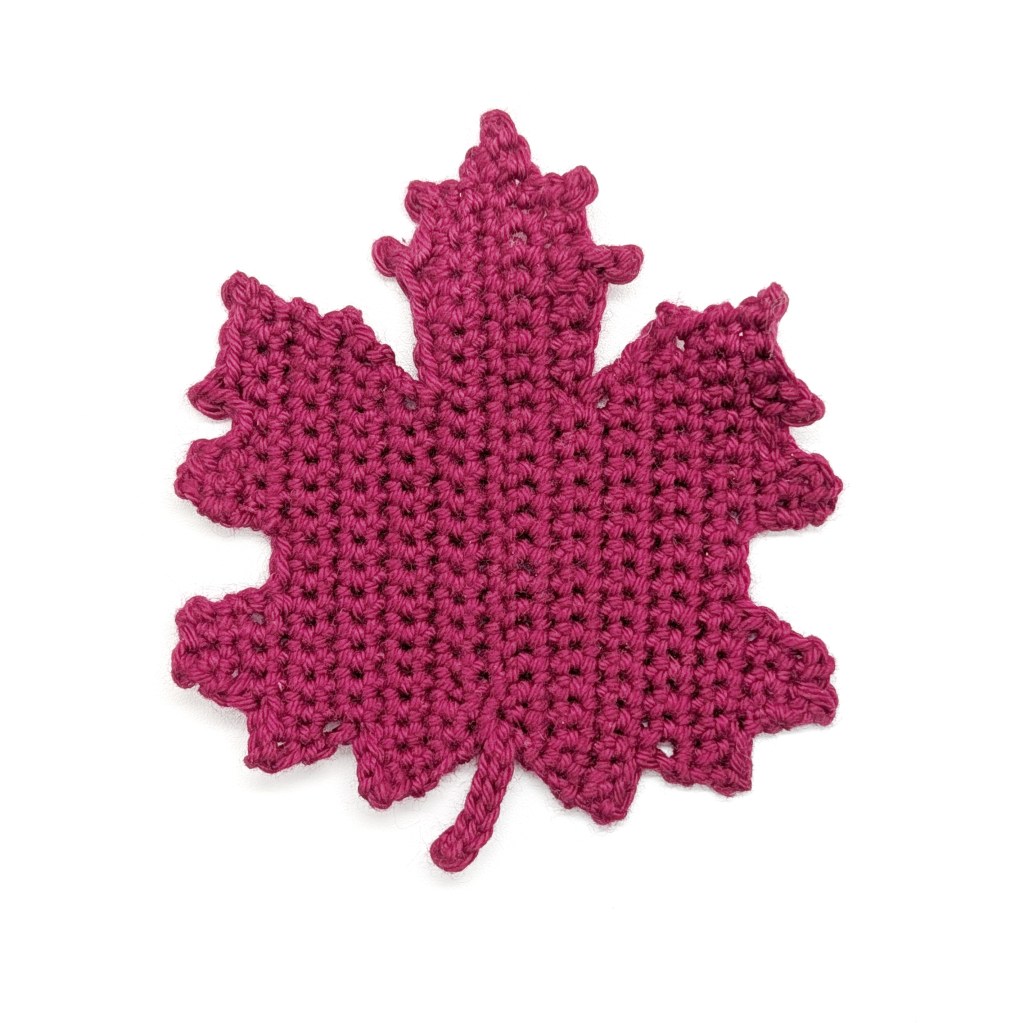
Ch 22 + 1. Leave a long starting yarn tail, which will be used to crochet the stem at the end.
First Half of the Leaf:
Row 1: 1 sl st in the 2nd ch from the hook, 1 sc in each of the next 20 sts, 2 sc in the last st, ch 1 and turn.
Row 2: 2 sc in the first st, 1 sc in each of the next 18 sts, sc2tog, skip the last 2 sts (= 1 sc and 1 sl st), ch 2 and turn.
Row 3: 1 sl st in the 2nd ch from the hook, 1 sc in each of the next 2 sts, 1 hdc in the next st. Then ch 2, work 1 sl st in the 2nd ch from the hook, and 1 sl st back into the previous hdc. Work 1 hdc into the same base st as the previous hdc (visually, this creates 2 hdc in the same stitch, with a ch-sl st detail above them). Then work 1 sc in each of the next 2 sts, 1 sl st in the next st, 1 sc in each of the next 13 sts, 2 sc in the last st, ch 1 and turn.
Row 4: 1 sc in each of the next 15 sts, leave the remaining sts unworked, ch 1 and turn.
Row 5: 2 sc in the first st, 1 sc in each of the next 13 sts, 2 sc in the next st, ch 1 and turn.
Row 6: Skip the first st, 1 sl st in each of the next 2 sts, 1 sc in each of the next 14 sts, then work 1 foundation single crochet (fsc): Insert your hook into the base of the last stitch, yarn over and pull up a loop. Yarn over and pull through 1 loop (= 1 ch). Yarn over again and pull through both loops (= 1 sc). Ch 3 and turn.
Row 7: 1 sc in each of the next 15 sts, leave the remaining sts unworked, ch 1 and turn.
Row 8: 2 sc in the first st, 1 sc in each of the next 13 sts, 2 sc in the last st, ch 1 and turn.
Row 9: 1 sc in each of the next 17 sts, ch 1 and turn.
Row 10: 1 sl st in each of the first 2 sts, 1 sc in each of the next 3 sts, sc2tog, leave the remaining sts unworked, ch 1 and turn.
Row 11: 1 sc in each of the next 2 sts, sc2tog, ch 1 and turn.
Row 12: 1 sc in each of the next 3 sts, ch 1 and turn.
Row 13: Skip the first st, 1 sl st in the next st, 1 hdc in the last st, ch 1 and fasten off.
With a new strand of yarn, join in Row 10, in the 3rd st after the decrease stitch. Ch 1 and work 1 sc into the same st, then 1 sc in each of the next 8 sts. Ch 2 and turn.
Row 11: 1 sl st in the 2nd ch from the hook, 1 sc in each of the next 3 sts, ch 2, work 1 sl st in the 2nd ch from the hook, then 1 sl st in each of the next 2 sts, followed by 1 sc in each of the last 3 sts, ch 1 and turn.
Row 12: 1 sc, sc2tog, leave the remaining sts unworked, ch 1 and turn.
Row 13: Skip the first st, 1 sc in the last st, ch 1 and fasten off.
Second Half of the Leaf:
Turn the piece over so that the starting yarn tail is on the left and the tip of the leaf points to the right.
Insert your hook into the chain indicated by the arrow, yarn over and pull up a loop, then ch 1. Work 1 sc into the same chain.
Work 1 sc in each of the following chains along the foundation chain, and 2 sc in the last ch.
Then repeat Rows 2–13 as for the first half of the leaf.
Stem:
Pick up the starting yarn tail and use it to ch 8. Starting in the 2nd ch from the hook, work 1 sl st in each of the 7 chains. Connect the stem to the leaf with 1 sl st.
Your maple leaf is finished!
Beech Leaf
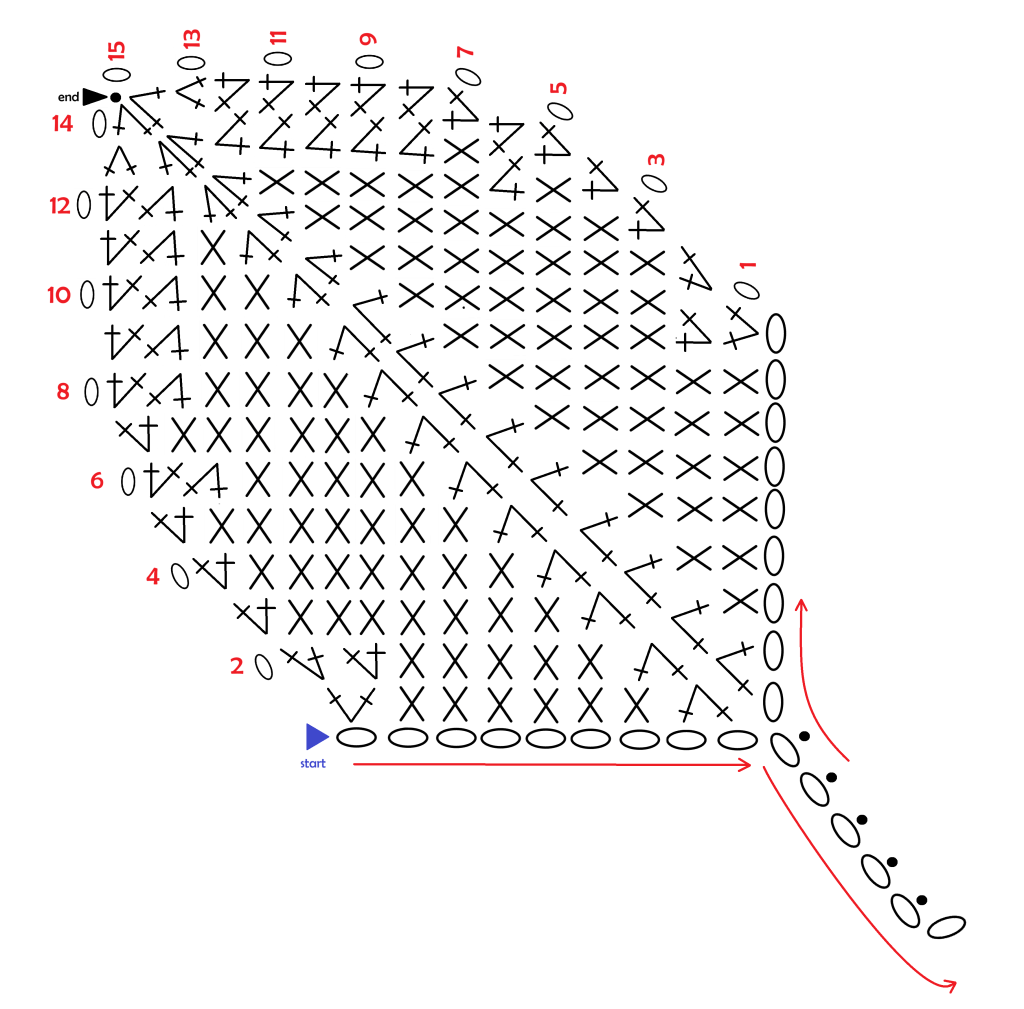
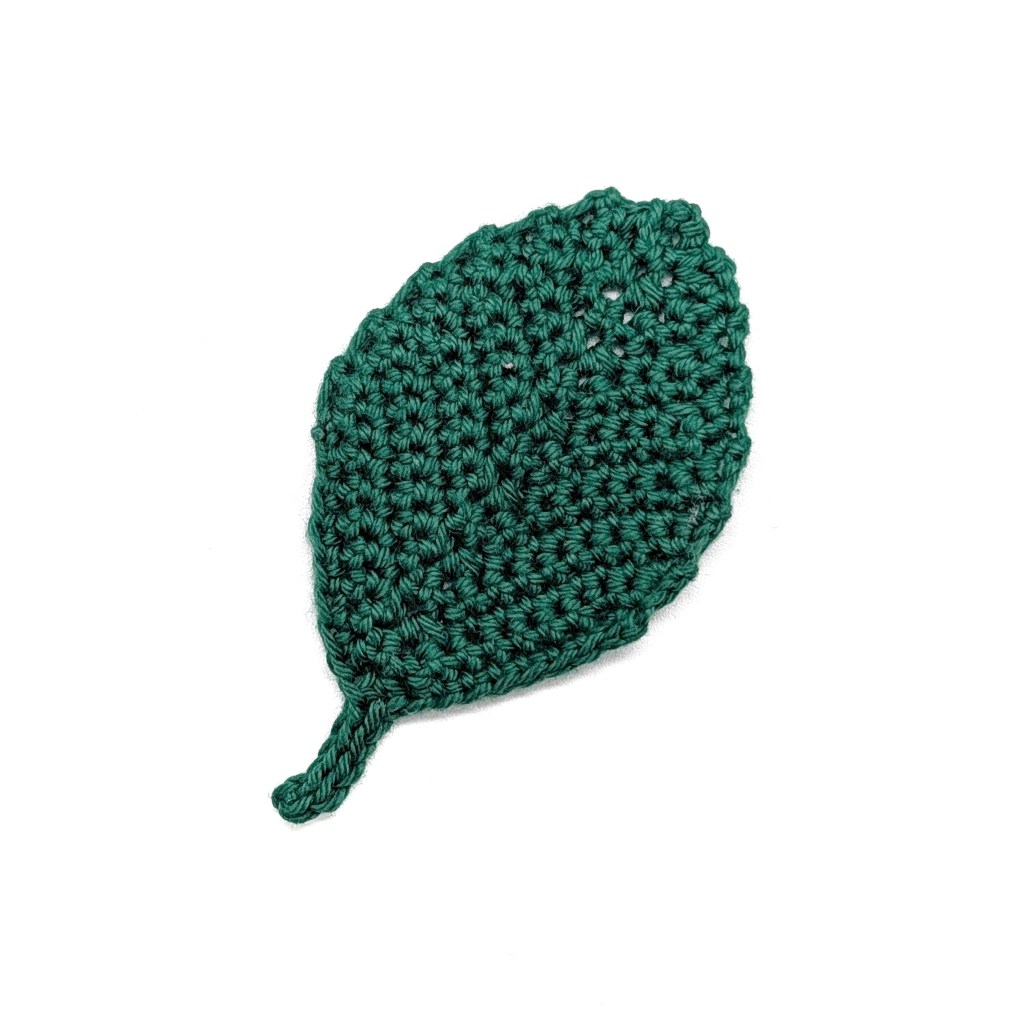
Ch 14 + 1. Starting in the 2nd ch from the hook, work 1 sl st in each of the first 5 chains. Then ch 9 + 1 and turn.
Row 1: 2 sc in the 2nd ch from the hook, 1 sc in each of the next 6 sts, sc2tog. Continue working along the other chain after the sl st: sc2tog, 1 sc in each of the next 6 sts, 2 sc in the last st, ch 1 and turn. (18)
Row 2: 2 sc in each of the first 2 sts, 1 sc in each of the next 5 sts, sc2tog twice, 1 sc in each of the next 5 sts, 2 sc in each of the last 2 sts, ch 1 and turn. (20)
Row 3: 2 sc in the first st, 1 sc in each of the next 7 sts, sc2tog twice, 1 sc in each of the next 7 sts, 2 sc in the last st, ch 1 and turn. (20)
Row 4: 2 sc in the first st, 1 sc in each of the next 7 sts, sc2tog twice, 1 sc in each of the next 7 sts, 2 sc in the last st, ch 1 and turn. (20)
Row 5: 2 sc in the first st, 1 sc in each of the next 7 sts, sc2tog twice, 1 sc in each of the next 7 sts, 2 sc in the last st, ch 1 and turn. (20)
Row 6: 2 sc in the first st, sc2tog, 1 sc in each of the next 5 sts, sc2tog twice, 1 sc in each of the next 5 sts, sc2tog, 2 sc in the last st, ch 1 and turn. (18)
Row 7: 2 sc in the first st, 1 sc in each of the next 6 sts, sc2tog twice, 1 sc in each of the next 6 sts, 2 sc in the last st, ch 1 and turn. (18)
Row 8: 2 sc in the first st, sc2tog, 1 sc in each of the next 4 sts, sc2tog twice, 1 sc in each of the next 4 sts, sc2tog, 2 sc in the last st, ch 1 and turn. (16)
Row 9: 2 sc in the first st, sc2tog, 1 sc in each of the next 3 sts, sc2tog twice, 1 sc in each of the next 3 sts, sc2tog, 2 sc in the last st, ch 1 and turn. (14)
Row 10: 2 sc in the first st, sc2tog, 1 sc in each of the next 2 sts, sc2tog twice, 1 sc in each of the next 2 sts, sc2tog, 2 sc in the last st, ch 1 and turn. (12)
Row 11: 2 sc in the first st, sc2tog, 1 sc in the next st, sc2tog twice, 1 sc in the next st, sc2tog, 2 sc in the last st, ch 1 and turn. (10)
Row 12: 2 sc in the first st, sc2tog 4 times, 2 sc in the last st, ch 1 and turn. (8)
Row 13: Sc2tog 4 times, ch 1 and turn. (4)
Row 14: Sc2tog twice, ch 1 and turn. (2)
Row 15: Skip the first st, 1 sl st in the last st. (1)
Fasten off and weave in all yarn ends.
Your beech leaf is finished!
Birch Leaf
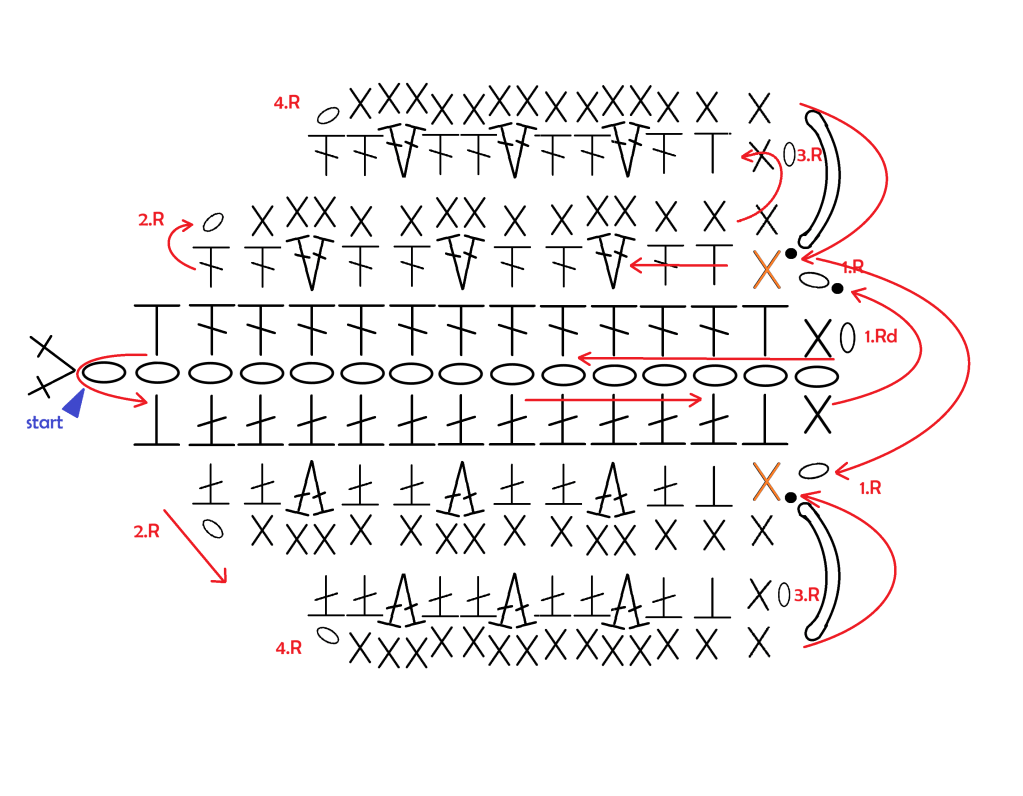

Ch 15 + 1. Leave a long starting yarn tail, which will be used to crochet the stem at the end.
Round 1: Starting in the 2nd ch from the hook, work 1 sc, 1 hdc, 1 dc in each of the next 11 sts, 1 hdc, 2 sc in the last ch. Continue working along the opposite side of the foundation chain: 1 hdc, 1 dc in each of the next 11 sts, 1 hdc, 1 sc. Join with 1 sl st into the first st.
Now continue working in rows without turning:
Row 1: Ch 1, 1 sc, mark this stitch, 1 hdc, 1 dc, 2 dc in the next st, (1 dc in each of the next 2 sts, 2 dc in the next st) twice, 1 dc in each of the next 2 sts. Leave the remaining sts unworked and turn.
Row 2: Ch 1, skip the first st, 1 sc in each of the next 14 sts, turn.
Row 3: Ch 1, 1 sc, 1 hdc, 1 dc, 2 dc in the next st, (1 dc in each of the next 2 sts, 2 dc in the next st) twice, 1 dc in each of the next 2 sts. Leave the remaining sts unworked and turn.
Row 4: Ch 1, skip the first st, 1 sc in each of the next 14 sts. Make 1 long ch and join with 1 sl st into the stitch marked in Row 1. Remove the stitch marker.
Continue working on the opposite side of the leaf: Repeat Rows 1–4. Finish Row 4 with 1 long ch and 1 sl st into the marked stitch.
Turn and work the edging as follows:
Edging: Ch 1, repeat [(1 sc, ch 2, 1 sc) in the next st, skip the next st] until the end. Work (1 sc, 1 sl st) into each corner stitch.
Note: For better visibility, the edging and the stem added later are not shown in the crochet chart.
Stem: Pick up the starting yarn tail and use it to ch 8. Starting in the 2nd ch from the hook, work 1 sl st in each of the 7 chains. Attach the stem to the leaf with 1 sl st.
Your stem is finished!
Weave in all yarn ends.
Your birch leaf is finished!
Oak Leaf
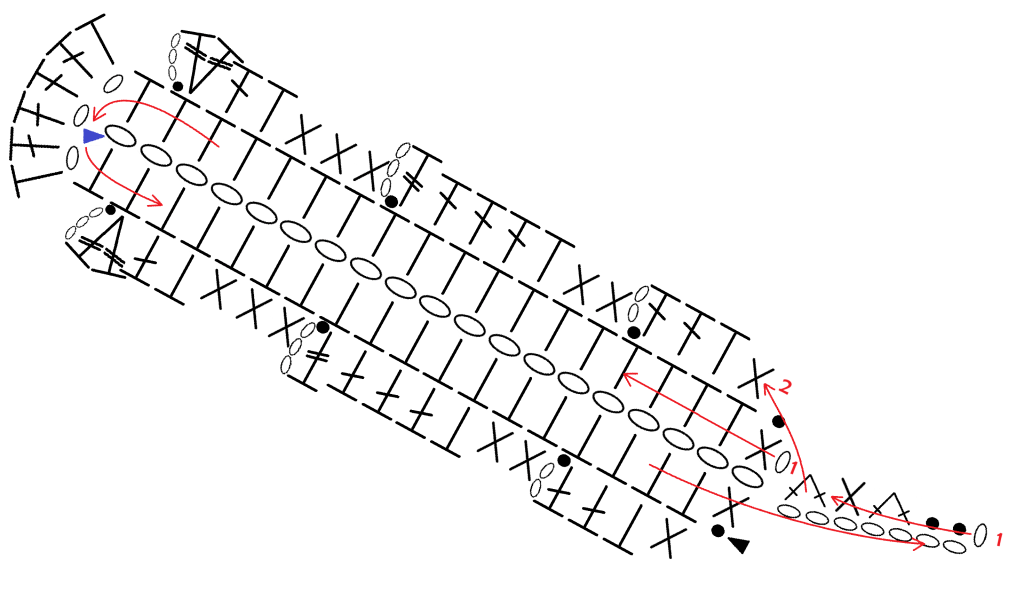
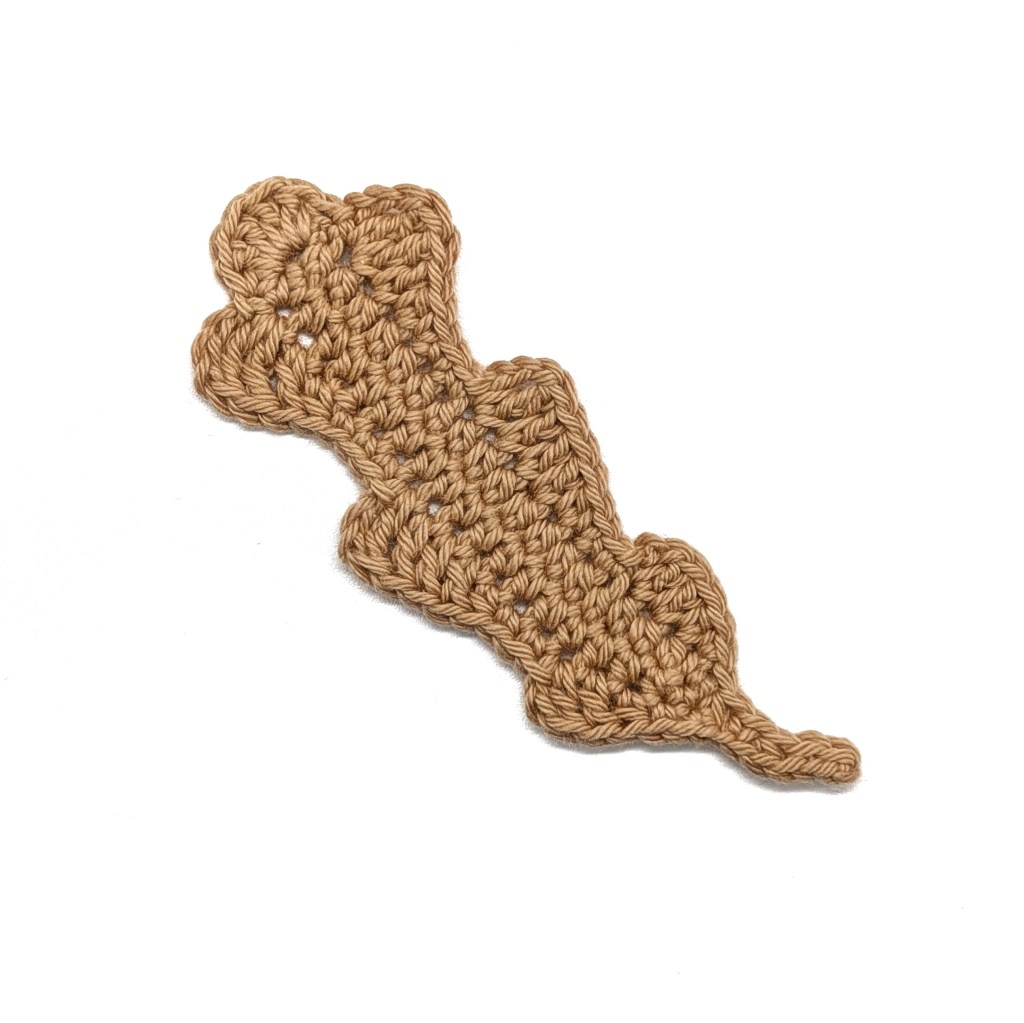
Ch 19 + 1.
Round 1: Starting in the 2nd ch from the hook, work 1 sc, 1 hdc in each of the next 18 sts, ch 3 and continue working along the opposite side of the foundation chain: 1 hdc into the opposite side of the same ch, 1 hdc in each of the next 17 sts, 1 sc into the opposite side of the last ch. Ch 7 + 1 turning ch and turn.
Round 2: 1 sl st in each of the next 2 sts, sc2tog, 1 sc, sc2tog, 1 sl st into the first sc of the leaf body.
Continue working along the edge of the leaf:
1 sc, 1 hdc, 1 dc in each of the next 2 sts, ch 2, 1 sl st into the same st as the last dc, 1 sc in each of the next 2 sts, 1 hdc, 1 dc in each of the next 3 sts, 1 tc, ch 3, 1 sl st into the same st as the tc, 1 sc in each of the next 3 sts, 1 hdc, 1 dc, tc2tog, ch 3, 1 sl st into the same st as the tc, skip the last st before the ch-3 space.
Work (1 hdc, 4 dc, 1 hdc) into the ch-3 space.
Skip the first hdc on the opposite side, 1 sl st in the next st, ch 3, 2 tc into the same st as the sl st, 1 dc, 1 hdc, 1 sc in each of the next 3 sts, 1 sl st in the next st, ch 3, 1 tc into the same st as the sl st, 1 dc in each of the next 3 sts, 1 hdc, 1 sc in each of the next 2 sts, 1 sl st in the next st, ch 2, 1 dc into the same st as the sl st, 1 dc, 1 hdc, 1 sc, 1 sl st in the last st.
Your oak leaf is finished!
Ginkgo Leaf

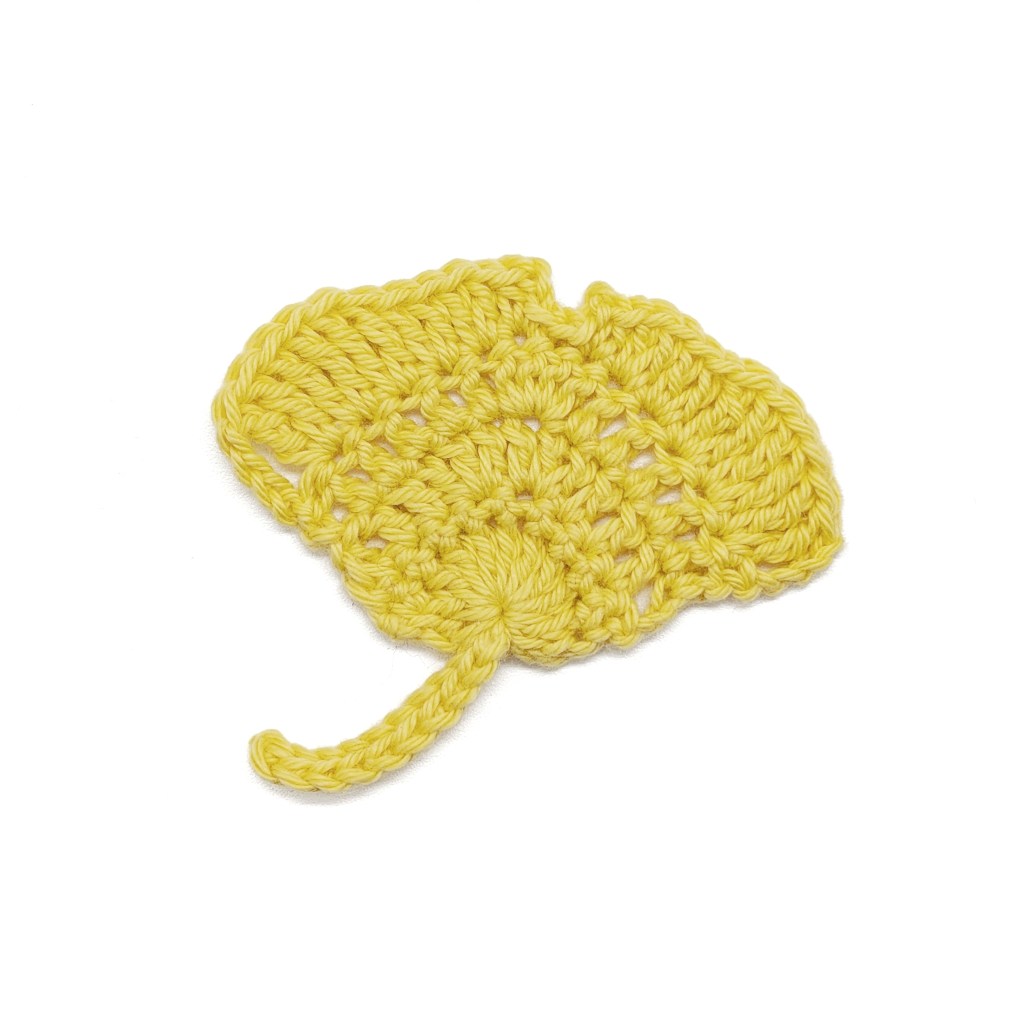
Make a magic ring. Leave a long starting yarn tail, which will be used to crochet the stem at the end.
Row 1: Ch 3, work 10 dc into the magic ring, pull the ring tight and turn.
Row 2: Ch 1, 1 sc in each of the next 10 sts, turn.
Row 3: Ch 3, skip the first st, 1 dc in each of the next 3 sts, 3 dc in each of the next 2 sts, 1 dc in each of the next 2 sts, dc2tog, turn.
Row 4: Ch 3, skip the first st, 1 dc in each of the next 5 sts, 4 dc in the next st, 1 dc in each of the next 5 sts, 1 dc in the 3rd ch, turn.
Row 5: Ch 4, skip the first st, 2 tc in each of the next 3 sts, 2 dc in each of the next 2 sts, 1 hdc, ch 2, 1 sl st in the same st, 1 sl st in each of the next 2 sts, ch 2, 1 hdc in the same st, 2 dc in each of the next 2 sts, 2 tc in each of the next 3 sts, ch 4, 1 sl st in the next st, fasten off.
Stem (not shown in the crochet chart):
Pick up the starting yarn tail and use it to ch 11. Starting in the 2nd ch from the hook, work 1 sl st in each of the 10 chains. Attach the stem to the leaf with 1 sl st.
Your stem is finished!
Weave in all yarn ends.
The Ginkgo Leaf is finished!
Chestnut Leaf
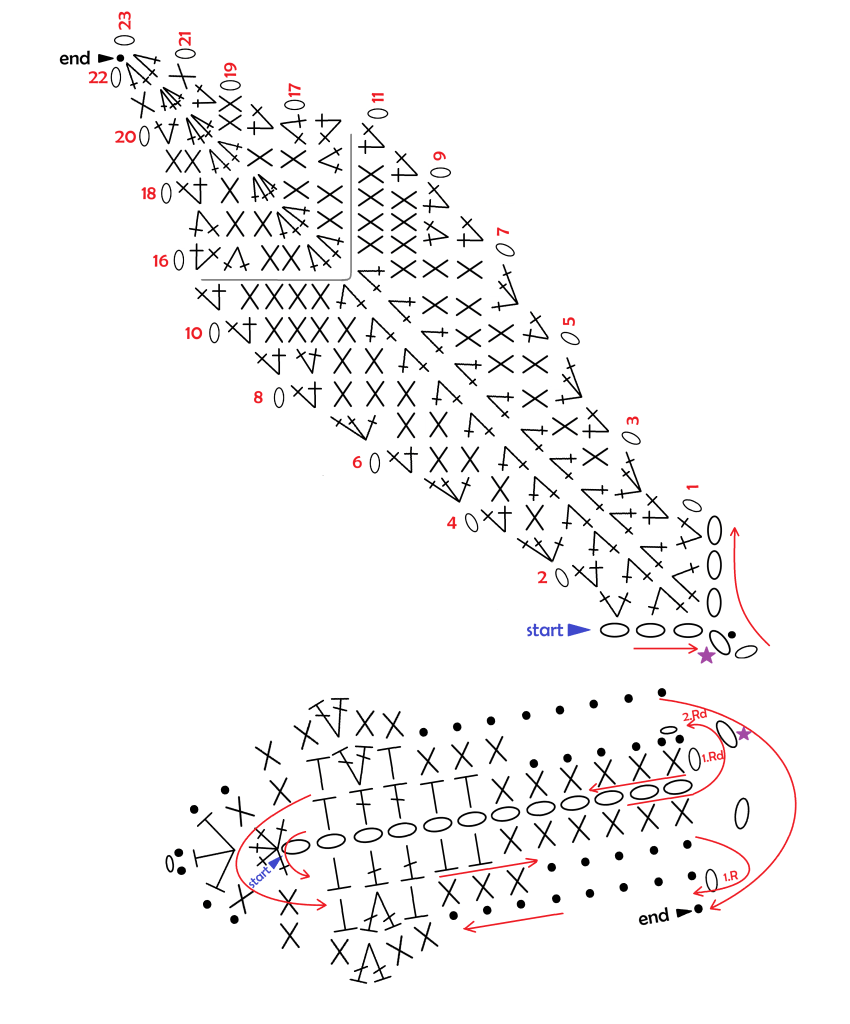

The chestnut leaf consists of leaflets in 2–3 different sizes. In my version, the three central leaflets are the same size, while the two opposite lower leaflets are the smallest. The large leaflets are crocheted similarly to the beech leaf, but with a more elongated shape.
Large Leaflets (Make 3)
Ch 4 + 1. Starting in the 2nd ch from the hook, work 1 sl st in the first ch, then ch 3 + 1 and turn.
Row 1: 2 sc in the 2nd ch from the hook, sc2tog. Continue working along the other foundation chain after the sl st: sc2tog, 2 sc in the last st, ch 1 and turn. (6)
Row 2: 2 sc in the first st, sc2tog twice, 2 sc in the last st, ch 1 and turn. (6)
Row 3: 3 sc in the first st, sc2tog twice, 3 sc in the last st, ch 1 and turn. (8)
Row 4: 2 sc in the first st, 1 sc in the next st, sc2tog twice, 1 sc in the next st, 2 sc in the last st, ch 1 and turn. (8)
Row 5: 3 sc in the first st, 1 sc in the next st, sc2tog twice, 1 sc in the next st, 3 sc in the last st, ch 1 and turn. (10)
Row 6: 2 sc in the first st, 1 sc in each of the next 2 sts, sc2tog twice, 1 sc in each of the next 2 sts, 2 sc in the last st, ch 1 and turn. (10)
Row 7: 3 sc in the first st, 1 sc in each of the next 2 sts, sc2tog twice, 1 sc in each of the next 2 sts, 3 sc in the last st, ch 1 and turn. (12)
Row 8: 2 sc in the first st, 1 sc in each of the next 3 sts, sc2tog twice, 1 sc in each of the next 3 sts, 2 sc in the last st, ch 1 and turn. (12)
Row 9: 2 sc in each of the first 2 sts, 1 sc in each of the next 2 sts, sc2tog twice, 1 sc in each of the next 2 sts, 2 sc in each of the last 2 sts, ch 1 and turn. (14)
Rows 10–15: 2 sc in the first st, 1 sc in each of the next 4 sts, sc2tog twice, 1 sc in each of the next 4 sts, 2 sc in the last st, ch 1 and turn. (6 rows of 14 sts each)
Row 16: 2 sc in the first st, sc2tog, 1 sc in each of the next 2 sts, sc2tog twice, 1 sc in each of the next 2 sts, sc2tog, 2 sc in the last st, ch 1 and turn. (12)
Row 17: Sc2tog, 1 sc in each of the next 2 sts, sc2tog twice, 1 sc in each of the next 2 sts, sc2tog, ch 1 and turn. (8)
Row 18: 2 sc in the first st, 1 sc in the next st, sc2tog twice, 1 sc in the next st, 2 sc in the last st, ch 1 and turn. (8)
Row 19: 1 sc in each of the next 2 sts, sc2tog twice, 1 sc in each of the next 2 sts, ch 1 and turn. (6)
Row 20: 2 sc in the first st, sc2tog twice, 2 sc in the last st, ch 1 and turn. (6)
Row 21: 1 sc, sc2tog twice, 1 sc in the last st, ch 1 and turn. (4)
Row 22: Sc2tog twice, ch 1 and turn. (2)
Row 23: Skip the first st, 1 sc in the last st, ch 1 and fasten off. (1)
Do not weave in the yarn ends yet, as they will help you identify the correct orientation when assembling the leaf.
Repeat twice more to make a total of 3 large leaflets.
Small Leaflets (Make 2)
Ch 12 + 1.
Round 1: Starting in the 2nd ch from the hook, work 1 sc in each of the next 6 sts, 1 hdc in each of the next 2 sts, 1 dc in each of the next 2 sts, 1 hdc, 5 sc in the last ch. Continue working along the opposite side of the foundation chain: 1 hdc, 1 dc in each of the next 2 sts, 1 hdc in each of the next 2 sts, 1 sc in each of the next 6 sts. Join with 1 sl st into the first st.
Round 2: Ch 1, 1 sl st in the same st, 1 sl st in each of the next 4 sts, 1 sc in each of the next 3 sts, 1 hdc, 2 dc in the next st, 1 hdc in the next st, 1 sc in each of the next 2 sts, 3 hdc in the corner st, 1 sc in each of the next 2 sts, 1 hdc, 2 dc in the next st, 1 hdc, 1 sc in each of the next 3 sts, 1 sl st in each of the last 5 sts.
Turn. Now continue working in rows.
Row 1: Ch 1, 1 sl st in each of the next 8 sts, 1 sc in each of the next 2 sts, 2 dc in the next st, 1 sc in each of the next 2 sts, 1 sl st in each of the next 2 sts, (1 sl st, ch 1, 1 sl st) in the corner st, 1 sl st in each of the next 2 sts, 1 sc in each of the next 2 sts, 2 dc in the next st, 1 sc in each of the next 2 sts, 1 sl st in each of the last 8 sts. Ch 2 and join with 1 sl st into the first st to create a small corner.
Do not weave in the yarn ends yet, as they will help you identify the correct orientation when assembling the leaf.
Repeat once more to make a total of 2 small leaflets.
Assembling the Chestnut Leaf and Stem
Arrange the leaflets so that the starting yarn tails of the small leaflets point inward. The starting yarn tails of the large leaflets should also point inward, but be positioned on the right side (as viewed from your perspective).
Each leaflet is attached to the stem from its wrong side. The insertion points are marked with a purple star (★) in the crochet chart.
With a new strand of yarn, ch 20 + 1 (= foundation chain).
Note: With so many yarn tails, it’s easy to lose track of which is which. I recommend keeping the working yarn of the foundation chain in your left hand while joining the leaflets to avoid mixing up the strands.
Starting in the 2nd ch from the hook, work:
1 hdc in each of the next 2 sts, 1 sc in each of the next 2 sts, 1 sl st in each of the next 13 sts (until only 3 chains of the foundation chain remain).
Now attach the individual leaflets directly to the foundation chain:
- 1st small leaflet (right): Position the leaflet with its wrong side facing you and the starting yarn tail pointing upward. Insert your hook through the 2nd ch at the end of Row 1 (right next to the final sl st), then through the next ch of the foundation chain. Yarn over and pull through all stitches and the loop on your hook (= 1 sl st). This attaches the first leaflet on the right side.
- 1st large leaflet: Position the leaflet with its starting yarn tail pointing down and to the right. Insert your hook through the sl st at the base of the leaflet (the bottom end), then through the second-to-last ch of the foundation chain. Yarn over and pull through all stitches and the loop on your hook (= 1 sl st).
- 2nd large leaflet: Attach this leaflet in the same way as the first large leaflet. Insert your hook through the sl st at the base of the leaflet, then through the last ch of the foundation chain. The starting yarn tail should point down and to the right. Yarn over and pull through all stitches and the loop on your hook (= 1 sl st).
- 3rd large leaflet: Insert your hook through the sl st at the base of the leaflet, then through the next ch on the opposite side of the foundation chain. The starting yarn tail should also point down and to the right. Yarn over and pull through all stitches and the loop on your hook (= 1 sl st).
- 2nd small leaflet (left): Attach this last leaflet in the same way as the first small leaflet. Insert your hook through the 2nd ch at the end of Row 1 of the leaflet, then through the next ch on the opposite side of the foundation chain. Yarn over and pull through all stitches and the loop on your hook (= 1 sl st).
Ch 1 and fasten off.
Weave in all yarn ends.
Your chestnut leaf is finished!
Linden Leaf

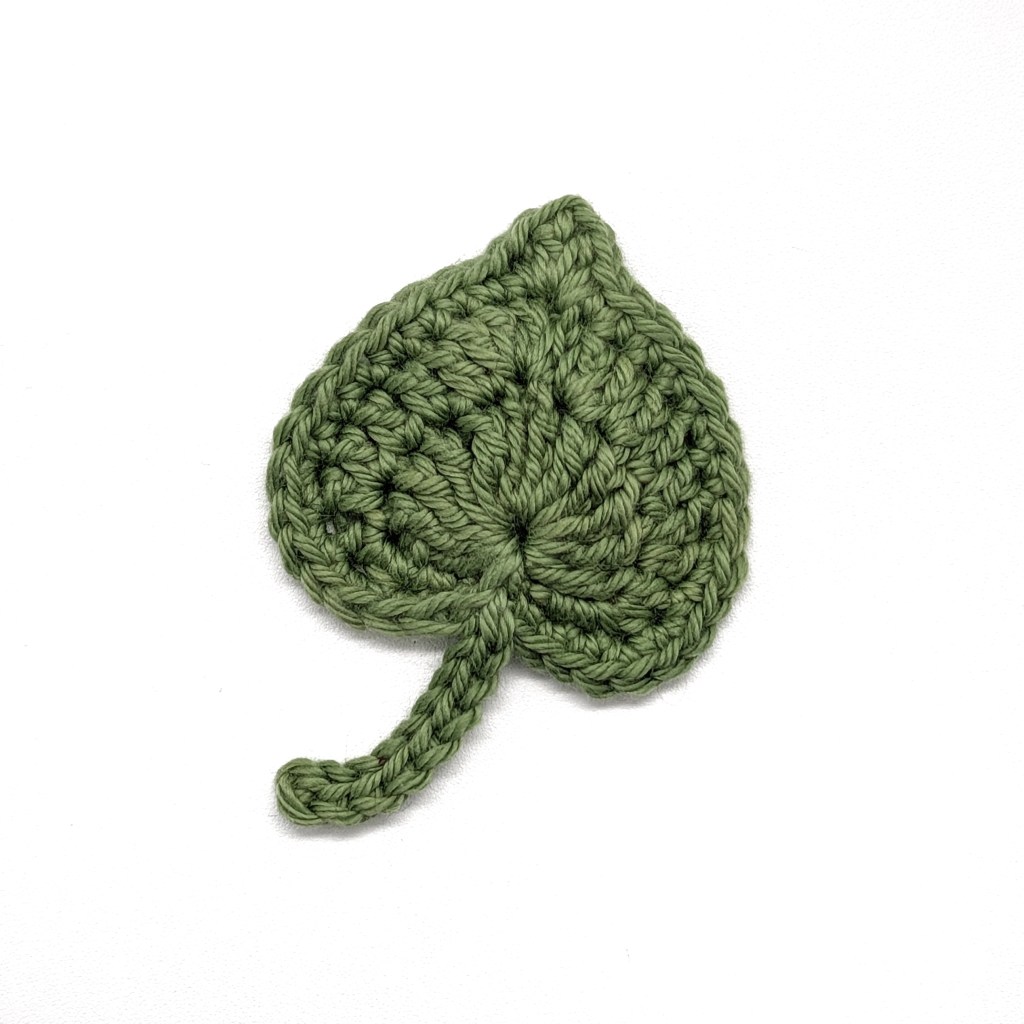
Make a magic ring.
Round 1: Ch 3, work 6 tc into the ring, ch 1, work another 6 tc into the ring, ch 2, 1 sl st into the ring.
Round 2: 3 sc into the ch-3 space at the beginning, 2 hdc in the next st, 2 dc in the next st, 1 dc in each of the next 3 sts, 2 dc in the next st, (1 dc, ch 1, 1 dc) into the ch-1 space (the tip of the heart), 2 dc in the next st, 1 dc in each of the next 3 sts, 2 dc in the next st, 2 hdc in the next st, 2 sc into the next ch space, 1 sl st into the sl st of the previous round.
Round 3: 1 sc in each of the next 3 sts, 2 sc in each of the next 3 sts, 1 sc in each of the next 7 sts, (1 sc, 1 dc, ch 1, 1 dc, 1 sc) into the ch space, 1 sc in each of the next 7 sts, 2 sc in each of the next 3 sts, 1 sc in each of the next 2 sts, 1 sl st into the magic ring (pull the yarn through from the wrong side of the leaf to create a more pronounced inward curve along the edge).
Stem: Ch 11. Starting in the 2nd ch from the hook, work 1 sl st in each of the 10 chains. Fasten off.
Weave in the yarn end.
Your Linden Leaf is finished!
Tips and AI-Generated Inspiration Collage
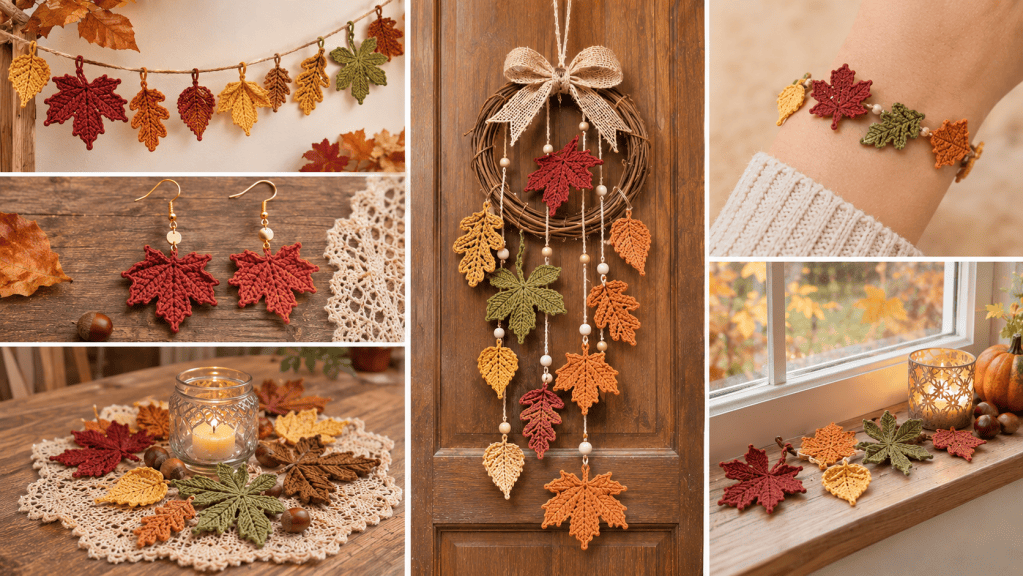
With these crocheted autumn leaves, there are hardly any limits to your creativity! Whether you use them as autumn garlands, window or table decorations, small ornaments, or – in miniature form – as crocheted earrings or delicate bracelets, there are countless ways to showcase these beautiful leaves.
You can also experiment with different yarn weights! For example, use a slightly sturdier medium-weight yarn to create larger, decorative leaf garlands, or fine lace-weight crochet thread for delicate autumn-inspired jewelry. With a little creativity, a love of crocheting, and a few additional craft supplies, you can create your very own unique autumn decorations in no time!
My Tip for Crochet Leaves That Hold Their Shape:
You can easily stiffen and shape your crocheted leaves using craft glue that dries clear. Crocheted rosehip branches and twigs can also be strengthened this way, giving them a more natural and realistic appearance.
For drying, it’s best to use a silicone or plastic surface that the glue won’t permanently stick to. This allows your crocheted pieces to dry completely without becoming stuck to the surface. Gently shape the leaves as desired before drying, then let them dry and harden thoroughly.
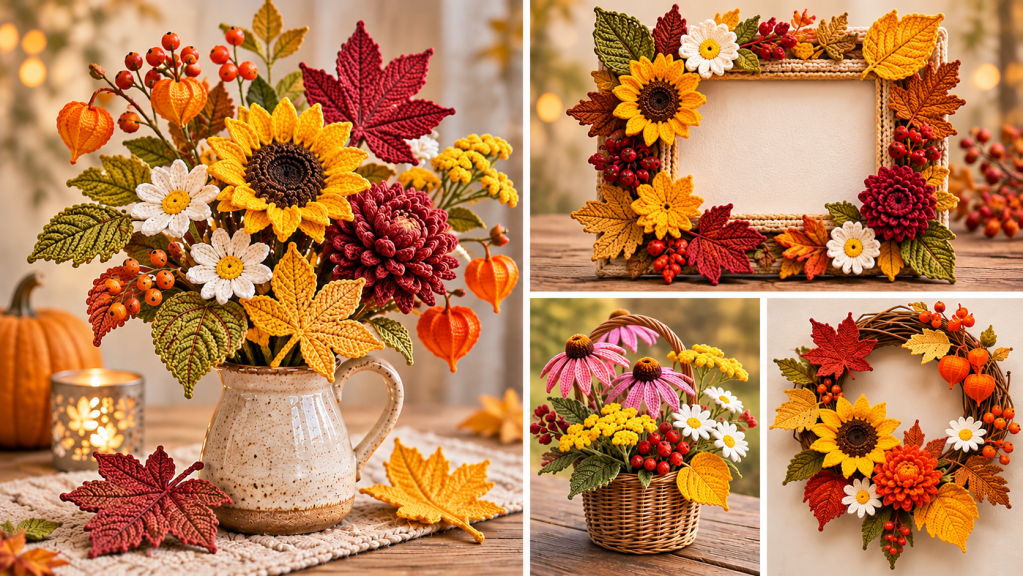
Would you like to combine your crocheted autumn leaves with realistic flowers? While browsing the internet recently, I came across the crochet blog Hookok and was immediately impressed by its wide selection of free crochet patterns for beautiful, three-dimensional flowers. I especially love the many ideas for flower bouquets and creative arrangements. The patterns include plenty of step-by-step photos, making them approachable even for less experienced crocheters. Perhaps you’ll find the perfect floral addition to your crocheted autumn leaves!
Combining crocheted autumn leaves with typical fall flowers such as chrysanthemums, dahlias, or asters, along with decorative rosehip branches, can create beautiful seasonal arrangements – whether as a flower bouquet, door wreath, or decorative picture frame. I had AI visualize a few ideas for inspiration. 😊