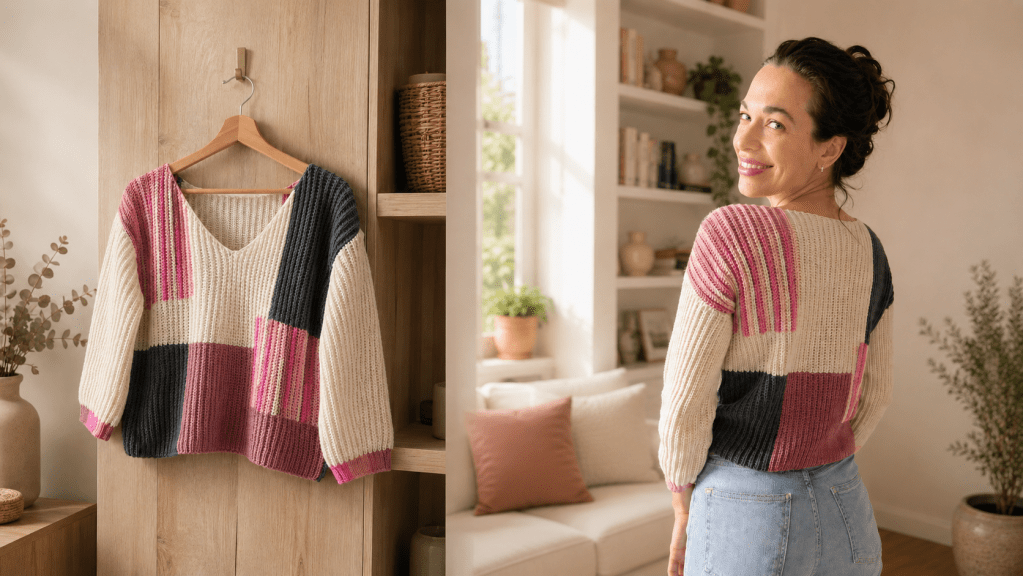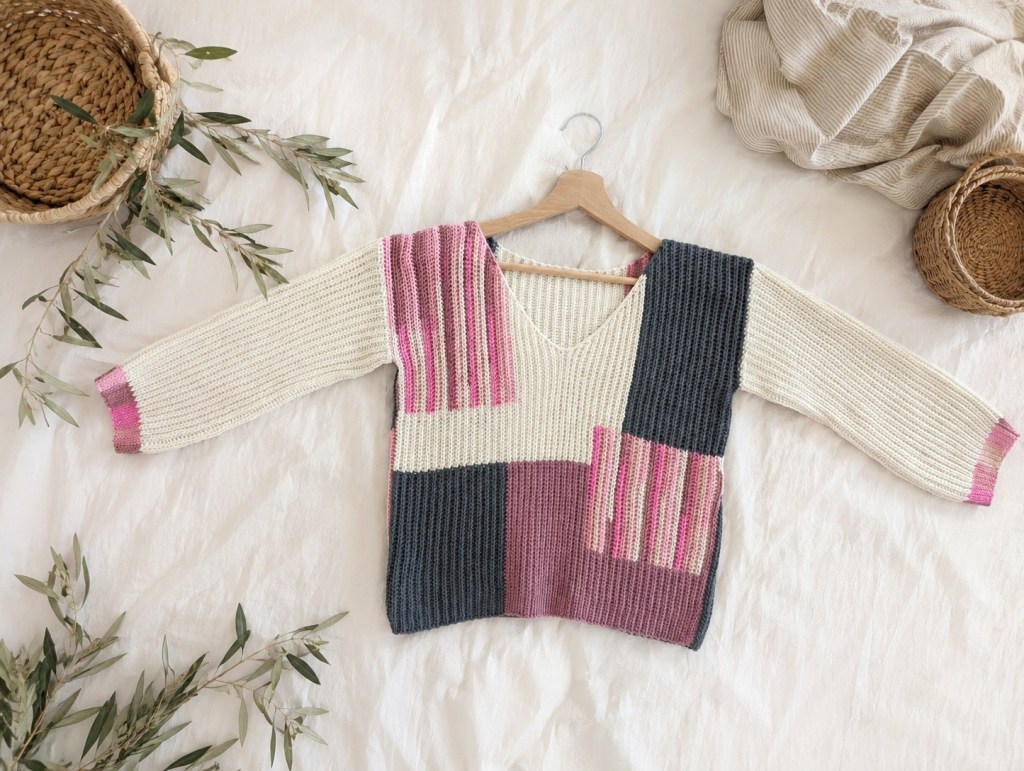
Another free crochet pattern for a new wardrobe favorite: a Scandinavian-inspired colorblock sweater in soft shades of pink, cream, and anthracite, crocheted in my favorite stitch—the Half Double Slip Stitch (also known as the Yarn Over Slip Stitch, or YO sl st). This stitch creates a calm, almost knitted-looking texture with a soft, modern feel, while the carefully chosen color palette gives the sweater a contemporary, feminine Scandinavian designer touch.
Sometimes the best crochet projects are created from what you already have on hand. I originally didn’t have enough yarn for a single-color crochet sweater, which led to the idea of an asymmetrical colorblock design featuring four harmonious shades that intentionally balance contrast and cohesion:
- Cream – adds lightness and a sense of calm
- Dusty Rose – brings warmth and elegance
- Pink Gradient Yarn – creates soft, feminine accents and gently blends the individual colorblock sections together
- Dark Anthracite – adds depth and a modern designer-inspired look
This colorblock crochet sweater combines clean geometric lines with soft color transitions and a relaxed silhouette. The consistent stitch pattern keeps the overall design balanced. Perfect for modern crochet fashion and easy to wear every day.
The flattering V-neckline completes the design, creating an elegant silhouette that makes this crochet sweater especially comfortable and wearable in larger sizes as well.
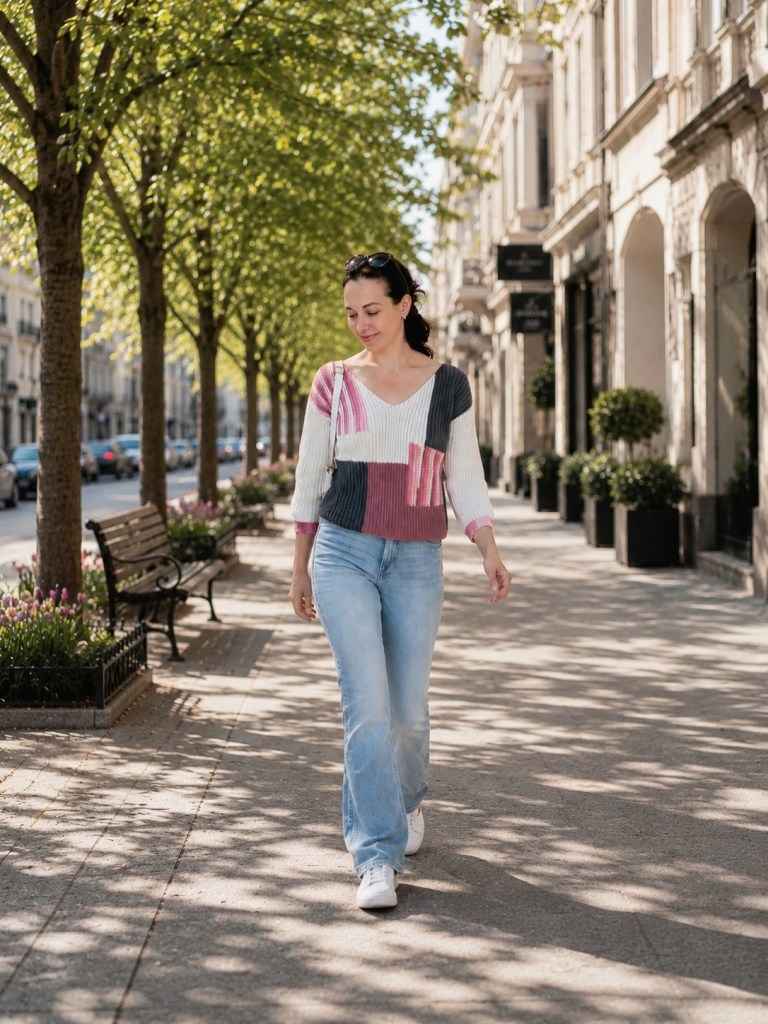
Crochet in one Go
The color changes are crocheted directly into the fabric. The unused color is simply carried along and picked up again in the following row. This technique minimizes yarn ends to weave in and creates clean, seamless transitions between the colorblock sections.
Thanks to the yarn-efficient nature of the YO sl st stitch, one skein of each color is sufficient for the front and back panels. Depending on your sleeve color arrangement, an additional skein per sleeve may be required. This also offers plenty of room for customization: solid-colored sleeves, subtle anthracite stripes, or unique colorblock combinations all work beautifully with the modern aesthetic of this sweater.
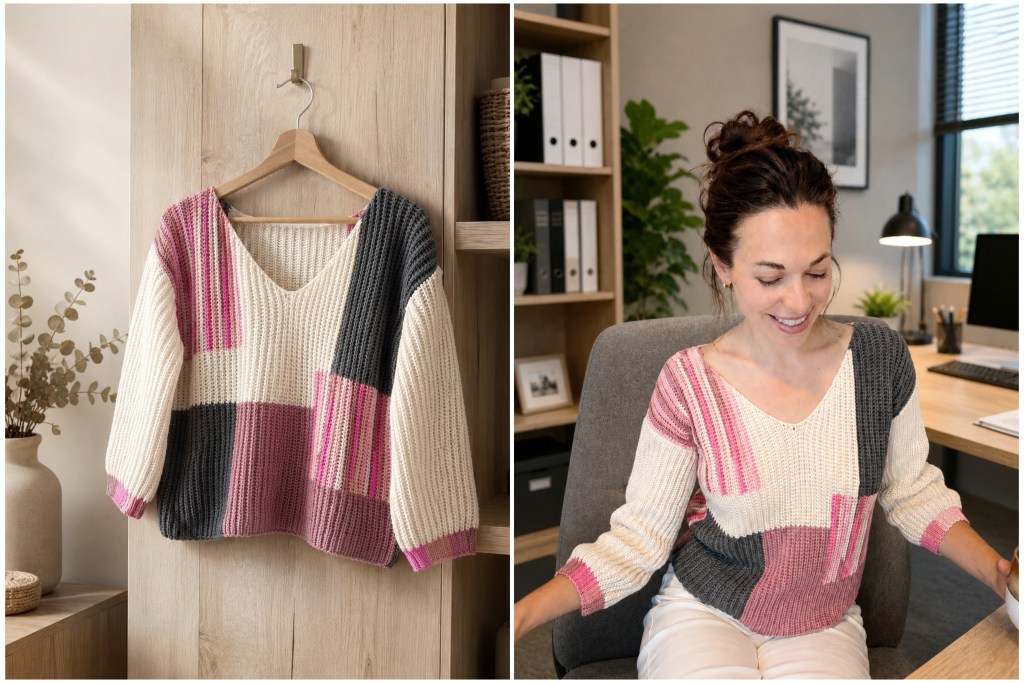
Materials
- Light (Category 3) yarn, such as Acacia and Acacia Print by Hobbii (51% acrylic, 49% cotton)
- Required yardage: approximately 1,200 m for size S/M
- 4.0 mm crochet hook
- Scissors
- Yarn needle for weaving in ends
Note: Yardage requirements may vary depending on size, gauge, and sleeve color placement.
Size
Size: S/M
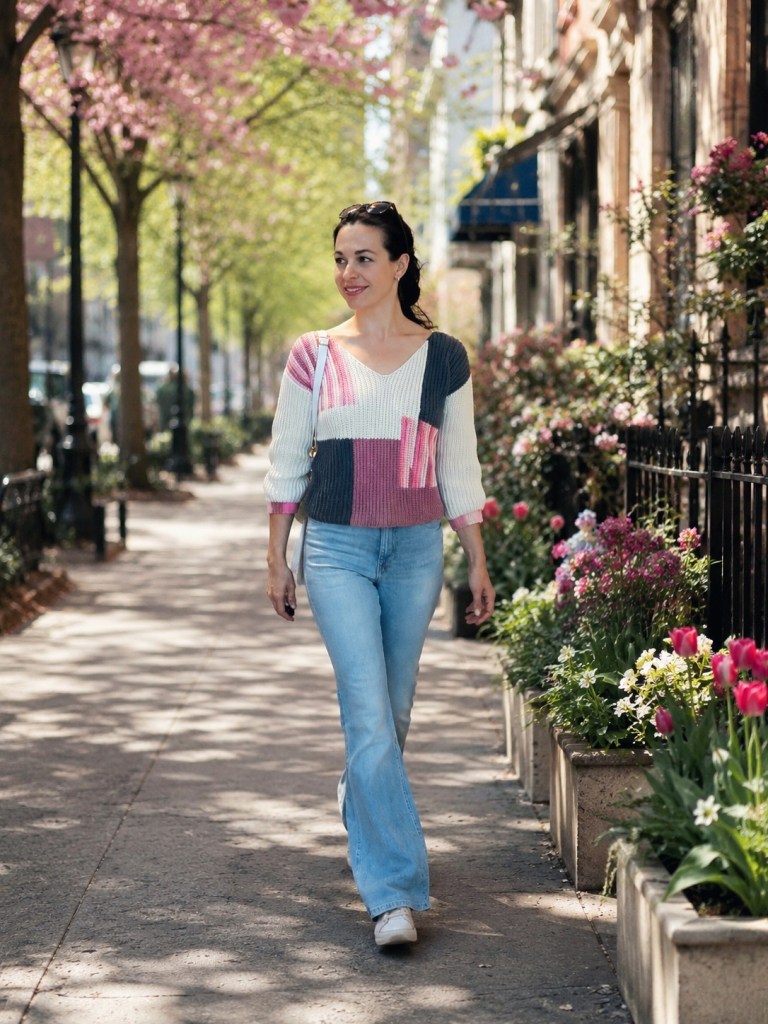
This crochet sweater is designed for size S/M and is ideal for a height of approximately 5’3″–5’5″ (160–166 cm). In the picture you see me, 166 cm tall, wearing my blocked sweater.
For additional length and width (size L and above), I recommend increasing not only the length of the panels (by working more foundation chains) but also the width (by crocheting additional rows). This will help maintain the intended fit and proportions of the sweater.
The measurements shown in the crochet diagram are intended as a general guide only. By making a gauge swatch before starting, you can calculate the exact number of stitches and rows needed for your desired size. Step 1 of the pattern explains how to do this. I also recommend trying the sweater on regularly as you work.
Sizing Tip for Larger Sizes (L and Up)
When adjusting the pattern, increase both the width (more rows) and the length (more foundation chains). This helps preserve the balanced look of the asymmetrical colorblock design.
You can increase stitches and rows proportionally to the original pattern layout. For example:
Size S/M:
- 40 stitches in Dusty Rose
- 15 stitches in Cream
- 45 stitches in Gradient Yarn
Size L:
- 43 stitches in Dusty Rose
- 18 stitches in Cream
- 48 stitches in Gradient Yarn
This adds 9 stitches in total, resulting in approximately 1.5 inches (4 cm) of additional length.
For size L, also add 2 extra rows to each color section (the sections where color changes occur at the same height):
- Right armhole section: +2 rows (Anthracite, Cream, Gradient Yarn)
- Center neckline section: +2 rows (Dusty Rose, Cream)
- Left armhole section: +2 rows (Dusty Rose, Gradient Yarn, Anthracite)
This keeps the proportions of the sweater balanced while maintaining the original colorblock layout.
Abbreviations
YO sl st = Yarn Over Slip Stitch (also known as Half Double Slip Stitch)st(s) = stitch(es)sl st = slip stitch(es)ch = chain(s)YO sl st2tog = yarn over slip stitch 2 together (decrease over 2 stitches)FLO = front loopBLO = back loopRnd(s) = round(s)Row(s) = row(s)
| k YO sl st × t (e.g. 2 YO sl st × 2) | Work k Yarn Over Slip Stitches into each of the next t stitches. Example: 2 YO sl st × 2 means to work 2 YO sl sts into each of the next 2 stitches. After working into 2 stitches, you will have a total of 4 stitches. |
| Right, Left | Directional references apply to the sweater itself (and are therefore mirrored from the crocheter’s point of view). |
| k YO sl st-BLO × t (e.g. 2 YO sl st-BL × 2) | Work k Yarn Over Slip Stitches into the back loop of each of the next t stitches. Example: 2 YO sl st-BLO × 2 means to work 2 YO sl sts into the back loop of each of the next 2 stitches. This creates 4 YO sl sts with the front loops remaining visible on the fabric surface. |
Special Crochet Techniques
- Yarn Over Slip Stitch (YO sl st), also known as the Half Double Slip Stitch or Yarn Over Slip Stitch … Umschlagskettmasche – How To
Construction Overview
The front and back panels of the sweater are crocheted separately, working from the right side to the left side of the garment. The waistband ribbing is worked as part of each panel. Once both panels are complete, they are joined at the shoulders using single crochet stitches.
The sweater body is worked using the following stitches:
- YO sl st (Yarn Over Slip Stitch / Half Double Slip Stitch)
- YO sl st-BLO (Yarn Over Slip Stitch worked in the back loop only)
- sl st (Slip Stitch)
- sl st-BLO (Slip Stitch worked in the back loop only)
Color Changes
When changing colors, the yarn placement depends on the direction of the row:
- Every other row (=every even row) is worked away from the waistband ribbing. When changing colors in these rows, place the unused yarn behind your work and pick up the new color from behind.
(In short: working away from the waistband = switch yarn behind the work.) - On the following row (=every odd row), when working toward the waistband ribbing, place the unused yarn in front of your work and pick up the new color from the front.
(In short: working toward the waistband = switch yarn in front of the work.)
This method helps create neat color transitions and prevents the carried yarn from showing on the right side of the fabric.
Sleeves
The sleeves are crocheted separately and sewn to the sides of the sweater once all pieces are complete.
Color Palette
The sweater is worked in the following colors:
- Anthracite
- Ecru/Cream
- Dusty Rose
- Gradient Yarn
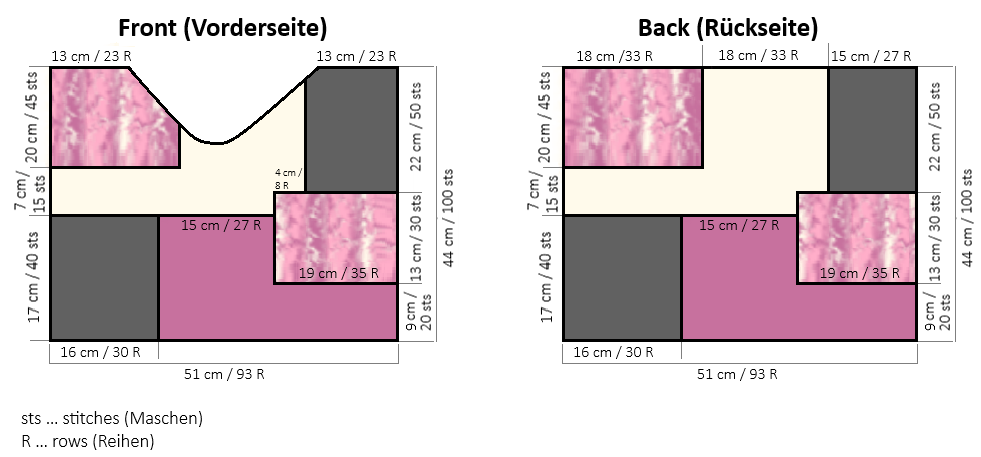
Crochet Pattern
Step 1: Make a Gauge Swatch
Before starting the sweater, crochet a gauge swatch. This will help you determine the correct number of foundation chains and rows needed to achieve your desired size.
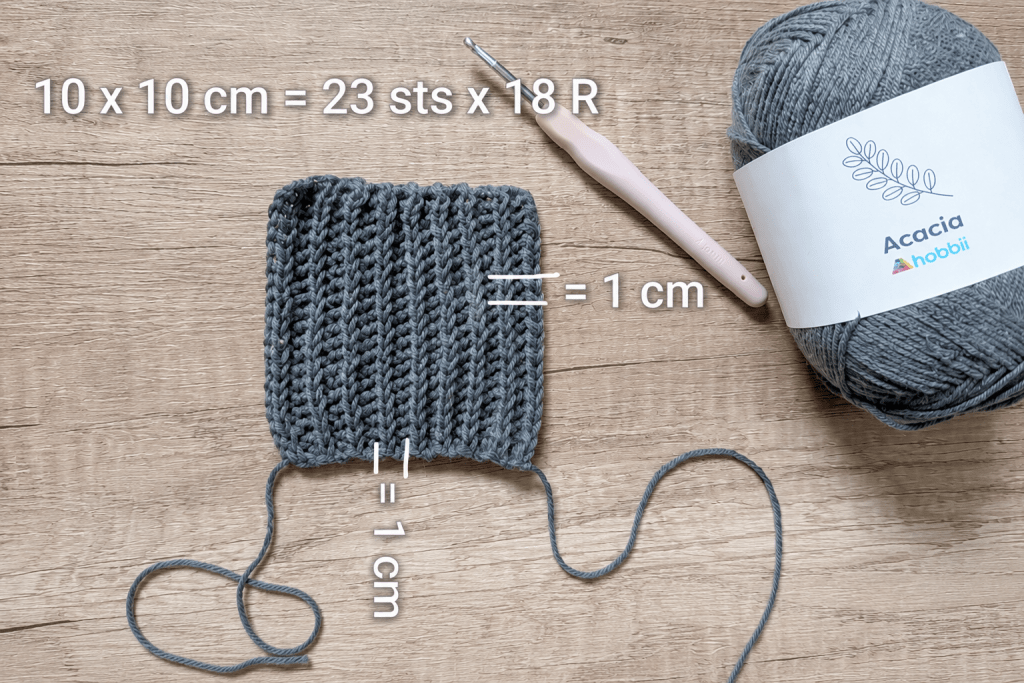
My gauge is: 23 sts × 18 rows = 4 × 4 in (10 × 10 cm)
Based on this gauge:
- To add 1 cm (0.4 in) of length to the sweater, I need approximately 2–3 additional stitches.
- To add 1 cm (0.4 in) of width, I need approximately 2 additional rows.
For a sweater length of approximately 44 cm (17.3 in), I start with 100 foundation chains plus 1 turning chain:
44 cm × 23 sts ÷ 10 cm ≈ 100 sts
Or, more generally: Desired length (cm) × stitches per cm from your gauge swatch
For a sweater width of approximately 51 cm (20 in), I need 93 rows:
51 cm × 18 rows ÷ 10 cm ≈ 93 rows
Or, more generally: Desired width (cm) × rows per cm from your gauge swatch
If your gauge swatch results in more stitches or rows than mine, add the corresponding difference in stitches and rows throughout the pattern. Likewise, if your gauge contains fewer stitches or rows, reduce the stitch and row counts accordingly.
For the best fit, I also recommend trying the sweater on regularly while crocheting and making small adjustments as needed.
Step 2: Crochet the Back Panel
The back panel is worked from the right side to the left side of the sweater. The waistband ribbing is crocheted at the same time as the panel. The ribbing is created by starting every other row with 7 sl sts worked in the back loops only (sl st-BL).
For neat and sturdy edges:
Work the last stitch of every row (both right-side and wrong-side rows) through the entire stitch, rather than through the back loop only.
For Neat Color Transitions
Every other row (all even-numbered rows) is worked away from the waistband ribbing. When changing colors, place the unused yarn behind your work and pick up the new color from behind.
In short: working away from the waistband = switch yarn behind the work.
These rows will form the outside of the sweater, so the color changes should remain invisible from the front.
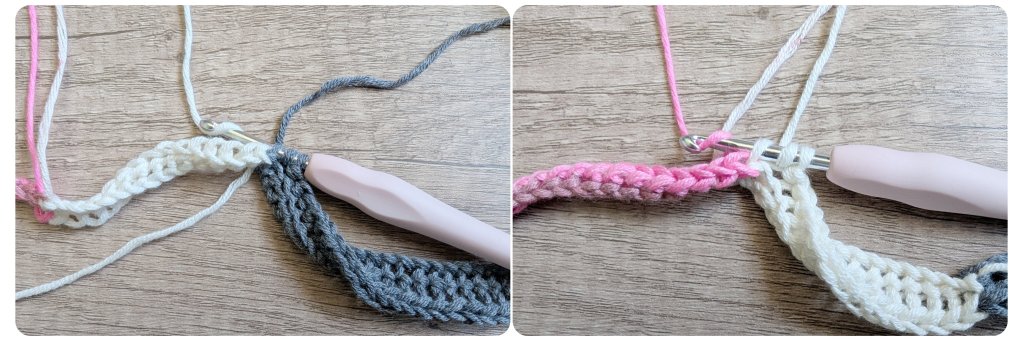
All odd-numbered rows are worked toward the waistband ribbing. When changing colors, place the unused yarn in front of your work and pick up the new color from the front.
In short: working toward the waistband = switch yarn in front of the work.
These rows will face the inside of the sweater once assembled.
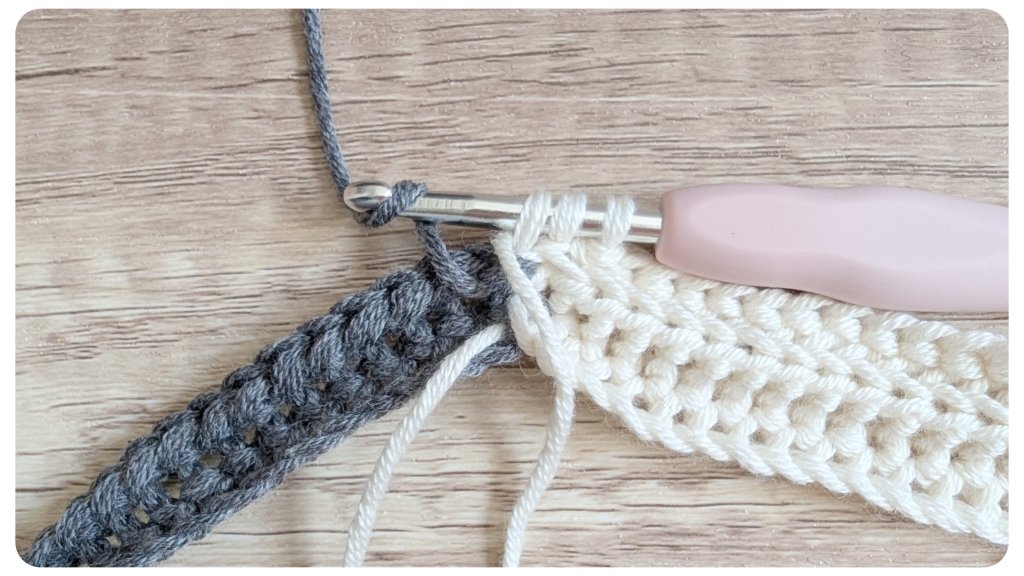
Ch 100, then add 1 turning ch. Work 40 sts in Anthracite (g), change to Cream (c) in the 40th stitch and work 15 sts, change to Gradient Yarn (v) in the 15th stitch and work the remaining 45 sts, ch 1, turn (100)
1.R: 1 YO sl st x 45 in v, 1 YO sl st x 15 in c, 1 YO sl st x 40 in g, 1 LM + wenden (100)
Beginning with the next row, every even-numbered row starts with the waistband ribbing.
2.R: 1 sl st-BLO x 7 in g, 1 YO sl st-BLO x 33 in g, 1 YO sl st-BLO x 15 in c, 1 YO sl st-BLO x 44 in v, 1 YO sl st in the last st, ch 1 + turn (100)
3.R: 1 YO sl st-BLO x 45 in c, 1 YO sl st-BLO x 15 in c, 1 YO sl st-BLO x 39 in g, 1 YO sl st in the last st, ch 1 + turn (100)
Repeat Rows 2 and 3 until the panel measures approximately 6¼ in (16 cm) wide, ending after Row 30.
In Row 31 (working toward the waistband), replace Anthracite (g) with Dusty Rose (a). Continue with the new color sequence v – c – a and a – c – v for Rows 31–33.
In Row 34 (working away from the waistband), continue only with the color sequence a – c and c – a. The former v-color is now worked in c according to the color chart. Continue this color arrangement for approximately 15 cm (6 in) or 27 rows total. The a – c / c – a color section therefore spans 27 rows.
In Row 58 (working away from the waistband): work the first 20 sts in Dusty Rose (a), change to Gradient Yarn (v) and work the next 30 sts, change to Cream (c) and work the final 50 sts. Continue with the color sequence a – v – c / c – v – a for 8 rows.
In Row 66 (working away from the waistband), replace Cream (c) with Anthracite (g). Continue with the color sequence a – v – g for approximately 15 cm (6 in) or 27 rows total.
The back panel should now measure approximately: 93 rows / 20 in (51 cm) wide (before blocking).
If additional width is desired, continue crocheting additional rows while maintaining the established color pattern.
Weave in all yarn ends.
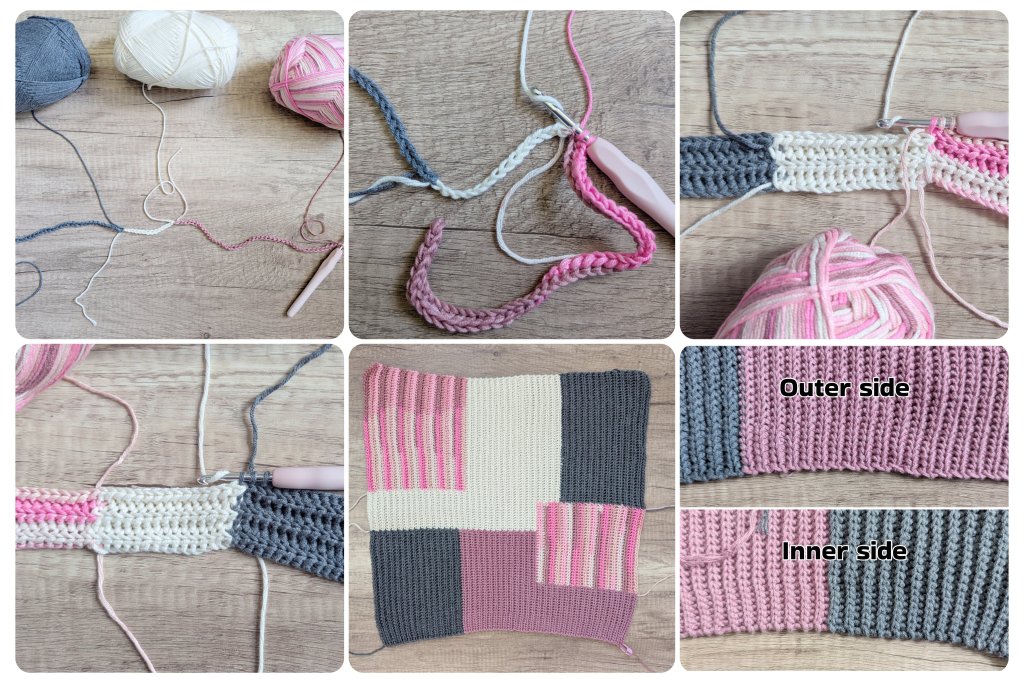
Step 3: Crochet the Front Panel
The front panel is worked in the same way as the back panel, from right to left, using the same color transitions. The only difference is the addition of the V-neckline.
As with the back panel:
- The waistband ribbing is worked at the same time as the panel.
- Every even-numbered row (working away from the waistband) begins with 7 sl st-BLO, followed by YO sl st-BLO.
- The last stitch of every row is always worked through the entire stitch, not through the back loop only.
Ch 100, then add 1 turning ch.
Work 40 sts in Anthracite (g), change to Cream (c) in the 40th stitch and work 15 sts, change to Gradient Yarn (v) in the 15th cream stitch and work the remaining 45 sts, ch 1, turn (100)
1.R: 1 YO sl st x 45 in v, 1 YO sl st x 15 in c, 1 YO sl st x 40 in g, ch 1 + turn (100)
2.R: 1 sl st-BLO x 7 in g, 1 YO sl st-BLO x 33 in g, 1 YO sl st-BLO x 15 in c, 1 YO sl st-BLO x 44 in v, 1 YO sl st in the last st, ch 1 + turn (100)
3.R: 1 YO sl st-BLO x 45 in v, 1 YO sl st-BLO x 15 in c, 1 YO sl st-BLO x 39 in g, 1 YO sl st in the last st, ch 1 + turn (100)
Repeat Rows 2 and 3 until the panel measures approximately 4¾ in (12 cm) wide (in my case, ending after Row 23).
Shaping the V-Neck
From this point onward, neckline shaping begins.
Neckline Shaping Rules:
- Rows worked toward the neckline (rows worked away from the waistband): Decrease 1 stitch at the neckline edge. When working the decrease, insert the hook through the entire stitch of the second stitch being decreased.
- Rows worked toward the waistband: Decrease 2 stitches at the neckline edge. All decrease stitches are worked through the back loop only.
In total, the neckline is shaped by alternating:
- 1 decrease on rows worked toward the neckline
- 2 decreases on rows worked away from the neckline
After a total of 21 decreases (11 rows with 2 decreases and 10 rows with 1 decrease), work 3 straight rows, then mirror the shaping with 21 increases (11 rows with 2 increases and 10 rows with 1 increase).
The detailed instructions follow below.
24.R (1 dec): repeat Row 2 until 2 sts remain. Leave the final 2 sts in v unworked. Work 1 YO sl st into the final (98th) stitch, ch 1, turn (98)
25.R (2 dec): YO sl st2tog twice (= 2 decreases), continue as in Row 3: 1 YO sl st-BLO x 39 in v, 1 YO sl st-BLO x 15 in c, 1 YO sl st-BLO x 39 in g, 1 YO sl st in the last stitch, ch 1, turn (96)
26.R (1 dec): repeat Row 2 until 2 sts remain, i.e. 1 sl st-BLO x 7 in g, 1 YO sl st-BLO x 33 in g, 1 YO sl st-BLO x 15 in c, 1 YO sl st-BLO x 42 in v, 1 YO sl st in the 43th st. Decrease the final 2 sts together (=1 dec), ch 1, turn (95)
27.R: rep 25.R: 38 sts in v, 15 sts in c, 40 sts in g (93)
28.R: rep 26.R (92)
29.R: rep 5.R: 35 sts in v, 15 sts in c, 40 sts in g (90)
30.R: rep 26.R (89)
31.R (color change to v – c – a): 2x dec, 30 sts in v, 15 sts in c, change color to Dusty Rose (a) in the 15th st, 40 sts in a (87)
32.R: rep 26.R in the new color arrangement (86)
33.R: rep 25.R: 27 sts in v, 15 sts in c, 40 sts in a (84)
34.R (color change to c – a): rep 26.R, this time, do not change back to v after c. Continue working in c instead (83)
35. – 45. R: alternate Rows 25 (2 dec) and 26 (1 dec) until Row 45 is completed.
Work 3 rows even while maintaining the waistband ribbing.
46.R: rep 2.R (66)
47.R: rep 3.R (66)
48.R: rep 2.R (66)
From this point onward, begin increasing at the neckline edge.
49.R (2 inc): 2 YO sl st-BLO x 2 (= 2 inc), 1 YO sl st-BLO x 24 in c und x 39 in a, 1 YO sl st in a in last st, ch 1, turn (68)
50.R (1 inc): 1 sl st-BLO x 7 in a, 1 YO sl st-BLO x 33 in a, 1 YO sl st-BLO x 27 in c, 2 YO sl st in c in last st (=1 inc), ch 1, turn (69)
51. – 56.R: rep Rows 49 and 50 three more times.
57.R: rep 49.R.
58.R (color change to a – v – c): 1 sl st-BLO x 7 in a, 1 YO sl st-BLO x 13 in a, change color to v in the 13th st, 1 YO sl st-BLO x 30 in v (after 20 stitches, carry the c-yarn and crochet over it for the remaining 10 sts so that the c-color is carried invisibly across the row), in the 30th v stitch, change to c, work in c until 1 st remains, 2 YO sl st in c in last st (=1 inc), ch 1, turn.
59. – 65. R: rep Rows 49 and 50 in the new color arrangement.
66.R (color change to a – v – g): rep Row 50, but instead of changing to c, join a new strand of g. Cut the c yarn, as it is no longer needed.
67. – 69.R: rep Rows 49 and 50.
70.R: rep Row 50. At the end of the row, add 3 chains plus 1 turning chain, turn (100 stitches total).
From this point onward, work straight without shaping. Continue in the color sequence a – v – g bzw. g – v – a for 23 additional rows, ending after Row 93.
Weave in all yarn ends.
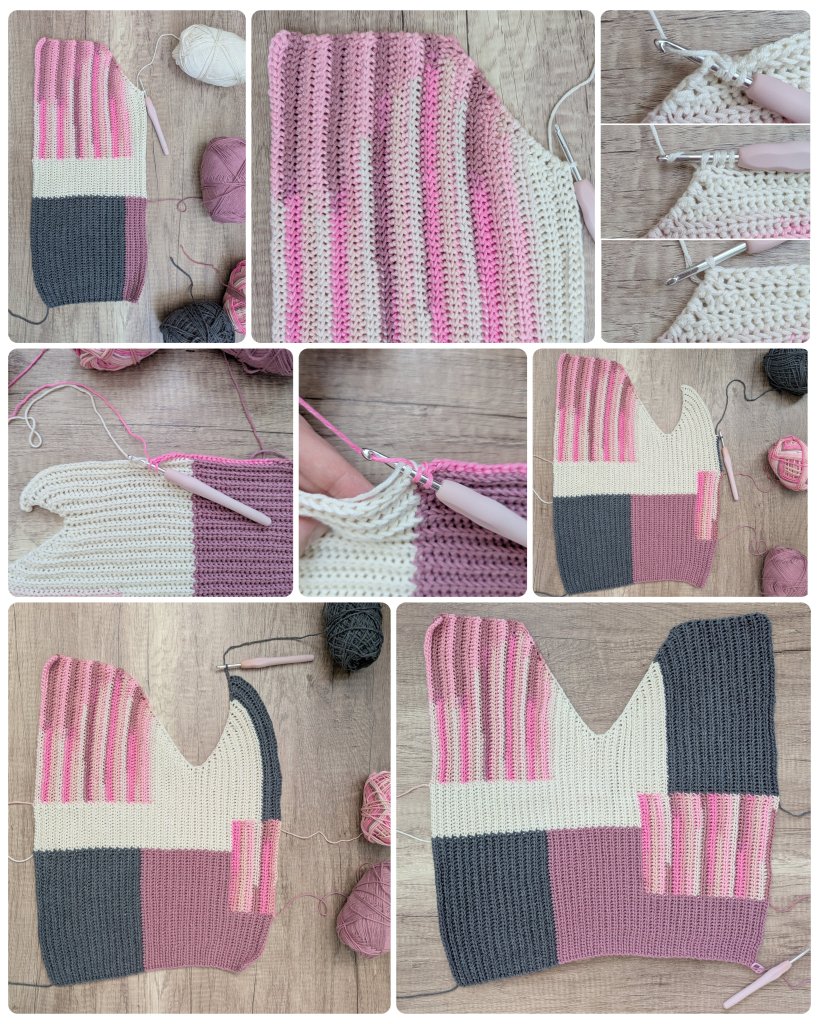
Step 4: Join the Front and Back Panels at the Shoulders
Place the front and back panels right sides together (with the outer sides facing each other and the wrong sides facing outward).
Starting at the armhole edge and working toward the neckline, join the shoulder seams using slip stitches (sl sts).
As you join the pieces, make sure the stitch pattern aligns properly so that the texture flows smoothly across the shoulder seam.
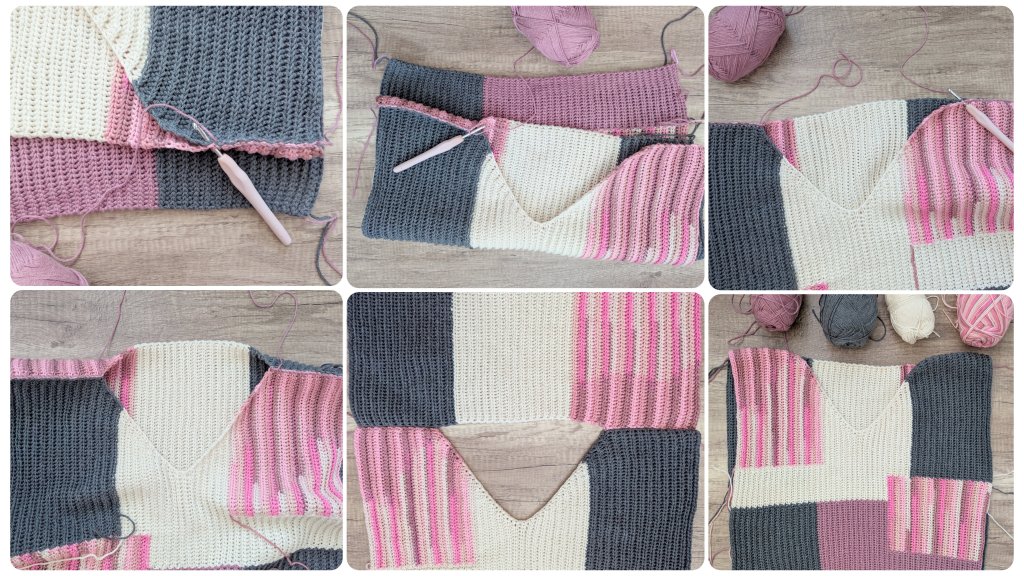
Step 5: Crochet the Sleeves
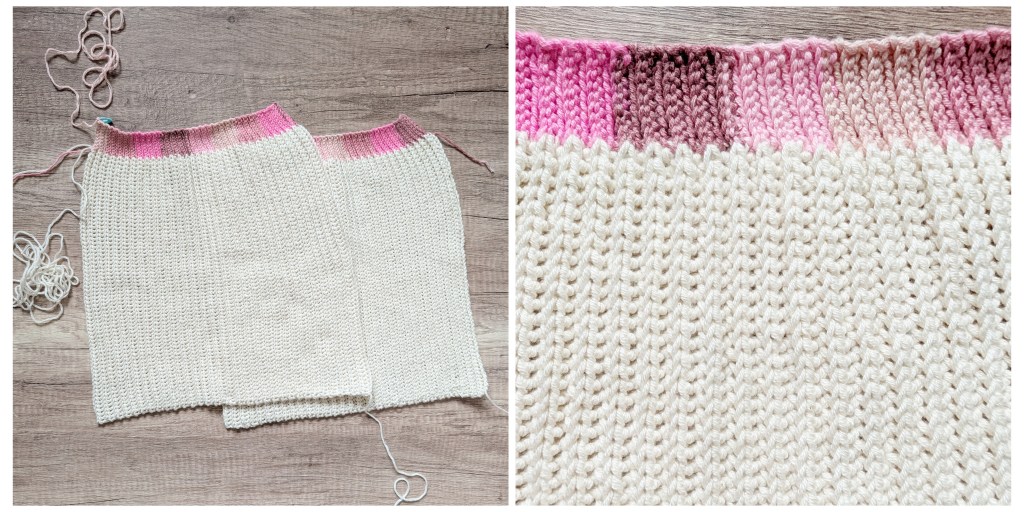
The sleeves are worked from one side to the other, with the cuff crocheted at the same time as the sleeve.
The sleeve is worked using: Cream (c) and Gradient Yarn (v).
Ch 70 in c, in the 70th chain, change to v and work an additional 9 ch in v. Ch 1 in v, turn (79)
1.R: 1 sl st x 9 in v, 1 YO sl st x 70 in c, ch 1, turn (79)
In the following rows, the cuff is worked simultaneously with the sleeve.
- Even-numbered rows (working toward the cuff): end the row with 8 sl st worked in the front loops only (sl st-FL) and 1 sl st in the final stitch. Change colors on the front side of the work.
- Odd-numbered rows (working away from the cuff): begin the row with 9 sl st worked in the back loops only (sl st-BL). Change colors on the back side of the work.
2.R (toward the cuff): 1 YO sl st-BLO x 70 in c, 1 sl st-FLO x 8 in v, 1 sl st in v in last st, ch 1, turn (79)
3.R (away from the cuff): 1 sl st-BLO x 9 in v, 1 YO sl st-BLO x 69 in c, 1 YO sl st in last st, ch 1, turn (79)
Repeat Rows 2 and 3 a total of 31 more times, then Row 2 again, ending after Row 64.
Leave:
- approximately 32 in (80 cm) of yarn in v
- approximately 98 in (250 cm) of yarn in c
which will be later used to close the sleeve.
Step 6: Attach the Sleeves
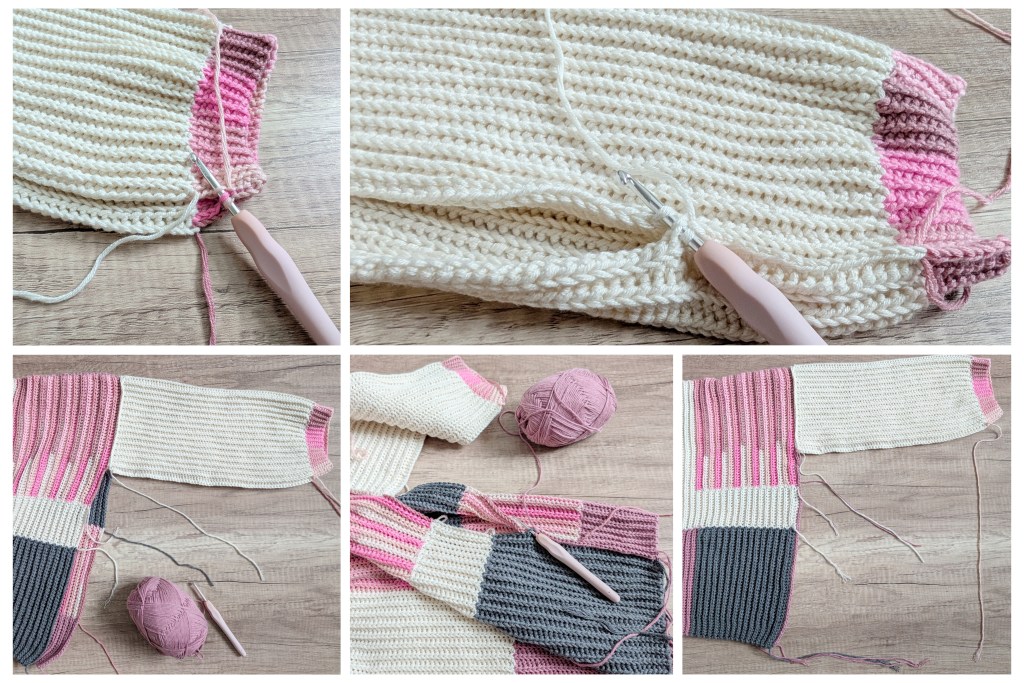
Join a new strand of Cream (c).
Center each sleeve along the shoulder seam so that 32 stitches extend onto the front panel and 32 stitches onto the back panel.
With the right sides together (outer sides facing each other), attach the sleeve to the sweater using single crochet stitches (sc) along the shoulder edge.
Make sure the sleeve is positioned evenly before joining.
Do not close the sleeve or side seams yet. Leave both sides of the sleeve open for the next assembly step.

Step 7: Close the Sleeves and Side Seams
Turn the sweater inside out so that the wrong side is facing outward.
First, close the sleeves. Using the long yarn ends left from the sleeve panel, join the sleeve edges with single crochet stitches (sc), working from the cuff toward the underarm.
Continue the color transition as established in the sleeve:
- Work the first stitches in v
- Continue the remaining stitches in c
Work all joining stitches through the back loops only.
Next, join the side seams of the sweater.
Using a new strand of Dusty Rose (a), work single crochet stitches (sc) through the back loops only, joining the front and back panels from the waistband up to the underarm on both sides.
Weave in all remaining yarn ends.
Step 8: Block Your Sweater
Your sweater is now finished!
To achieve a soft drape and a relaxed, comfortable fit, I highly recommend blocking your sweater before wearing it.
Wet Blocking
- Soak the finished sweater in lukewarm water for approximately 15–20 minutes.
- Gently squeeze out the excess water. Do not wring or twist the fabric.
- Roll the sweater in a towel and press gently to remove additional moisture.
- Lay the sweater flat on a blocking mat or a dry towel.
- Gently shape the sweater to the desired measurements. If needed, secure it with blocking pins or alternatively hang it on a hanger.
Optional Steam Blocking
If the yarn feels stiff or lacks drape, light steaming with a garment steamer or steam iron can help relax the fibers while the sweater is still slightly damp.
For acrylic fibers, steam can more permanently relax the fibers and significantly improve the drape of the fabric. To achieve this effect, hold the steam very close to—or lightly touch—the fabric. Be careful not to overstretch the sweater, as excessive steaming may cause it to lose its shape.
The relaxing effect of steam on acrylic fibers is often long-lasting and may remain even after washing.
For cotton yarn, however, the effect is less permanent. Cotton fibers tend to return closer to their original state after washing, so the improved drape achieved through steaming may partially or completely disappear over time.
Allow the sweater to dry completely before wearing it.
Care Instructions
The sweater can be machine washed regularly on a gentle cycle at a maximum temperature of 86°F (30°C).
After washing, the yarn may return somewhat to its original shape or lose some of the softness and drape gained through blocking. For best results, reshape the sweater while damp and allow it to dry flat after every wash.
Finished!
I hope you enjoy wearing your new crochet sweater and have lots of fun making it!