If you’re looking for a modern crochet top for summer that is both lightweight and comfortable while still providing good coverage, this free crochet pattern might be exactly what you’re looking for.
This airy top combines a simple, figure-flattering bodice with a flowing boho-inspired lower section, creating the perfect balance of comfort, femininity, and modern style.
The upper section is worked in my favorite stitch: the Half Double Slip Stitch (also known as the Yarn Over Slip Stitch). Its dense texture creates a well-covered bust area with a beautiful fit and comfortable feel. The wider straps provide additional support and make this top perfect for everyday wear.
Below the bust, the design transitions into a relaxed, boho-inspired lace pattern. A combination of different crochet stitches creates a light and airy fabric with beautiful drape, giving the top its effortless summer look. The result is a versatile crochet top that pairs beautifully with denim shorts, skirts, or linen pants.
Depending on how you style it, this top can create very different looks:
• Paired with light-colored linen pants, it creates an effortless boho look – perfect for vacations, a stroll along the boardwalk, or a relaxing afternoon at a café on a warm summer day.
• Paired with black pants, it becomes an elegant summer outfit for the evening.
• Paired with dark blue denim, it creates a timeless and effortless everyday look.
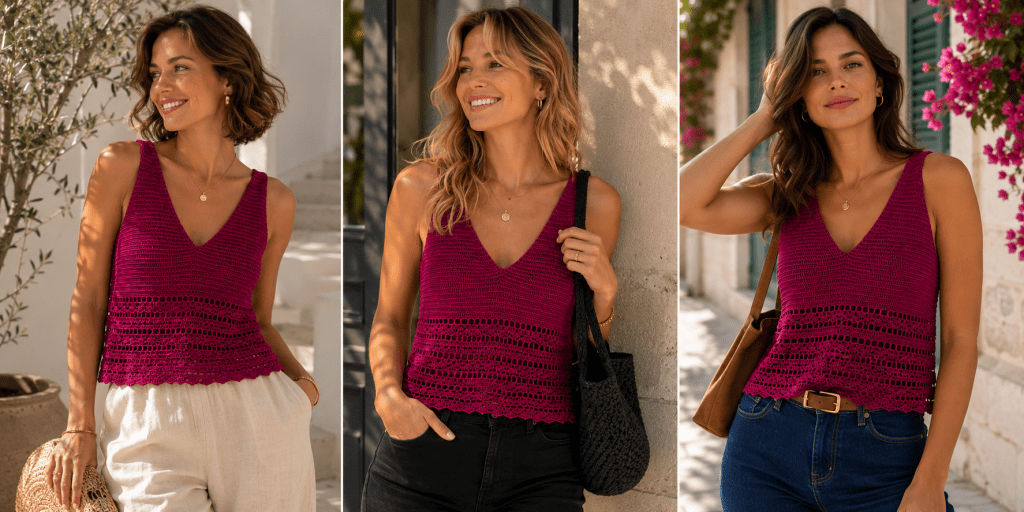
Key Features of the Top:
- Sleeveless design
- Deep V-neckline
- Well-covered bust area
- Airy lace pattern at the waist

The top is worked from the top down, allowing you to easily adjust the length as you crochet and try it on throughout the process.
This project is perfect for anyone who loves simple designs with a special touch. The combination of clean lines in the upper section and the flowing lace pattern below creates a versatile garment for warm-weather days. And thanks to the repeating stitch pattern, the design is also suitable for adventurous beginners with some basic crochet experience.
Happy crocheting! ♡
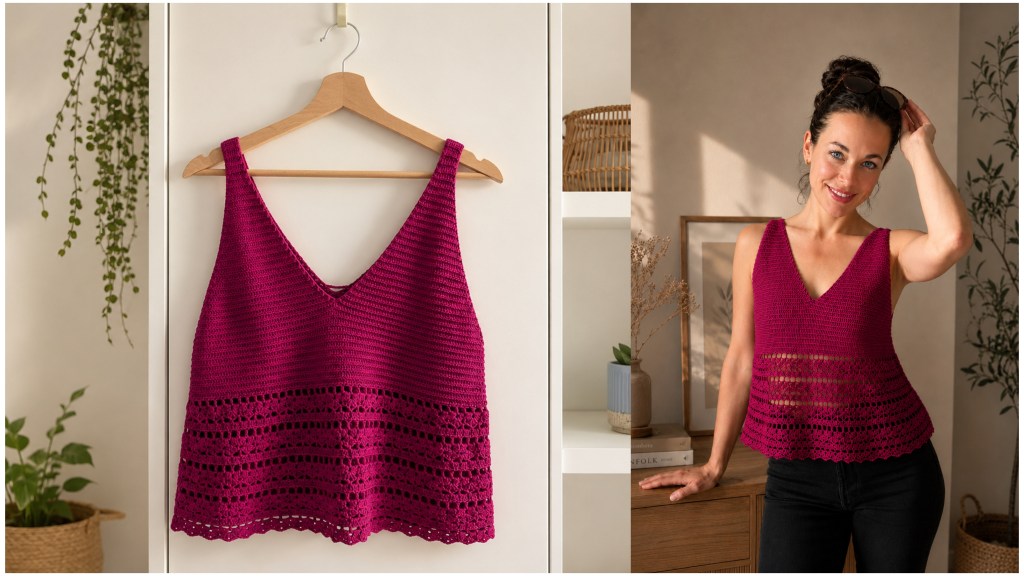
Materials
- Super Fine weight yarn in dark magenta, such as Friends Cotton 8/4 by Hobbii (100% cotton)
- Approx. 656 yds (600 m) for size S/M
- Gauge: 21 sts × 26 rows = 4 × 4 in (10 × 10 cm)
- 2.5 mm crochet hook
- Scissors
- Tapestry needle for weaving in ends
Size
Size: S (M/L). Instructions for the larger size are given in parentheses.
Abbreviations
YO sl st = Yarn-Over Slip Stitch (also known as Half Double Slip Stitch)sc = single crochetdc = double crochetst(s) = stitch(es)sl st = slip stitch(es)ch = chain(s)ch sp = chain spacedec = decreaseYO sl st2tog = work 2 stitches together in a Yarn-Over Slip Stitch decreaseFLO = front loop onlyBLO = back loop onlyrnd(s) = round(s)row(s) = row(s)
| k YO sl st × t (e.g. 2 YO sl st × 2) | Work k Yarn-Over Slip Stitches into each of the next t stitches. Example: 2 YO sl st × 2 means to work 2 Yarn-Over Slip Stitches into each of the next 2 stitches. After working into 2 stitches, you will have a total of 4 stitches. |
| Right, Left | Directional references always refer to the garment itself and not to the crocheter’s perspective while working. |
| k YO sl st BLO × t (e.g. 2 YO sl st BLO × 2) | Work k Yarn-Over Slip Stitches into the back loop only of each of the next t stitches. Example: 2 YO sl st BLO × 2 means to work 2 Yarn-Over Slip Stitches into the back loop only of each of the next 2 stitches, resulting in 4 YO sl sts with the front loops remaining visible. |
| ch-sp | the chain-space is the space formed by chains or the space formed between two double crochet stitches. |
Special Techniques
- Yarn-Over Slip Stitch (YO sl st) (also known as the Half Double Slip Stitch) – How To
Crochet Pattern
The top is worked as 2 panels from the top down, beginning with the straps.
The top consists of two triangles that are joined together at the bust:
- Upper Right Triangle
- Upper Left Triangle
The straps and bust section are worked in: Yarn-Over Slip Stitches worked in the Back Loops Only (YO sl st BLO).
Note: The last stitch of every row is worked through the entire stitch, not just the back loop.
Upper Left Triangle
Ch 8 (11/15) + 1 turning ch.
Leave approximately 10 in (25 cm) of yarn at the beginning. This tail will later be used to join the straps.
1.R: 1 YO sl st in each ch across, ch 1, turn. (8 (11/15))
2.-10.R: 1 YO sl st BLO in each st until 1 st remains, 1 YO sl st in last st, ch 1, turn. (9 rows of 8 (11/15) sts)
The strap is now complete.
Next, continue with the bust section. From this point onward, increase 1 stitch at the beginning and end of every other row.
11.R: 2 YO sl st BLO in first st, 1 YO sl st BLO in each st until 1 st remains, 2 YO sl st in last st, ch 1, turn.
12.R: 1 YO sl st BLO in each st until 1 st remains, 1 YO sl st in last st, ch 1, turn.
Repeat Rows 11–12 a total of 21 (23/25) times, ending with Row 52 (56/60), until you have 50 (57/62) sts.
The Upper Left Triangle is complete.
Fasten off and leave some yarn end for orientation.

Upper Right Triangle
Repeat the instructions for the Upper Left Triangle.
Do not fasten off at the end. Continue directly with the next section.
Join the Triangles and Continue the Bust Section
53.R (57.R/61.R): 2 YO sl st BLO in first st, 1 YO sl st BLO in each st until 1 st remains, 2 YO sl st in last st.
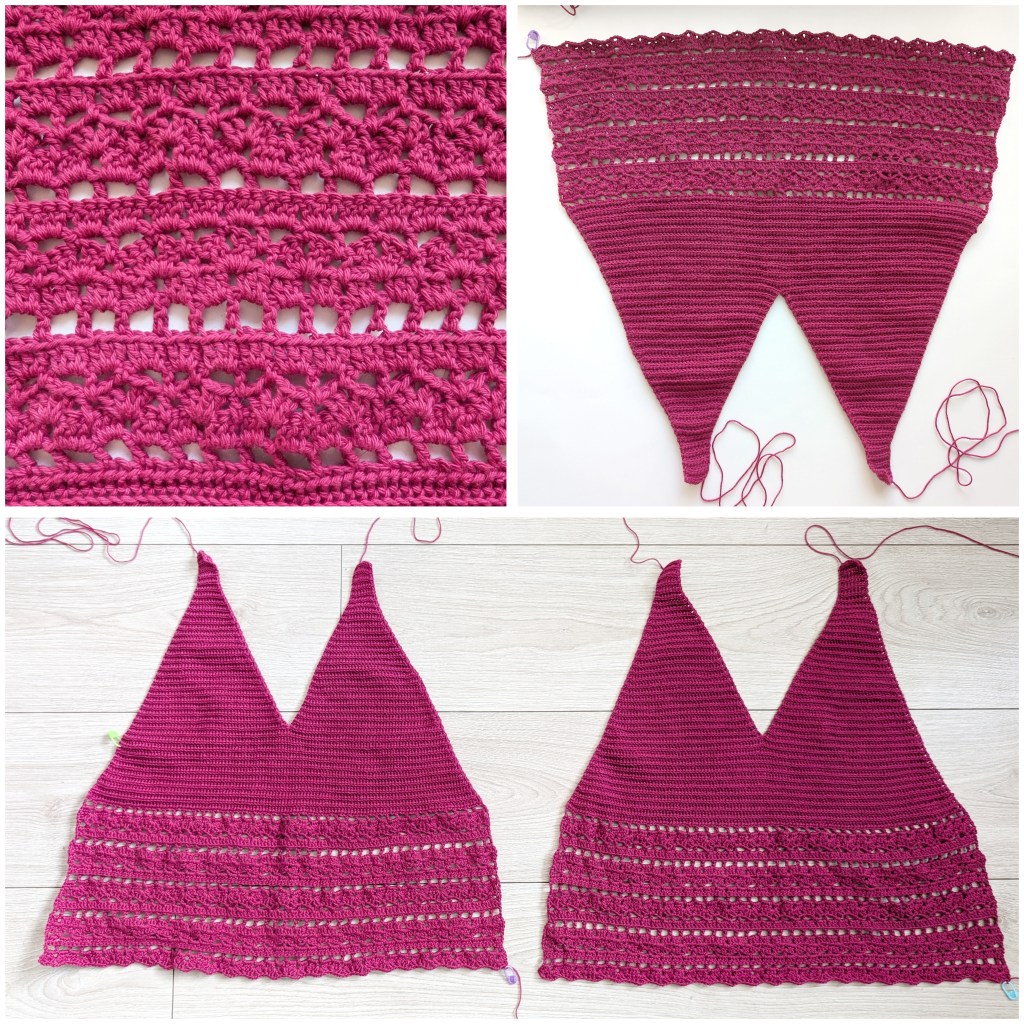
Position the left triangle so that its yarn end is closest to you (see photos below), then continue working across it:
2 YO sl st in first st of the left triangle, 1 YO sl st BLO in each st until 1 st remains, 2 YO sl st in last st, ch 1, turn. (54 (61/66))
54.R (58.R/62.R): 1 YO sl st BLO in each st until 1 st remains, 1 YO sl st in last st, ch 1, turn. (54 (61/66))
55.R (59.R/63.R): 2 YO sl st BLO in first st, 1 YO sl st BLO in each st until 1 st remains, 2 YO sl st in last st, ch 1, turn. (56 (63/68))
Repeat Rows 54–55:
- Size S: 11 times total (10 more repeats) until 76 (83/88) sts
- Size M: 13 times total until 80 (87/92) sts
- Size L: 15 times total until 84 (91/96) sts
The bust section is now complete.
Check that the top reaches approximately 1¼ in (3 cm) below the bust. Add or remove rows if necessary.
Keep in mind that some yarns may stretch slightly during blocking.
Also ensure that the sides of the top comfortably reach from one side of the body to the other.

Continue with the lace pattern.
Lace Pattern
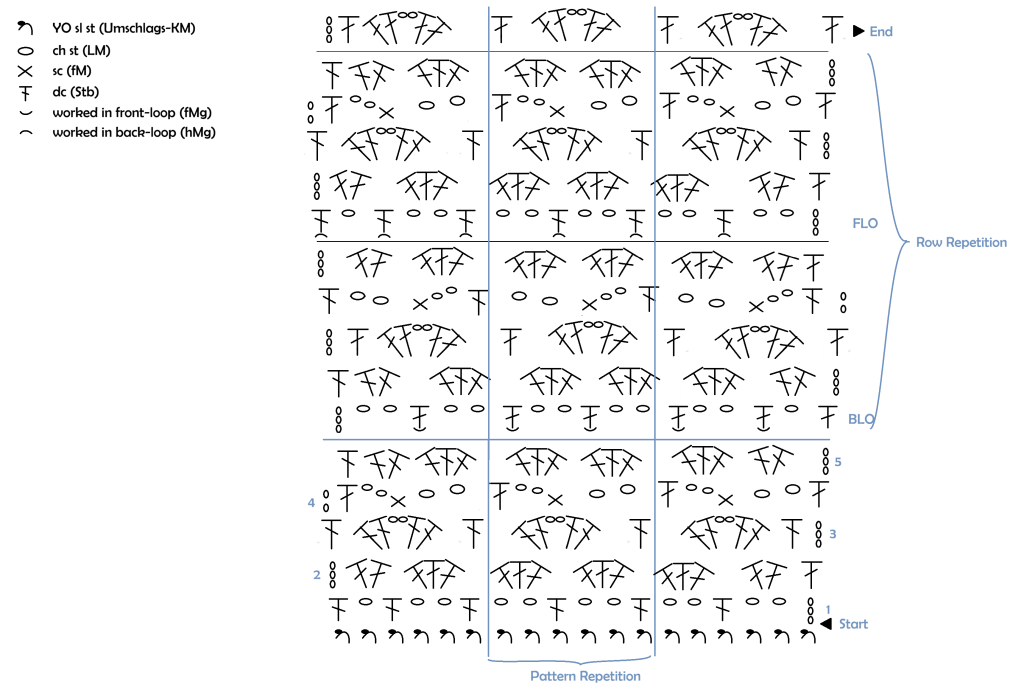
The lace pattern consists of a 5-row repeat.
Each repeat begins either in the front loops only or the back loops only.
The stitch chart can be found after the written instructions.
The Row-Number is based on size S.
73. R (wrong side facing): Ch 3 (counts as 1 dc), ch 2, skip the ch-2-space and next 2 sts, 1 dc in next st, [ch 2, skip next 2 sts, 1 dc in next st] repeat across until 2 sts remain, ch 1, skip 1 st, 1 dc in last st, turn.
74. R (right side facing): Ch 3 (counts as 1 dc), 2 dc in first ch-1-spase, 3 dc in each ch-2 spase across to last ch-spase, 2 dc in last ch-spase, 1 dc in 3rd ch of previous row, turn.
75. R: Ch 2, 1dc in the space between the base of the turning ch-3 and the next 2-dc-cluster, [(2 dc, ch 2, 2 dc) in the space between the next two dc-clusters, 1 dc in the space between the next two dc-clusters] repeat across until 1 cluster remains, work [2 dc, ch 2, 2 dc] in the final cluster space, 1 dc in 3rd ch of previous row, turn.
76. R: Ch 3 (= 1 sc, ch 2), 1 dc in next space between 1-dc and start of 2-dc-cluster (starting immediately after the dc from previous row), ch 2, 1 sc in next ch-2 space, [ch 2, 1 dc in space before next 1-dc, ch 2, 1 sc in next ch-2 space] repeat across, ch 2, 1 dc in 3rd ch of previous row, turn.
77. R: Ch 3 (= 1 dc), 2 dc in first ch-2 space, 3 dc in each ch-2 space across until 1 ch-space remains, 2 dc in final ch-sp, 1 dc in last dc, turn.
From this point onward, continue repeating Rows 73–77.
78. R: Repeat Row 73, working into the front loops only (FLO) until 2 sts remain, skip 1 st, dc in last st, turn.
79. R: Repeat Row 74.
80. R: Repeat Row 75.
81. R: Repeat Row 76.
82. R: Repeat Row 77.
—
83. R: Repeat Row 73, working into the back loops only (BLO) until 2 sts remain, skip 1 st, dc in last st, turn.
84. R: Repeat Row 74.
85. R: Repeat Row 75.
86. R: Repeat Row 76, but work 1 sc into the 3rd ch of the previous row instead of 1 dc for the final stitch.
87. R: Repeat Row 77.
—
88. R: Repeat Row 73, working into the front loops only (FLO) until 2 sts remain, skip 1 st, dc in last st, turn.
89. R: Repeat Row 74.
90. R: Repeat Row 75.
91. R: Repeat Row 76, but begin with: Ch 3 (= 1 dc), [ch 2, 1 sc in first ch-2 space, ch 2, 1 dc in the space before the next 2dc–ch2–2dc-cluster] repeat across, 1 dc in the 3rd ch of the previous row, turn.
92. R: Repeat Row 77.
—
93. R: Repeat Row 73, working into the back loops only (BLO) until 2 sts remain, skip 1 st, dc in last st, turn.
94. R: Repeat Row 74.
95. R: Repeat Row 75, ending with a 2dc–ch2–2dc-cluster in the final space and 1 dc in the 3rd ch of the previous row.
Leave approximately 20 in (50 cm) of yarn for seaming the front and back panels together.
The front panel is complete. The pattern with the visible “steps” on the Row-73-repeats faces outside.
Repeat the entire process for the back panel.
Join the Panels
Place the front and back panels with right sides together.
Using slip stitches worked through the back loops only, join first the straps of both panels together. Then slip stich the panels together from the bottom edge upward until you reach a point 16 rows above the beginning of the lace pattern (see green marker in the photos below – crochet the panels together from the bottom up to the marker). This forms the armhole.


To easily distinguish the front from the back later, mark the back panel. You can either sew a label onto the inside of the back panel or, as I did, crochet a short chain and attach it directly to the V-neck edge of the back panel.
Your A-Line Boho Crochet Top is now complete! ♡