
Quiet Books (literally translated as books for quiet activities or “silent books”) are fabric activity books for children that incorporate playful, sensory, and educational elements. Often referred to as ‘Montessori books’ or ‘activity books’ these fabric books can be designed in various ways suitable for different age groups: for babies and toddlers focusing on tactile experiences and learning (e.g., matching birds to their corresponding coloured birdhouses; counting apples, etc.) or as themed activity books for older kids (e.g., a dollhouse in book format where each page represents a room, or a farm with activities per page, or a treehouse with forest animals).
But all quiet books share one thing in common: they engage the child, stimulate their imagination, and are an ideal toy for on-the-go entertainment.
I also wanted to try making a quiet book for my children using materials and scraps from home to craft a dollhouse activity book. In this post, I’d like to share my experiences, tips, and insights from what I have seen on the internet. Since I haven’t made a quiet book before, I should point out that my experiences may not necessarily align with those who have made these activity books more frequently.
My quiet book is crocheted and also includes felt and fabric components. Additionally, I used various everyday accessories (like buttons for flowers in the garden, flower appliqués for the cover pages, an LED light as a nightlight, aluminum foil and 160 µm thick file folder for a bathroom mirror) as well as fabric scraps from old clothing. For flexible attachment of the page elements, I mostly used cut and acrylic-painted Velcro strips (for the small details I used felt-tip pens) as well as thin, small magnets.
I mostly implemented my own sketches as templates and occasionally used sketches from the internet (leaf, flower 1, flower 2, apple, owl) or adapted templates from Quiet Book ideas on Pinterest – see collection of ideas below. My main character is a modified and small version of this pretty, free felt doll from Pixie Faire. I hand-drew the felt templates on paper, cut out the shape, and used it as a pattern for the felt. Most felt shapes are sewn together in form of 2 identical layers. For the crocheted shapes, I simply crocheted until it had the right shape for me. Most crocheted shapes consist of rows (single-layered). If it needed to be something that I wanted to be able to insert things into, I worked in rounds (e.g., basket in the garden).


Choice of Material
The most important component of your activity book: the material or the mix of materials for the pages, the material for the page inserts (the layer that connects 2 pages to a front and back page of a sheet) and the page elements. The material significantly determines the “user experience” (soft vs. hard, more stable fabrics) and how the game elements can actually be played with.
You don’t have to stick to one type of material; you can combine various materials.
The following materials work well for pages in Quiet Books:
- Felt: commonly used, also excellent for the play elements
- Fabric: mainly used as surface layers or fabric scraps for individual elements in the fabric book (harder materials, such as polyester felt, are then used as inserts)
- Yarn: somewhat unusual, as it is much more time-consuming to crochet (or knit) pages, but crocheted objects are ideal for the page elements to play with
- (Photo) Cardboard: found in inexpensive Quiet Books, easy to make, although binding the pages is more laborious than with the above materials
Felt


The ideal solution between fabric and cardboard: Felt.
Quiet Books are mostly made from felt. Already 1 mm thick polyester felt sheets are suitable as they can be easily processed and sewn, and they do not fray at the edges. However, such thin polyester felt should be processed in 2 layers, which in turn offers some design possibilities; for example, in the case of a refrigerator, the back layer is the complete back wall, while the front layer is cut into shelves with closed edges (basically a digital ‘8’); the door then also consists of 2 layers, between which the hinges are sewn. For single-layer felt elements, use 2-3 mm thick polyester felt (e.g., food for the refrigerator).
High-quality wool felt can also be used, but it is expensive, usually softer, less tear-resistant, and does not necessarily yield better results aesthetically. Additionally, wool can feel slightly drying to the skin, at least that was my experience while crafting.
The advantages of felt as a basis for activity books speak for themselves:
- Felt is relatively stiff compared to fabric and can thus be easily processed, it is very lightweight at the same time.
- It is highly durable and easily moldable.
- Felt can be easily glued or sewn (by hand or machine).
- Felt does not fray, so you can cut it without needing to finish the edges.
- Felt, whether wool or polyester, has a natural slight adhesion. Like synthetic chemical fibers and wool in general, felt can easily charge statically, making it easy for other synthetic materials to stick to it. This means that the play elements made of other synthetic materials or wool (like felt itself) will stick almost by themselves.
Quiet Book made of felt: Each page gets its own felt base on which the elements are sewn before the pages are sewn together to form a sheet with a front and back. They they are “bound” into a book. In the end, each book page consists of 2 layers of felt (or 3 layers in case an intermediate layer is used).
Fabric


If you choose to use fabric, opt for non-stretch, opaque variants that do not fray, such as 100% polyester, polyacrylic blends, or linen. However, to ensure that the pages of the fabric book are stable, you’ll need a thick or firm intermediate layer that provides support to the pages, for example, 2 mm thick felt per page, or a thick layer of outdoor fabric, (faux) leather, etc. (approximately 240 g/m² weight or more).
Advantages of fabric in activity books:
- You can easily combine different fabric variations (soft to rough fabric, with bumps or lace).
- You can create more colour diversity with patterns and textures (e.g., for a stone floor in the garden, as tiles in a room, or as a flowery bedspread).
Disadvantages of fabric:
- It is not as easy to work with as felt, especially when making small page elements from it.
- Fabric can be more expensive than felt, especially if you opt for high-quality, sturdy fabrics.
- Depending on the fabric choice, you may need to finish the edges.
- You’ll likely need a sewing machine, as glued areas are easily noticeable on fabric. Also, while you can use more generous stitching distances with felt (e.g., if sewing by hand), with fabric you should aim for shorter stitch lengths.
Quiet Book made of fabric: Be sure to use a strong intermediate layer for each page, as otherwise, the pages will be too loose in hand and may not be suitable for playing. Be careful with the choice of patterns for each page, as too many patterns can make the book visually overwhelming and distract from the interactive elements.
Yarn


Polyester felt, polyester fabric… one thing stands out: These are not necessarily environmentally friendly, as polyester is a type of plastic fiber. If you don’t want to opt for expensive wool or linen and still lean more towards natural fibers (like cotton), you can use yarn and crochet (or knit) the pages and their elements. This method significantly increases the amount of time required (after all, you’re crocheting each page front and back). However, it’s a great way to use up larger quantities of yarn scraps.
When using yarn in a fabric book, it’s important to consider the following:
- Use the same brand of yarn for each page (ideally, even the same colour (lot), as there can be slight differences in size for different colours of the same yarn) to ensure that all pages end up the same size. Different types of yarn can be used for the play elements.
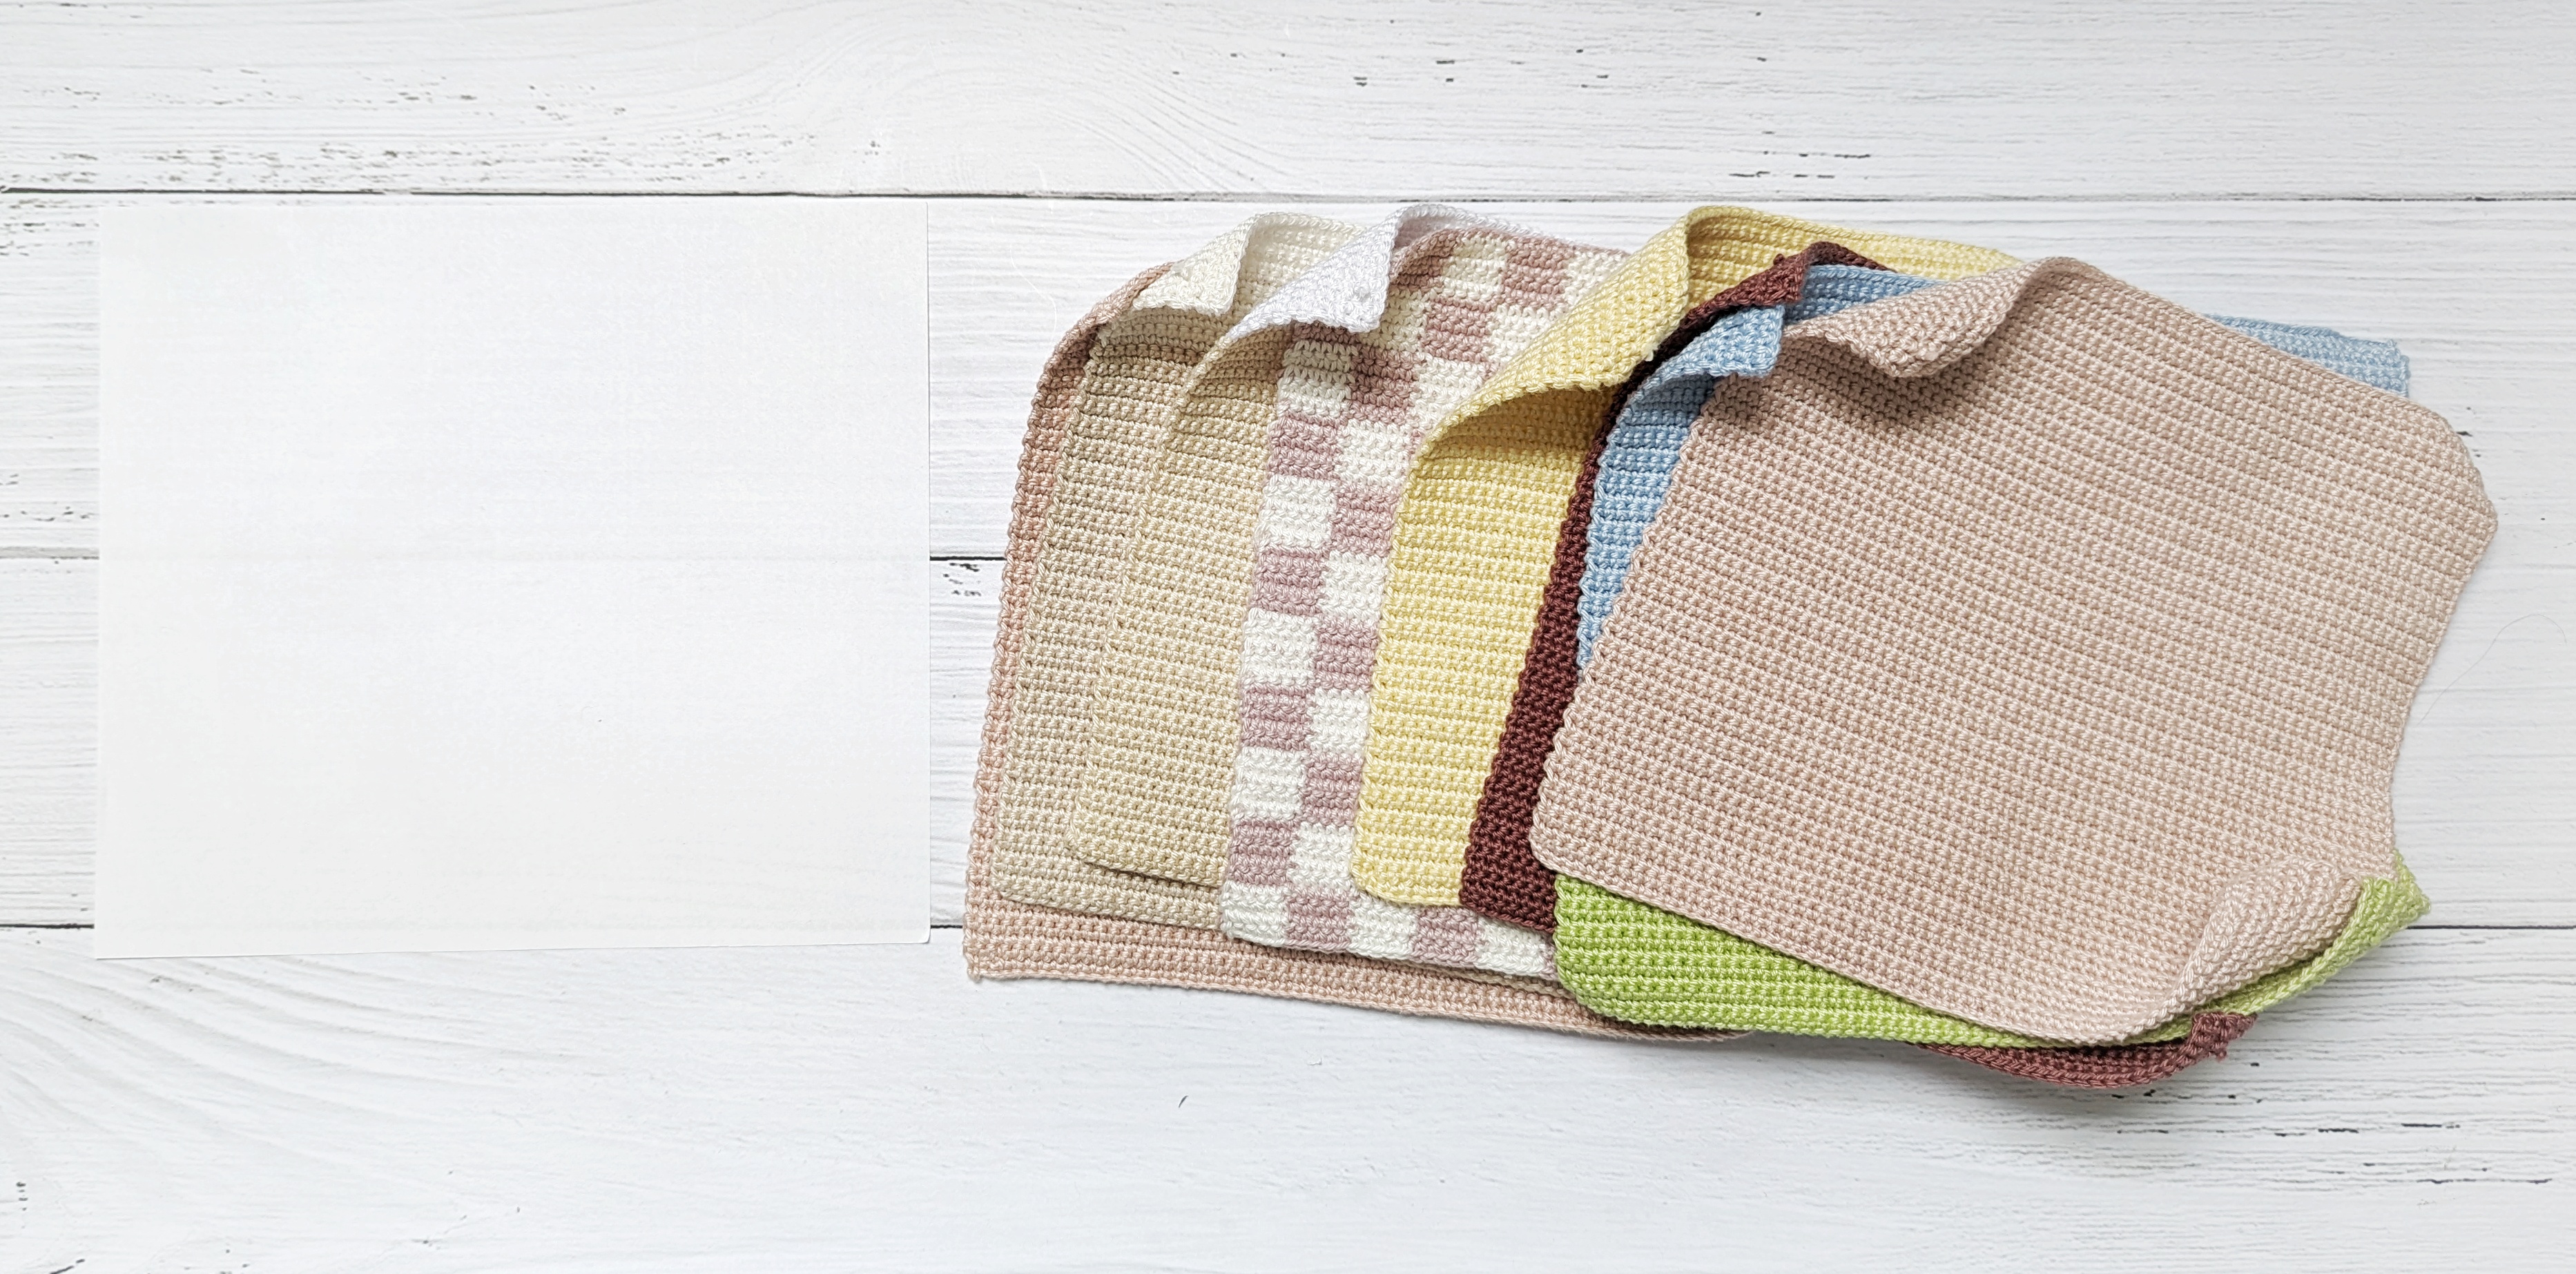
- The best choice is combed, mercerized, and gassed 100% cotton yarn. These fibers are firm, soft, have a nice sheen, and don’t fray easily during processing.
- Crochet using single crochet stitches and make sure to maintain consistent tension.
- For flexible attachment of the page elements, Velcro points or strips, or colour snaps, work wonderfully.
Quiet Book made of yarn: Time-consuming, high yarn consumption, but ideal if you prefer minimal cutting, no gluing, or avoiding the use of a sewing machine. For added fun in the book, consider using other materials in addition to various types of yarn (e.g. felt, woody items, buttons, elastic bands…)
Tools and Equipment
Overview of the tools and equipment I used for my fabric book:
- Sewing by hand: For very large fabric books and experienced sewing skills with a sewing machine, a sewing machine can certainly save a lot of time and provide smoother seams than hand sewing. However, to capture the details of my rather small activity book well and because sewing on crocheted items isn’t as easy with a sewing machine, I exclusively worked with my hands. I used various coloured polyester thread for sewing, which is smoother, more robust, and has a slight shine compared to cotton thread.
- Using polyester felt: The quality of the felt depends on the project. Soft “real” felt (=wool felt) is suitable for a quiet book for babies. However, for an activity book with many small felt details, polyester felt or felt with a high proportion of synthetic fibers (polyester, polyamide, polyacrylic) should be used. Depending on the proportion of hardening “plastic fibers,” polyester felt or mixed felt can vary in thickness and firmness. In general, the higher the plastic content in the felt, the thinner, firmer, and smoother the felt can be produced (and is also generally cheaper), making it easier to craft small felt elements with detail. If the elements are then sewn (or glued) in 2 layers, a very stable, realistic shape is obtained, which is also easier to paint than soft wool felt.
- Velcro points and stripes (Alternative: press fasteners or colour snaps): The page elements in my book can be inserted into specific areas or attached on Velcro areas. The Velcro stripes should be cut to fit their placement and painted with acrylic or felt-tip paint to blend in (e.g., the branches of the tree).
- Double-sided adhesive tape: To temporarily attach some critical areas before sewing, or to invisibly connect some felt positions without sewing, I relied on thin, strong adhesive, and temperature-resistant (!) double-sided adhesive tape (of the brand 3M, like this one here).
- Acrylic and felt-tip paint: I painted the white Velcro stripes and points as well as some felt play elements with waterproof acrylic markers. Acrylic paint can be wonderfully applied to felt on a large scale without being absorbed into the felt. With thin felt-tip pens, you can also draw fine details on the felt (e.g., eyes and wings of the owl), but only on polyester felt. In my experience, felt-tip pen ink is absorbed into wool felt and spreads uncontrollably into the surroundings.
- Accessories: Flower-shaped buttons, a mini wooden bird or butterfly from the last decoration, an unusual gift ribbon, lace trim, magnets, patches, rubber bands, colourful clips, beads, mini LED lights, small clothespins… it’s the versatility that brings the activity book to life. These can be brought from everyday life and old items can be reused in new ways, see next point.
- Upcycling: Upgrading old items by reusing them in a new product. Whether it’s a piece of no longer needed transparent envelope cover (e.g., for refrigerator shelves, a shower door, or an ice rink), a scrap of aluminum foil (e.g., crafted into a mirror with a transparent cover), old clothing (e.g., as background for pages)… quiet books are an ideal way to give new purpose to materials from everyday life that are no longer needed.
- Sketches and templates: I first drew everything I wanted to cut out of felt or crochet from yarn on a sheet of paper in actual size. I then used this as a cut-out pattern for the felt or as a template for the crocheted shape.


My Material List
For my Quiet Book, I primarily used yarn (various types, for the pages Woll Butt Camilla from Buttinette) and felt (mostly polyester felt, occasionally wool felt). Other materials included:
- Fabric scraps from old garments (for the bedding and the doll’s clothing)
- Some lace trim (to embellish the bedspread, for the curtains or the tablecloth)
- Various flower appliques (for the bouquets on the pages)
- Buttons in different shapes (for the doorknobs, flowers…)
- Double-sided adhesive tape (to invisibly assemble some areas of the felt layers (e.g., oven in the kitchen), but also to hold some areas together to make sewing easier later on)
- A very small amount of cardboard combined with double-sided adhesive tape (to stabilize the stairs at the entrance and exit)
- Aluminum foil and 160 µm thick envelope (crafted into a fake mirror. If you want a mirror that actually reflects, you should use mirror effect foil)
- Sewing supplies: sewing needle, various-colored sewing thread, scissors
- LED lights (for the bedside lamp)
- Miscellaneous: colour snaps (for the curtains), some polyester stuffing, 1 mm thick aluminum crafting wire in black (for the bike wheels) and in gray (for the curtain holders)
Conclusion to Planning
Material selection, sketching, specific tools… There’s one point that’s especially important: expect that the content may change as you work. Whether it’s because you come up with something better while crafting that you’d rather use instead, or the finished felt or crocheted element doesn’t quite look like it did in your sketch. Or perhaps you unexpectedly run out of space on the page and need to improvise. Or maybe, in the end, the page lacks that certain something for you, and you consider adding more small accessories to make it more exciting…
In my case, that’s how it was: when comparing the finished pages with the sketches I made at the beginning, there are some differences. Starting with the fact that I originally planned for 8 pages (4 sheets), but ended up with only 6 pages (3 sheets including cover pages), meaning 2 fewer rooms. Or I chose alternatives to the planned felt elements (e.g., bathtub instead of shower, no wardrobe, or the option to change the doll’s clothing, thus no washing machine…).
I think this flexibility is particularly necessary when you work on your first Quiet Book.
My Journey to Creating my own Quiet Book
The individual steps of my journey to my own Quiet Book are summarized in the picture collage below. The details can be displayed in the right block, click on the image for a larger view:
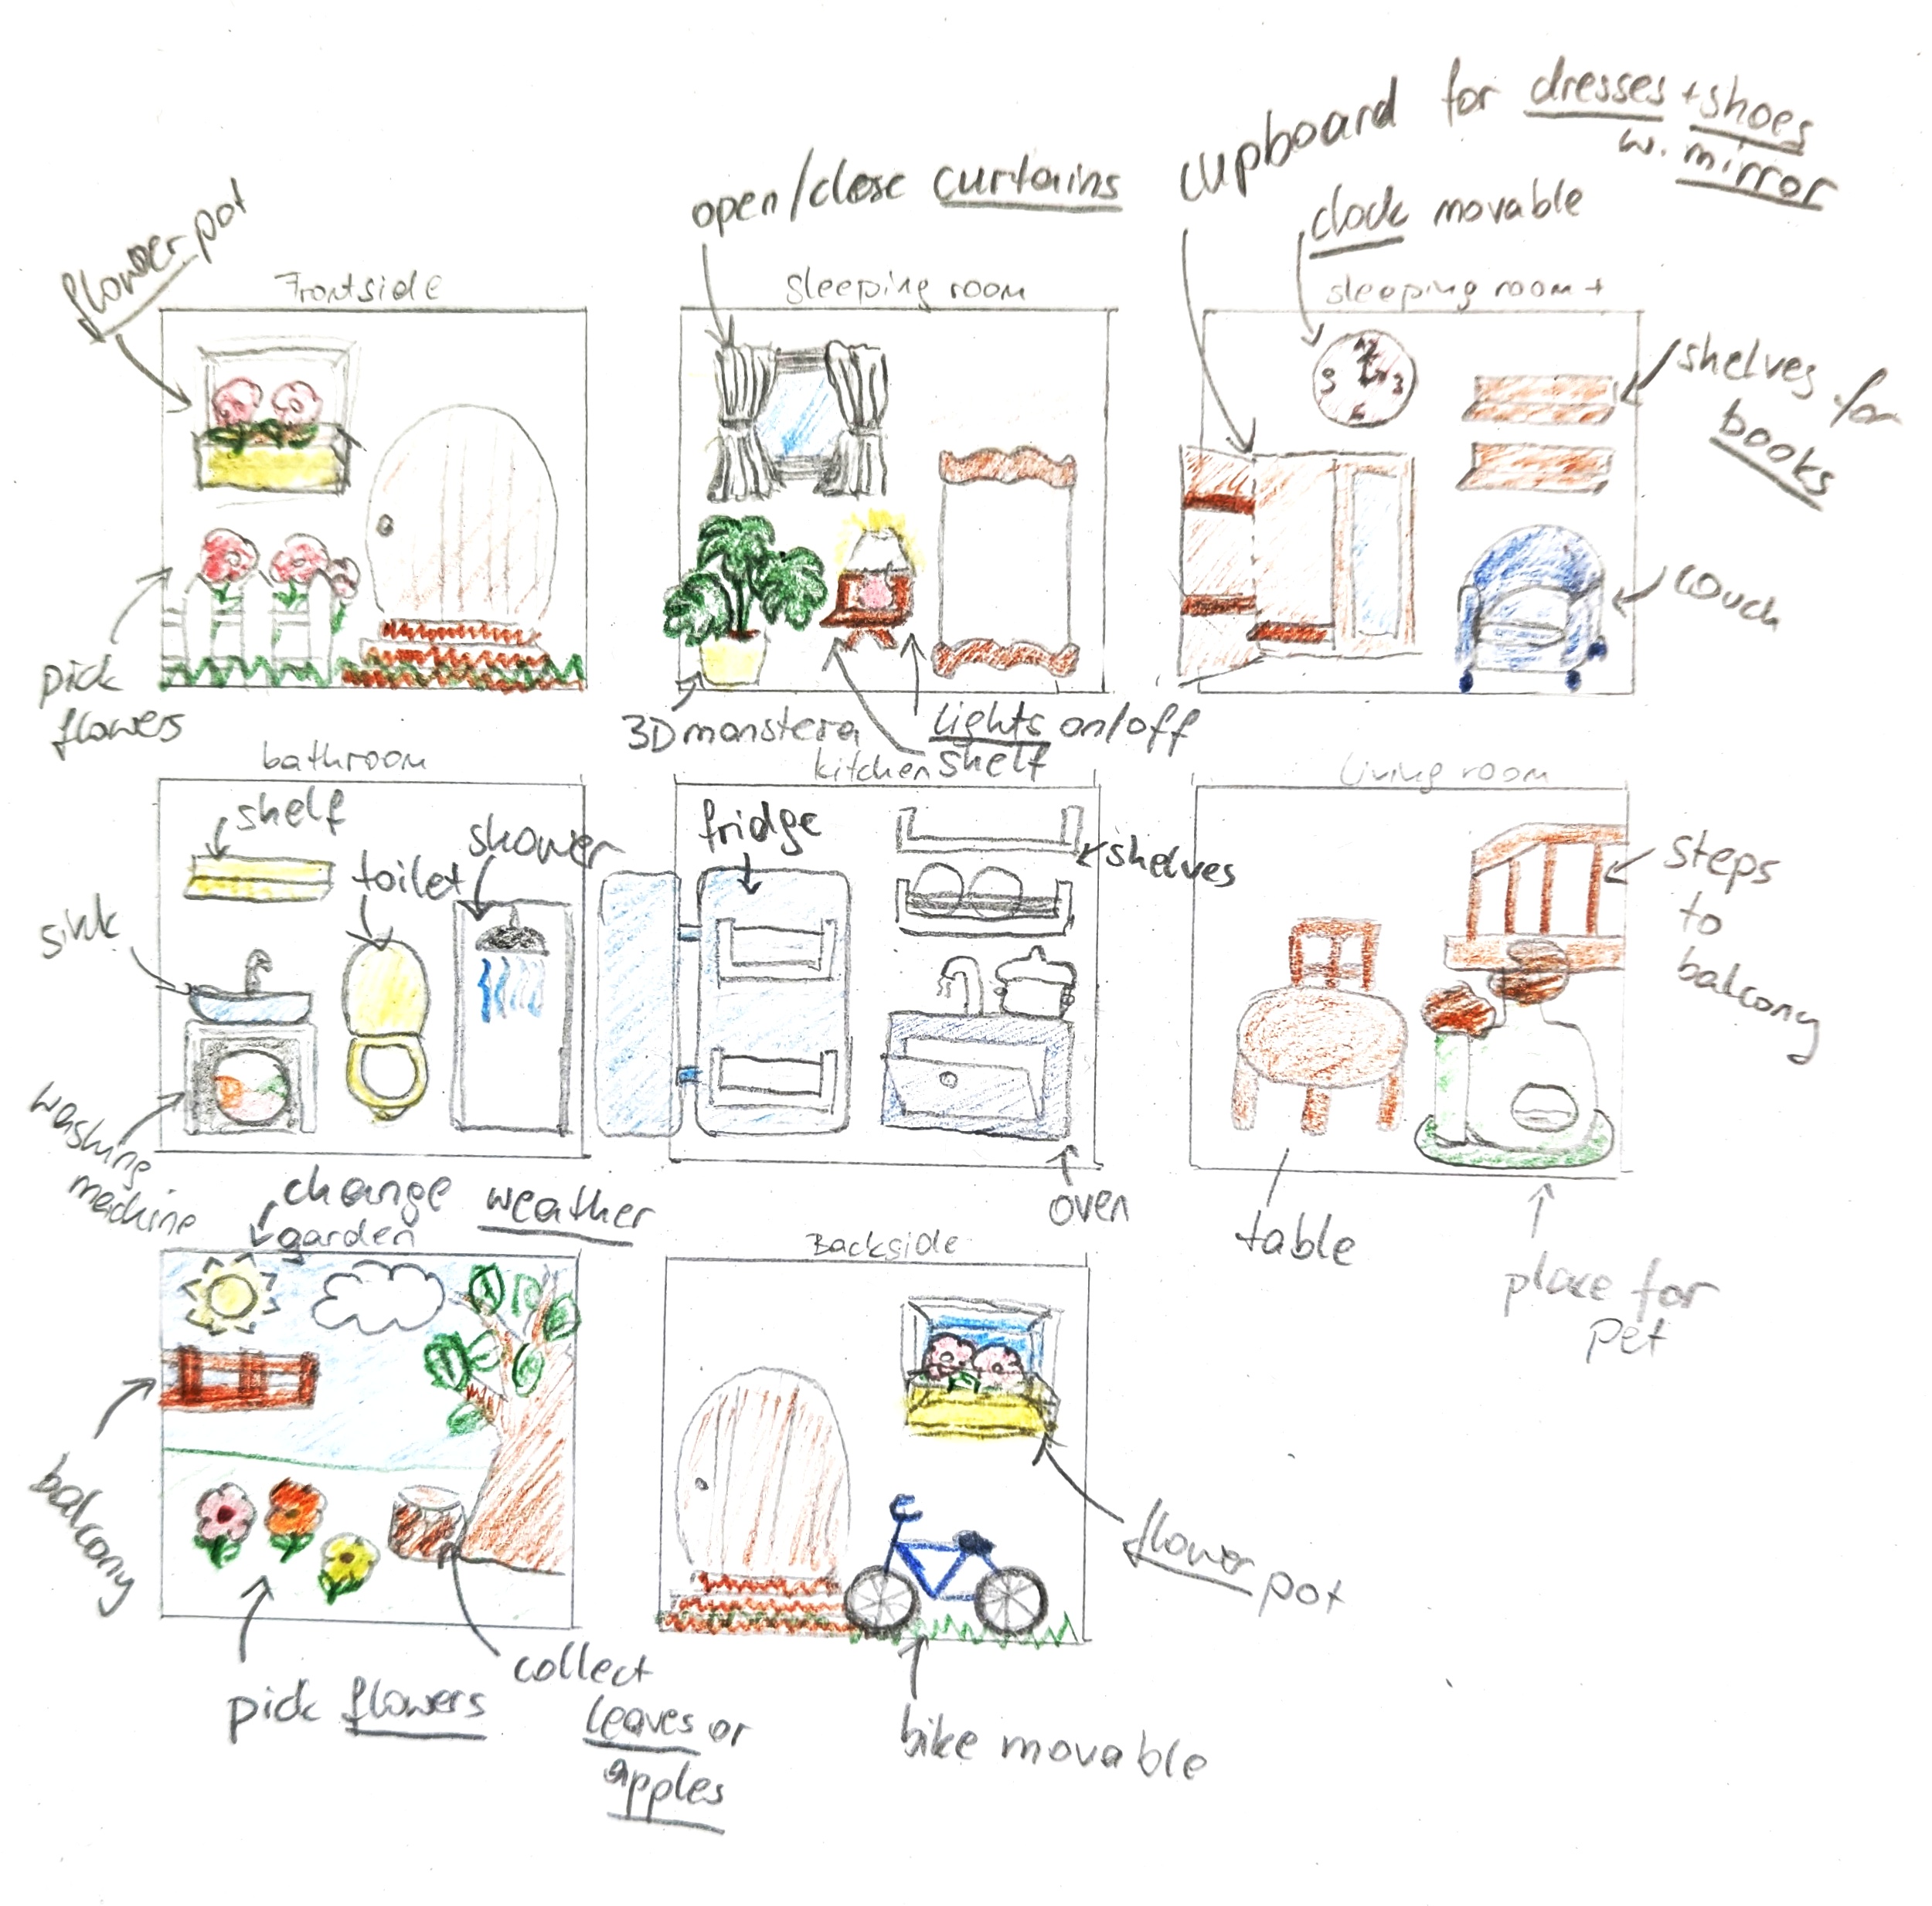
1) Concept and Visualization – determine the size and shape of the pages, consider the content of your quiet book and sketch them, so that they fit in proportion to each other…
- How large should the pages be? How should one be able to play with them? I took a sheet of paper and cut it until I had the size that felt right in my hands. The size of the pages determines the design possibilities for the page contents.
- Consider the theme of the book and the progression of the pages. Do you want to tell a story? What interactions should come on which page (e.g., regarding Velcro stripes, areas for inserting, elements for play…)?
- Sketch your ideas (on a small scale) on paper or digitally. Make sure that the contents are sketched in the correct proportions to each other so you can assess whether and how the planned elements will fit on the page. The sketches also help with material planning and creating templates.
- The pages don’t necessarily have to be rectangular. Depending on the theme of your activity book, creative variations can also fit (round, house-shaped, a treehouse book, a castle shape, etc.).
2) Material Planning – decide on the materials and prepare a material list for the pages, the play elements, and for an interlayer between the pages…
- What materials should the pages and their contents be made of? Should page interlayers be used?
- It was important to me to have a mix of materials for the play elements. For example, the bed should have a felt base, the head and foot are crocheted, and the blanket and cushions are sewn from a piece of patterned fabric with lace.
- Choosing a page interlayer: An interlayer serves to strengthen the page, but depending on the material used for the pages, it may not be necessary.
- The type of page interlayer also depends on whether you intend to wash the quiet book afterward. By the way, all-fabric books should always be hand-washed rather than washed in the washing machine (using the gentle cycle) to prevent them from becoming deformed.
- The choice of page interlayer can also be made at the very end, after all the pages and their contents are finished, because at that point, you have a better sense of whether and what type of interlayer would be most suitable.
- Instead of an interlayer, you can also thinly glue the pages on their backside with waterproof (temperature-resistant) glue. However, it’s advisable to test this beforehand on a separate test strip to check how the pages hold and ensure that the glue does not eat into the surface or deform the pages.

3) Start by creating the main character(s) – their size determines the size of the remaining elements on the pages…
- Before creating the pages, I started with the main character. My thought was: if I can get them ideally sized, I can adjust the page size if necessary.
- The size of your main characters also determines the size of your other play elements on the pages, as they should be proportional to the character!
- My character is made of wool felt, filled with cotton, and dressed in fabric pieces from old baby clothes. I used flat eyes to avoid any sharp edges and glued them with double-sided tape to the face.
4) Create the basic surfaces of the pages – yet without content…
- At this point, you know how the pages should look in terms of content, and you already have your main characters. Now you start creating the blank pages, which you will then fill with content in the next step.
- My pages are crocheted rectangles using single crochet stitches, measuring 60 stitches wide and 63 rows high. One page was crocheted in a checked pattern using tapestry crochet, which required only 60 rows to achieve the correct width.
- Originally, I planned and crocheted 8 pages, but in the end, only 6 pages made it into the book (due to time constraints, as it was intended as a birthday gift). 6 pages correspond to a book with a cover and 1 sheet, with all 6 pages having interactive elements.
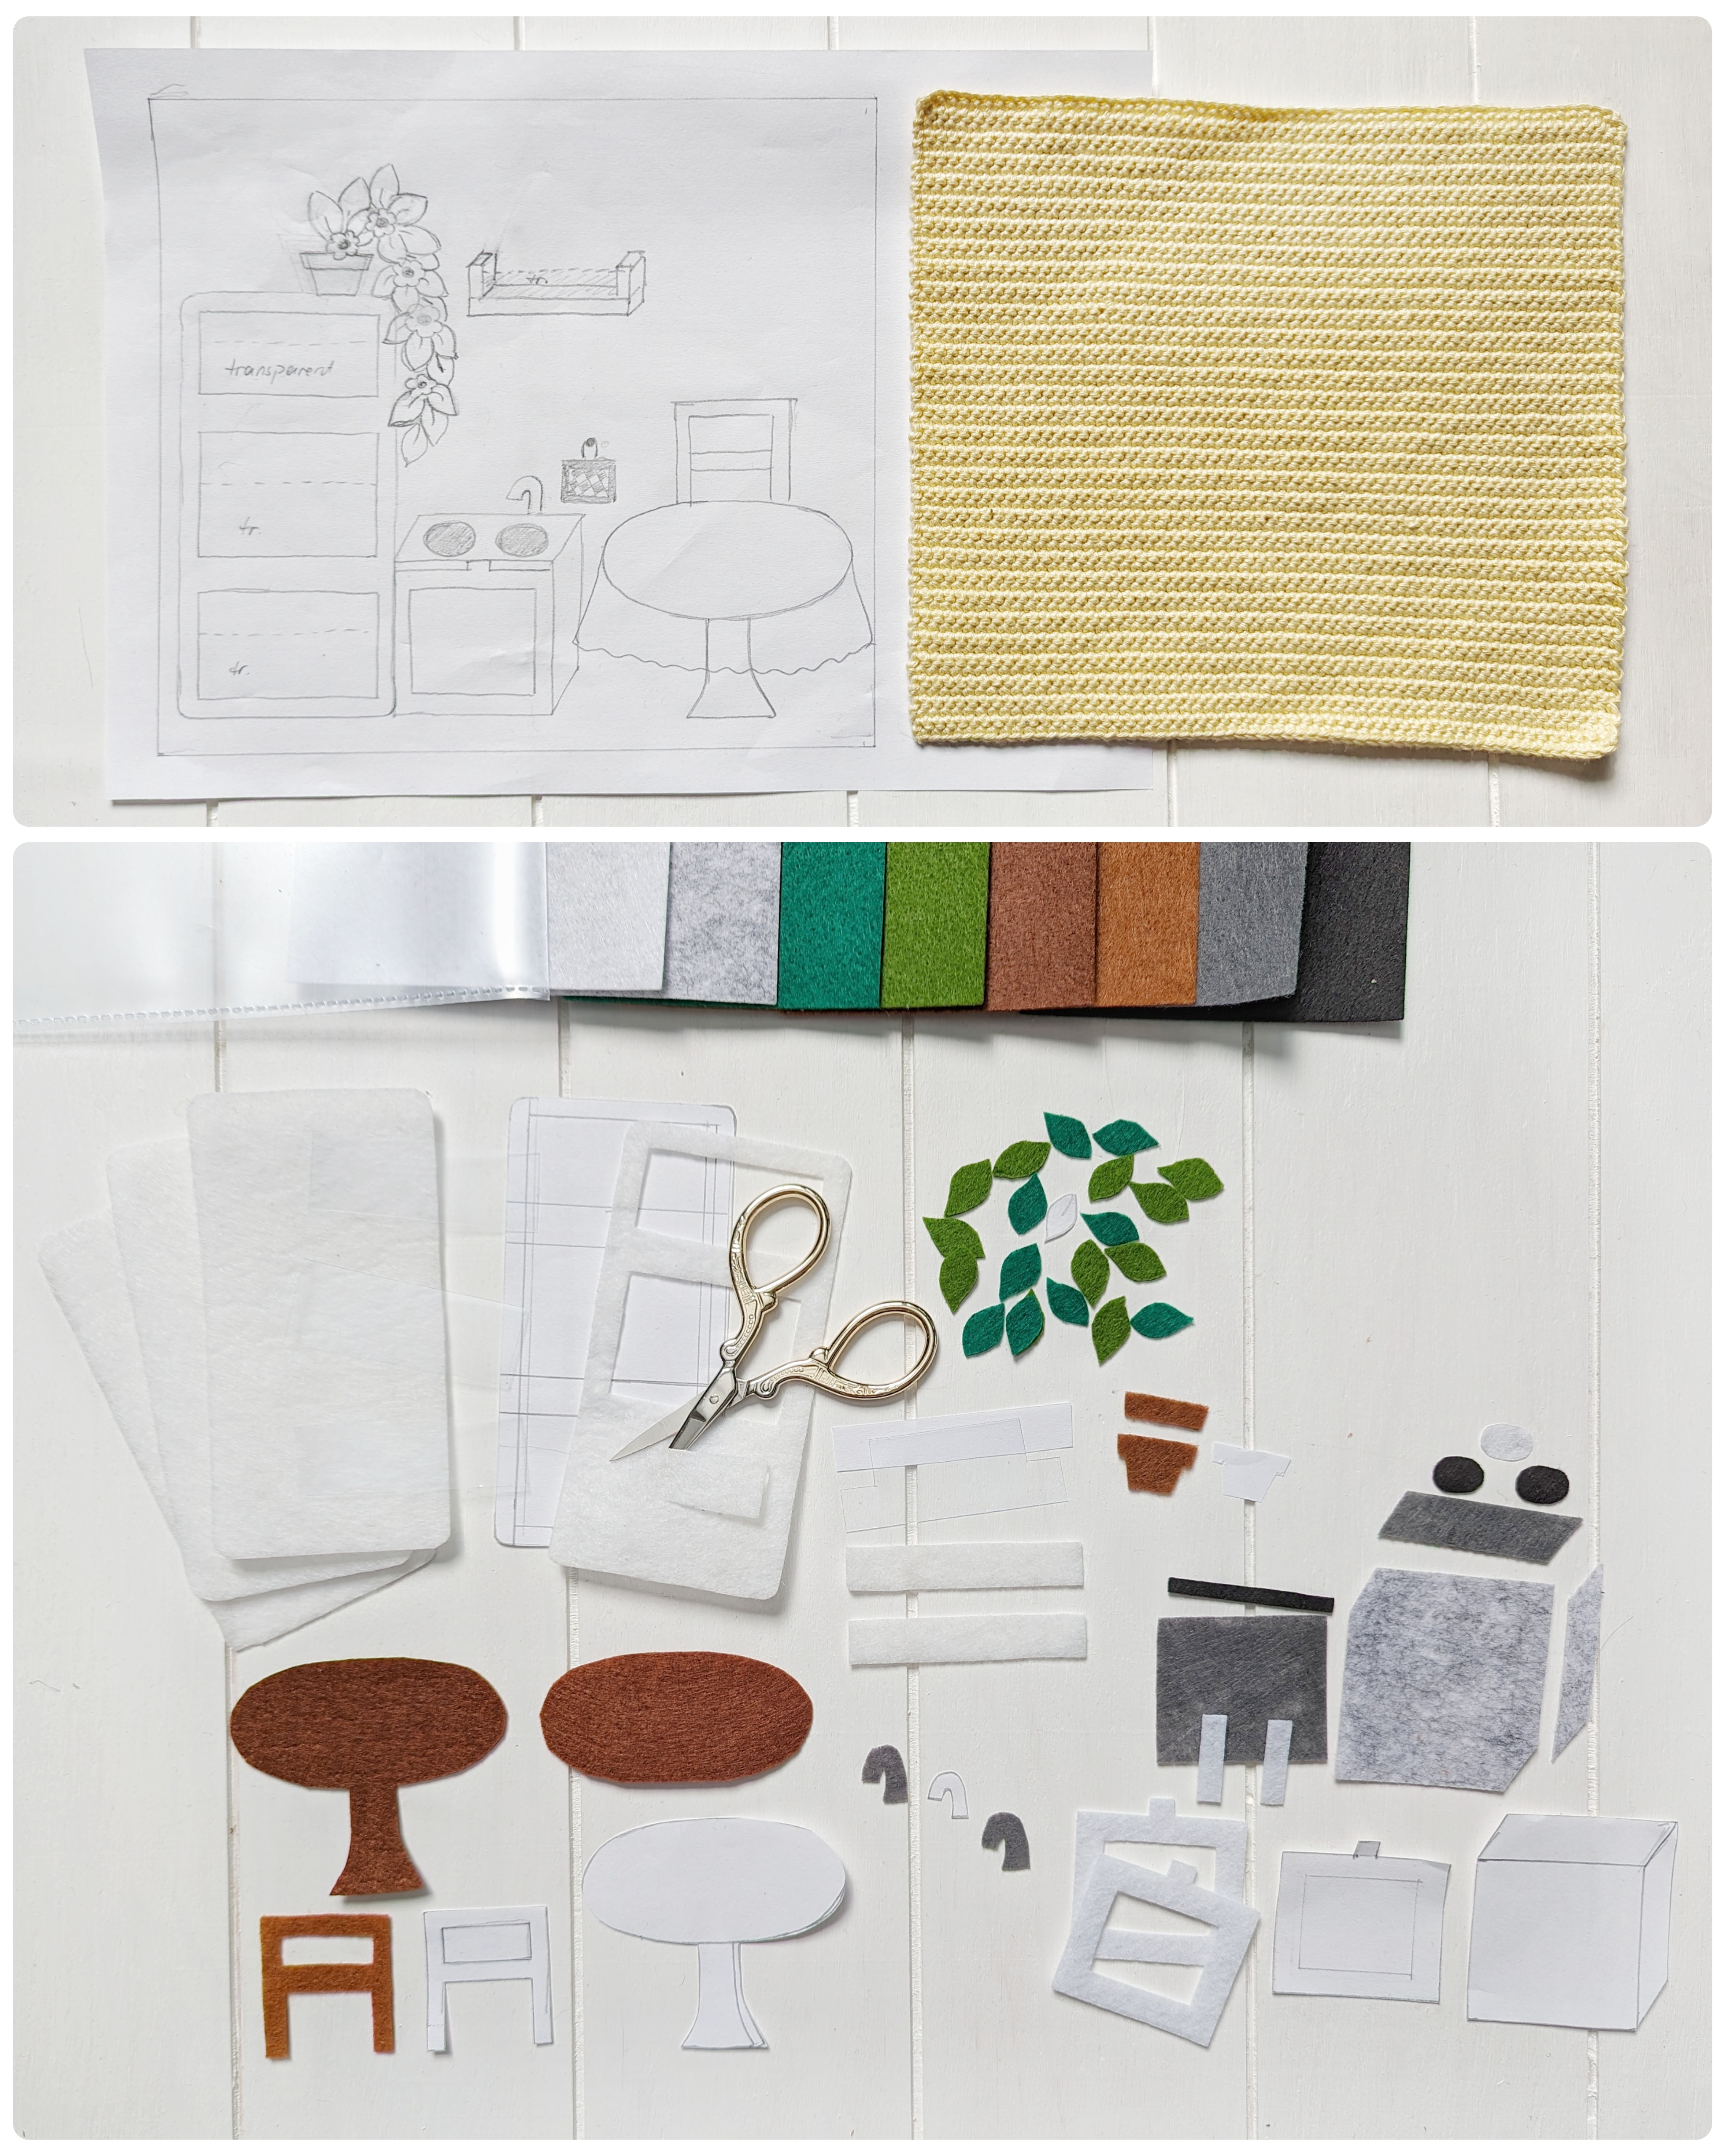
5) Create the page contents and attach them to the pages – start by sketching the page in actual size and derive patterns for the felt cutouts, here in the example of the kitchen…
- Work through each page step by step…
- First, sketch out the planned contents of the page (in actual size) on paper and cut these out to create templates for the felt.
- You can then place the paper cutouts on the crocheted page to double-check the space required and their positioning before cutting the felt accordingly.
In addition to felt, I also used a transparent folder for the transparent fiol areas, as seen in the example of the kitchen. These are used for the refrigerator shelves and the shelf on the wall above the stove.
For the finished view of the kitchen, please see below.
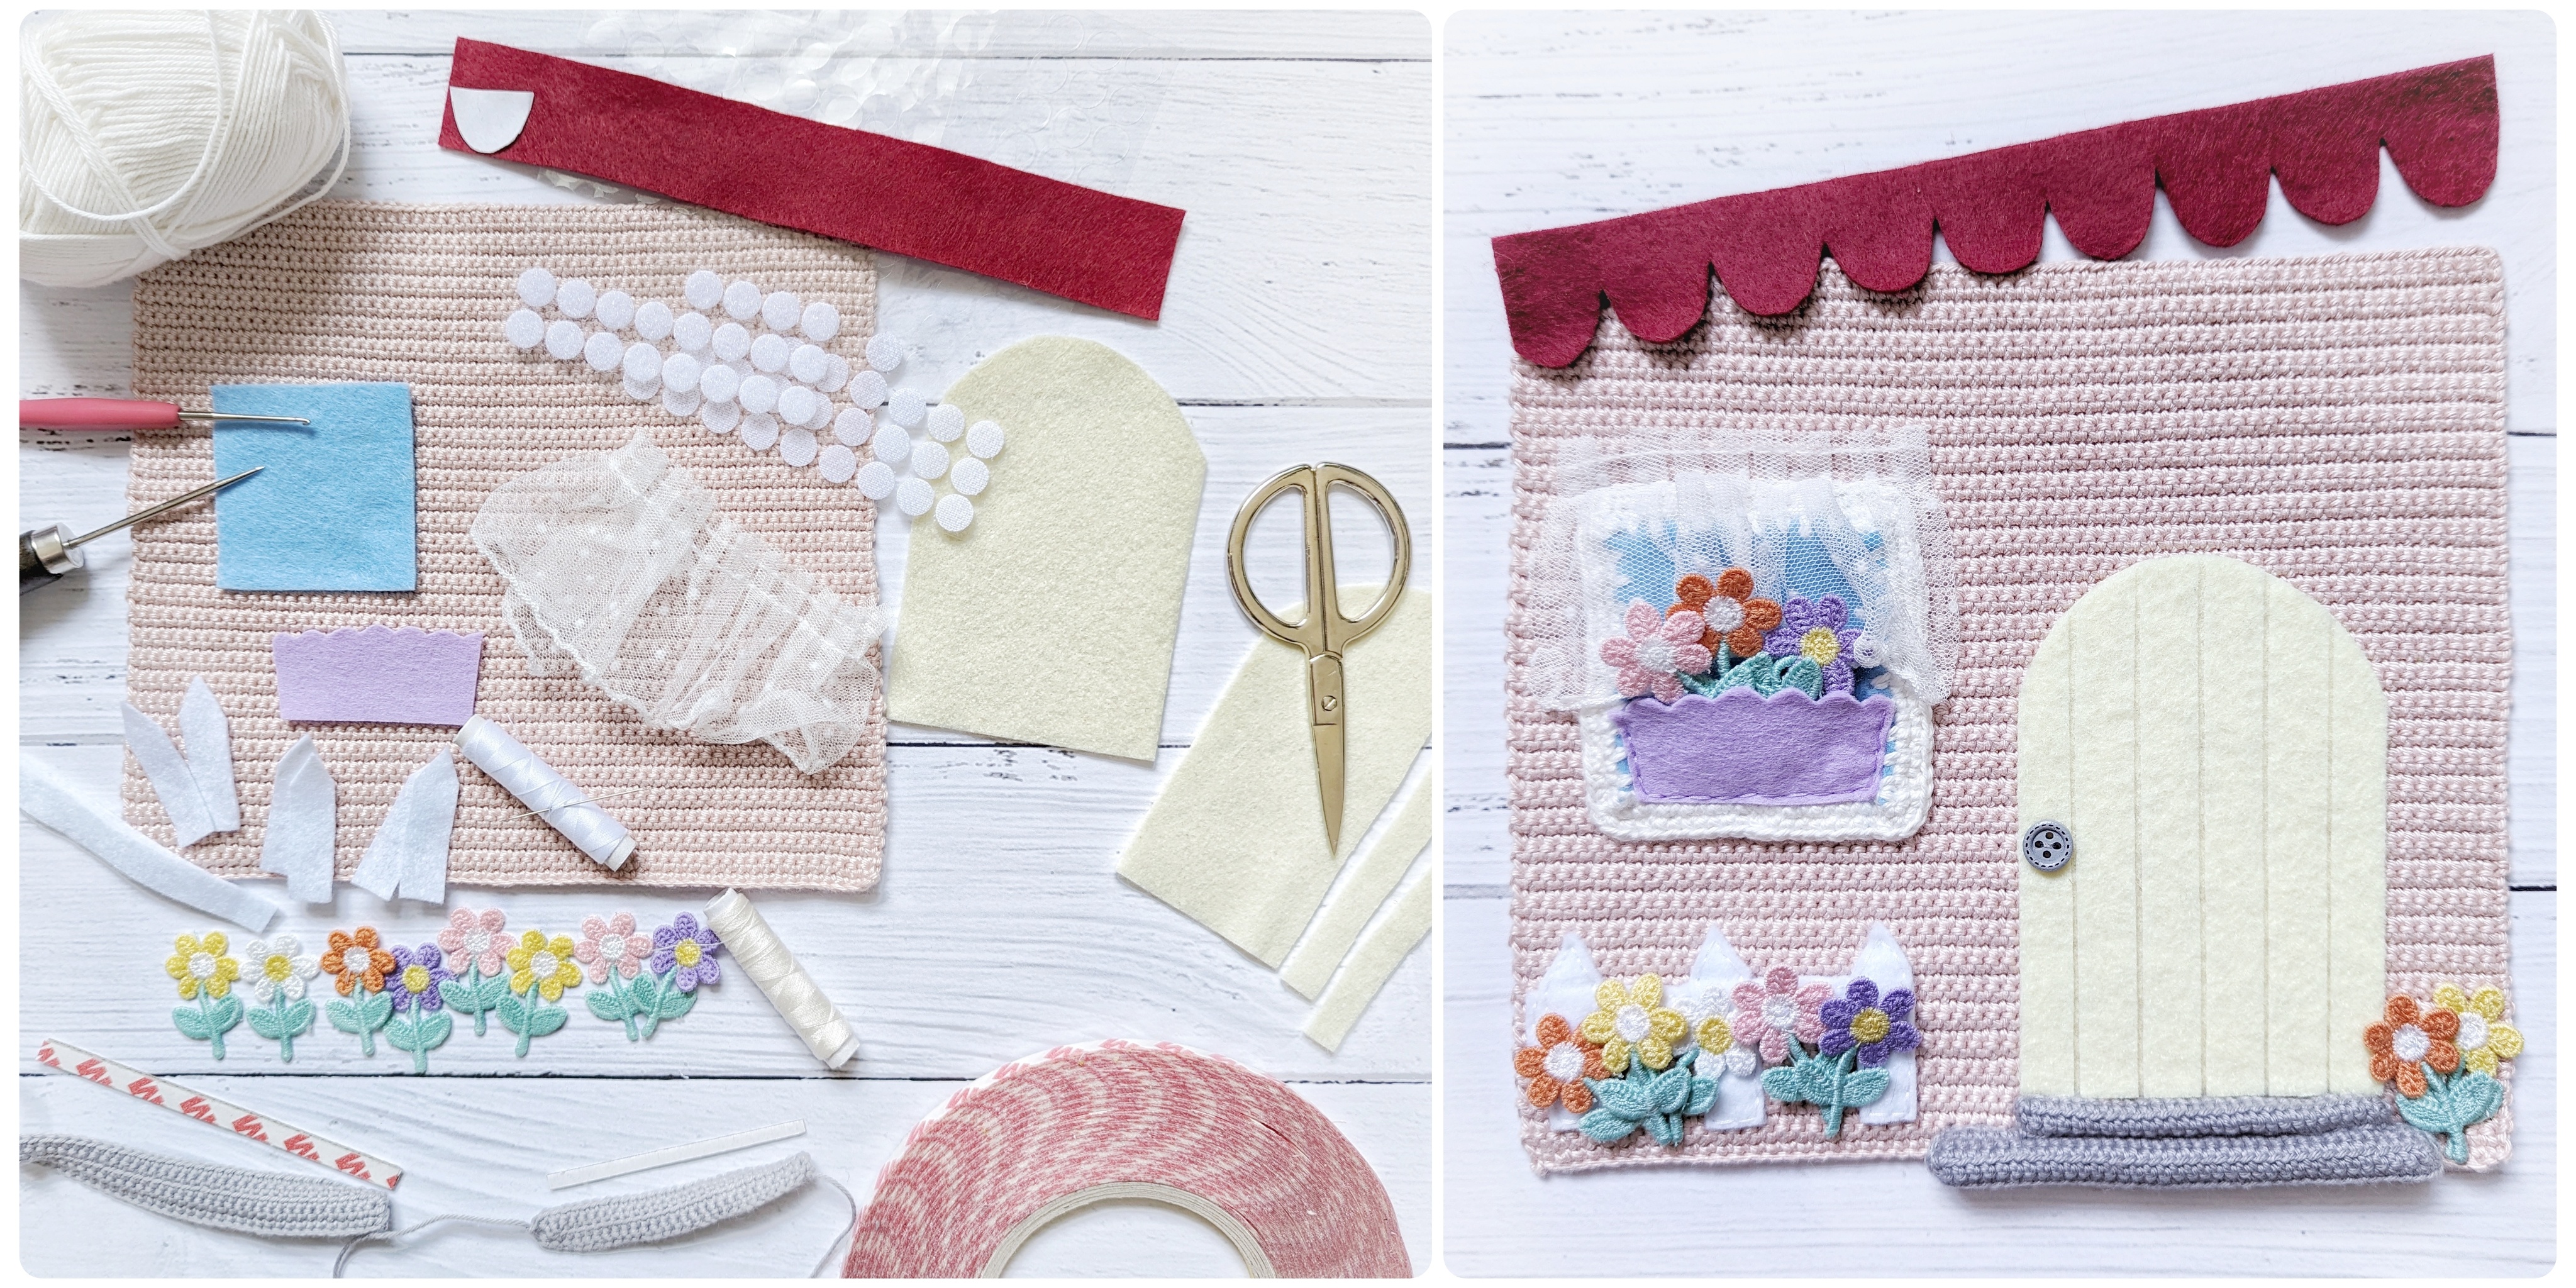
5) Create the page contents and attach them to the pages – here: the entrance, first page of my book…
I attached the red roof section entirely to the top edge at the end, after crocheting/binding this page together with the next page, so that the roof wouldn’t get in my way.
I sewed the flower appliqués into 3 bouquets, which can be attached to the fence with Velcro points or inserted into the flower pot at the window (the loop side is attached to the back of the bouquet, and the hook side is attached to the fence).
The curtains are made of a net lace trim.

5) Create the page contents and attach them to the pages – here: the sleeping room…
The lamp is an LED bulb (can be turned on and off by rotating), with a crocheted cover and white felt background.
For the window curtains, I used a wide lace trim and threaded a 1mm craft wire through it.
The window scene consists of one felt sheet each (day, night) which can be changed, painted with acrylic pens.
The bed consists of a felt base, crocheted top and bottom with flower appliqués, and sewn bedding.

5) Create the page contents and attach them to the pages – here: the bathroom…
For the mirror, I used regular aluminum foil, sandwiched between thick transparent covers from both sides and sewn onto the green frame. However, aluminum foil doesn’t reflect properly. For a real mirror effect, you would need mirror effect foil.
Additionally, I placed polyester filling as bathtub foam loosely inside the bathtub, and inserted a piece of fabric as a towel into the sink. Two mini buttons complete the sink.
Using two layers of white polyester felt, acrylic paint (pink and black), and the loop side of an oval-cut Velcro stripe as well as double-adhesive tape, I crafted a comb that can be inserted into the transparent compartment inside the bathroom cabinet.

5) Create the page contents and attach them to the pages – here: the kitchen…
The kitchen has 5 components: the refrigerator, the flowerpot above it, the kitchen counter (with stove, oven, sink), the shelf, and the dining table.
For the refrigerator, both the door and the interior compartment are made of 2 layers of felt. The interior compartment is divided into 3 differently sized compartments on the outer layer, half of which are covered by a transparent film as shelf compartments.
The kitchen counter consists of a light gray felt background and several differently cut, coloured pieces of a front felt layer that fully cover the background. The oven door consists of 2 layers, with a door hinge in between and covered with film. Using several blue threads of crochet yarn, I simulate flowing water (knotted on the back of the page).
For the dining table, I folded a piece of lace trim to sew the complete table shape and then sewed another tabletop (oval) on top of it.
Small accessories complete the page: magnets for the oven and refrigerator doors, a dishcloth, and a pearl for hanging.

5) Create the page contents and attach them to the pages – here: the garden…
Here, I have worked extensively with Velcro stripes (sewed on), acrylic paint, and crocheted surfaces. The flowers are made of felt and buttons, the leaves are double-layered.

5) Create the page contents and attach them to the pages – here: the exit, backside of the house…
The red roof section, like on the 1st cover page, was sewn on at the end.
The flower arrangements are sewn together from various appliqués and securely stitched onto the basket and flower box.
The curtains are improvised from a net lace trim.
The bicycle appliqué is from Kerri’s Crochet (https://www.youtube.com/watch?v=o4W9aq8Vtyc), with the tires additionally reinforced with black craft wire.

6) Add any additional play elements if necessary and further decorate the pages towards the end. Using polyester felt (1 layer of 3mm or 2-3 layers of 1-2mm), felt-tip pens (or acrylic paint), pieces of fabric, double-sided tape, and Velcro stripes, I added various utensils for the kitchen and bathroom.
- One can try various methods to add further details or elements to the pages: sewing multiple layers of felt together, attaching fabric to felt, adhering a paper print onto felt, using cardboard cutouts or wooden decorations…
- Start by cutting the felt and glueing it together, if needed it can be painted with felt pens, before adding additional appliqués (e.g., wrapping fabric over it).

7) Sew the pages together – from 6 pages I got 3 sheets, by crocheting 1 half double crochet through the stitches of 2 pages simultaneously, and 5 half double crochets at the corners. Without an intermediate layer…
The first and last sheet also serve as the front and back covers. I sewed the red roof section to the top edge after connecting, ensuring that the seam is not visible on the other side (sewn in a straight stitch, with the back side <1 mm long and the front side 3 mm).
I did not use an intermediate layer because my pages (crocheted in single crochet stitches) were stiff enough so that the sheets ended up being stable when held in hand.

8) Binding – The final step for your custom activity book is binding the pages together to form a book. There are numerous methods for binding quiet books, which also depend on the material of the pages. You can find several helpful tutorials on YouTube (“binding quiet books”). Choose a method that suits your preference and materials used for the pages.
- Depending on the materials used, there are several options available: sewing, using eyelets, using ribbons, or using Velcro stripes (if the pages need to be removable).
- For my version, I crocheted a wide cover band in single crochet stitches from one edge of the left side to the other edge. It consisted of a total of 67 stitches (1 single crochet stitch for each row of the page + 2 stitches per edge = 63 + 2 * 2). I crocheted 10 rows: Rows 1 to 5 in single crochet stitches, Row 6 in back loop only single crochet stitches, and Rows 7 to 10 again with single crochet stitches.
- The first and last pages were sewn onto the 1st and last rows of the cover band (sew only through the back loops), and the 2nd page was sewn onto the front loops of the 6th row of the cover band. However, please note: since the page crocheted in tapestry crochet has fewer rows than the other pages (60 instead of 63), I sewed 2 stitches of the cover band to 1 stitch of the page at two different points to ensure that no stitch of the cover band protruded in the end.


9) Finally, add more accessories, to the book to be able to close the book or store the play elements outside of the book.
- To embellish and conveniently store the play elements, I sewed a small pocket using transparent document cover, flower appliqués, a fabric ribbon, double-sided adhesive tape and magnets, with sewing thread and needle. I attached it to the book using a string of beads.
- To close the fabric book, I sewed an elastic band in red from the front door to the back door.
My finished Quiet Book:
Collection of Ideas
I’ve collected a few ideas for quiet books on Pinterest. They are also great for helping you create your own templates or patterns.
absolutely brilliant. A work of art! I especially love how the doll can really sit on the bike!
Thank you! 🙂