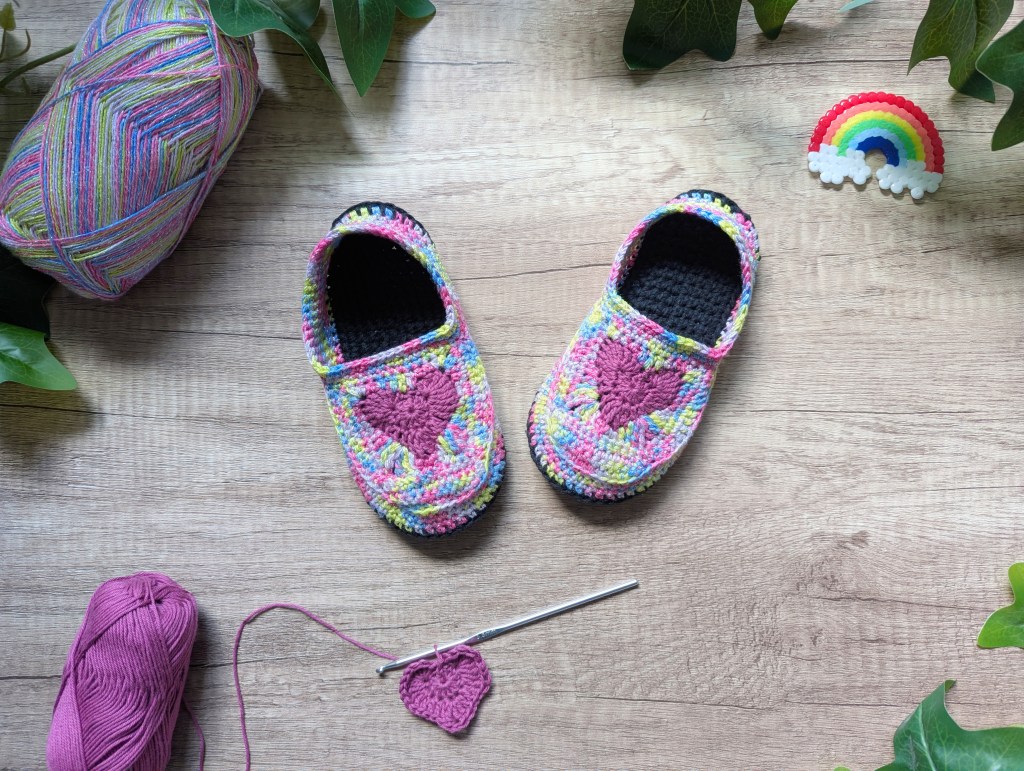
It all started the classic way: little kids who seem to grow overnight – and suddenly we needed new slippers for kindergarten. But not the usual suspects – no felt shoes (too warm), and definitely not Birkenstock sandals (too stiff). I had something else in mind: the good old gym shoes many of us still remember from school PE class. Soft, flexible, non-slip – almost like a second skin. And best of all: quick to crochet.
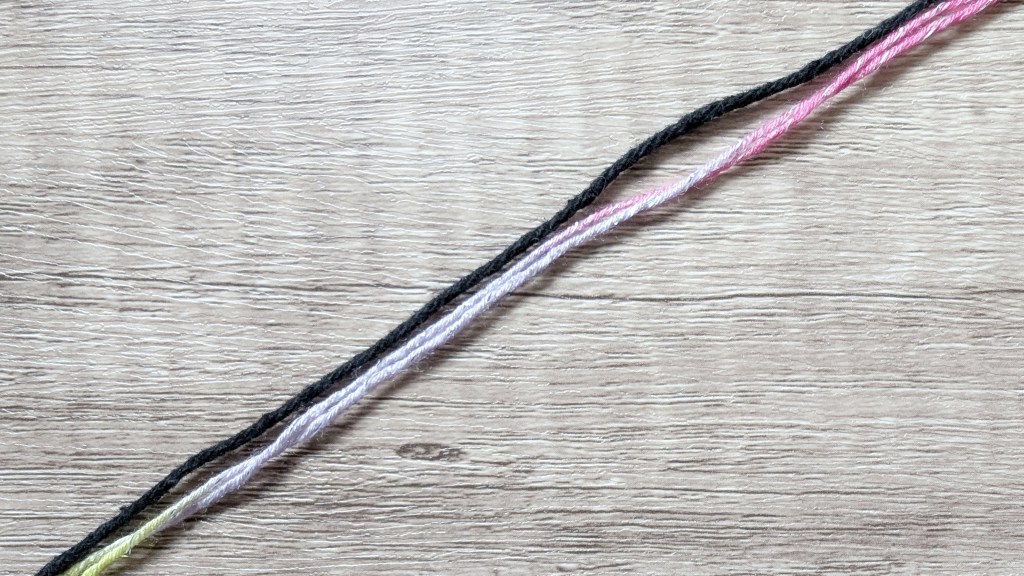
So I started experimenting with yarn. The sole needed to be sturdy and a little thicker, while the upper part should be lighter – almost like a classic sneaker that curves slightly inward. For the sole, I used a durable cotton yarn, held double. For the upper, I also worked with a double strand, this time using fingering-weight acrylic yarn with a touch of glitter (because a little sparkle always makes the day brighter). This yarn combo gives you the perfect sneaker look: solid on the bottom, light and flexible on top. Add an individual granny square for a favorite motif, and you’ve got a cozy sneaker-style slipper.
I’ll show you exactly how to crochet these kids’ slippers below!
Of course, these crochet sneakers don’t replace real sports shoes – they’re too soft for gym class. But as slippers at home or for kindergarten, they’re wonderfully comfy, budget-friendly, and a truly original alternative to store-bought options.
And the best part? They’re so quick to make that you can finish a pair before the evening is over – perfect for little feet that always seem to be getting bigger.
What you’ll need (details in the material list):
- sturdy cotton yarn for the sole (held double)
- fingering-weight acrylic yarn (with optional glitter) for the upper (also held double)
- additional yarn if you’d like to add a granny square motif
- crochet hook to match your yarn weight
- liquid latex or rubber milk to make the sole non-slip
Good to know: These crochet kids’ shoes are ideal as house slippers or kindergarten shoes. They are not suitable for PE or sports – they simply don’t offer the required stability.
Extra tip: Since they work up so quickly, you can easily make several pairs in advance. That way you’re always ready for when those little feet grow again overnight.
Have fun crocheting – and building your own little DIY sneaker-style shoe collection!


Size:
This pattern is written for kids’ in-between sizes 25/26, 27/28, and 29/30. The size instructions are separated by slashes. If only one number is given, it applies to all sizes.
Finding the right sole size:
The easiest way is to trace your child’s foot on cardboard and add about 1 cm (⅜ in) at the toe, so the shoe won’t be too tight later.
If the size you need doesn’t match the table below, simply choose the next larger size. You can also adjust the size easily by:
- using thicker or thinner yarn for a wider/longer or shorter/narrower sole
- or switching to a smaller hook size, which creates a denser, slightly smaller sole.
Size chart:
| Size (EU) | Length (cm) | Width (cm) – at the narrow middle part |
|---|---|---|
| 25/26 | 17,5 | 5,5 |
| 27/28 | 18,5 | 7,0 |
| 29/30 | 19,5 | 7,0 |
Material List
For one pair of children’s slippers, one skein of yarn each for the sole and the upper is enough. Both the sole and the upper are crocheted with a double strand – you can simply use the starting strand from inside the skein together with the strand from the outside.
- Sole: sturdy cotton yarn
- Gauge: with a 3.5 mm hook and yarn held double = 8 sts and 8 rows = 5 x 5 cm (2 x 2 in)
- Example: “Emilia” from Creativity Homemade
- Upper: sock yarn made from a polyacrylic or polyester blend (with sparkle if desired)
- Gauge: with a 3.5 mm hook and yarn held double = 10 sts and 14 rows = 5 x 5 cm (2 x 2 in)
- Example: “Unicorn Dream” from Handmade with Love
👉 Important: To make the shoe snug on the foot while keeping the sole the right length, use a yarn for the upper that is about half as thick as the sole yarn. If you use the same yarn weight for both sole and upper, you’ll get a more standard crochet slipper – which also works great with this pattern if you’d like a wider fit.
Other supplies:
- Crochet hook: 3.5 mm (use this size for both yarns, even though they differ in thickness)
- Scissors
- Yarn needle
- Latex rubber milk (for making the sole non-slip at the end)
How to make your own Kids’ Crochet Slippers
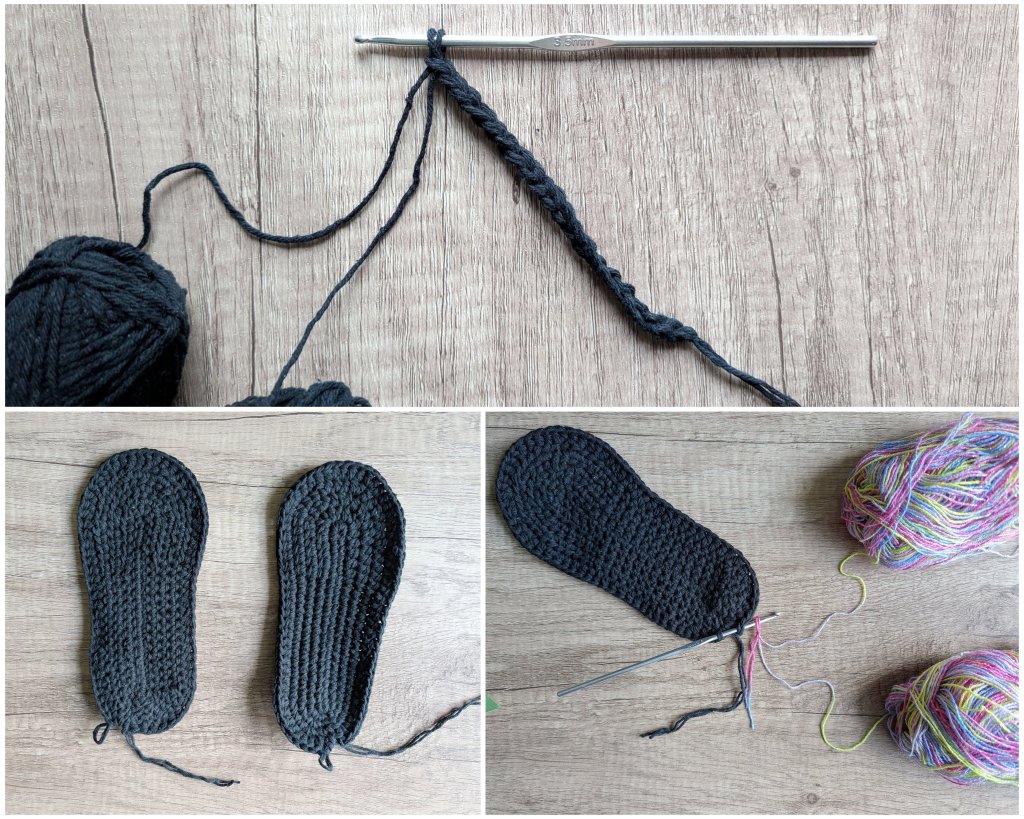
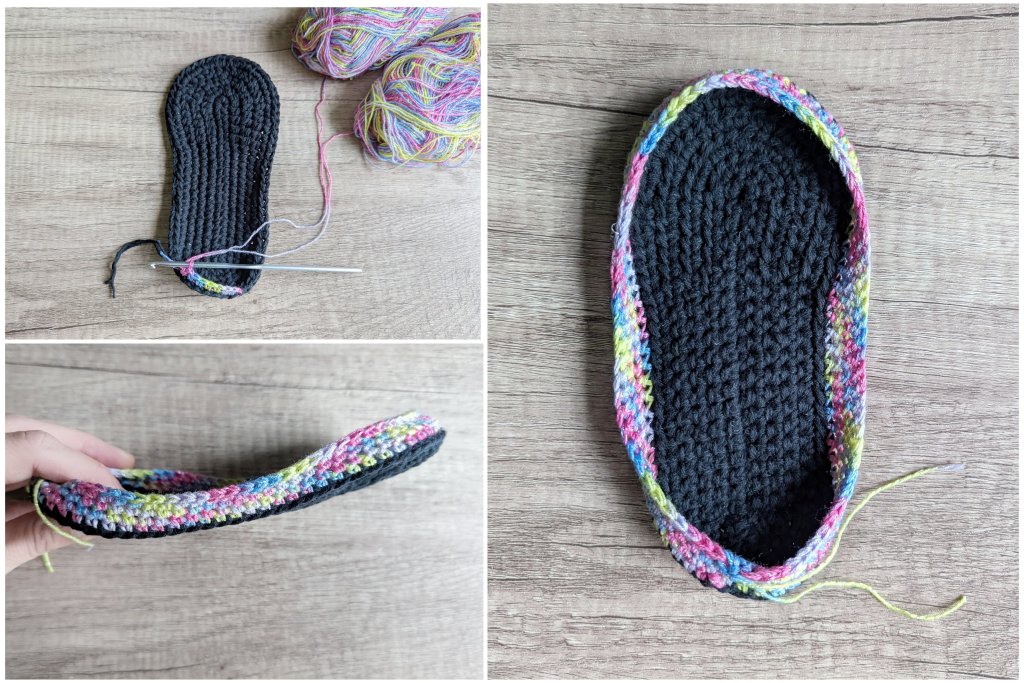
1. Shoe Sole
With yarn held double, chain 20/20/23.
1. Rd: Starting in 2nd ch from hook, work 1 sc in next 18/18/21 ch, then 5 sc in last ch. Continue on the other side: 1 sc in next 17/17/20 ch, 2 sc in last ch. Join with sl st to first sc (42/42/48)
2. Rd: Ch 1, 1 sc in same st as sl st, 1 sc in next 13/13/15 sts, 1 hdc in next 4/4/5 sts, 2 hdc in each of next 5 sts, 1 hdc in next 4/4/5 sts, 1 sc in next 13/13/15 sts, 2 sc in each of last 2 sts. Join with sl st to beginning ch (50/50/56)
3. Rd: Ch 1, 1 sc in same st as sl st, 1 sc in next 14/14/16 sts, 1 hdc in next 4/4/5 sts, repeat (2 hdc in next st, 1 hdc in next st) 5 times, 1 hdc in next 4/4/5 sts, 1 sc in next 13/13/15 sts, repeat (2 sc in next st, 1 sc in next st) 2 times. Join with sl st to beg ch (58/58/64)
4. Rd: Ch 1, 1 sc in same st as sl st, 1 sc in next 15/15/17 sts, 1 hdc in next 4/4/5 sts, repeat (2 hdc in next st, 1 hdc in next 2 sts) 5 times, 1 hdc in next 4/4/5 sts, 1 sc in next 13/13/15 sts, repeat (2 sc in next st, 1 sc in next 2 sts) 2 times. Join with sl st to beg ch (66/66/72)
👉 Stop here for size 25/26. Change to double strand of upper material yarn and continue with upper.
For sizes 27/28 and 29/30, work one more round as follows (note: left and right soles differ):
5. Rd – Left Sole: Ch 2, 1 hdc in same st as sl st, 1 hdc in next 20/23 sts, repeat (2 hdc in next st, 1 hdc in next 3 sts) 5 times, 1 hdc in next 17/20 sts, repeat (2 hdc in next st, 1 hdc in next 3 sts) 2 times. Join with sl st to top of beg ch-2 (74/80)
5. Rd – Right Sole: Turn work and crochet in the opposite direction. Ch 2, 1 hdc in same st as sl st, 1 hdc in next 2 sts, 2 hdc in next st, 1 hdc in next 3 sts, 2 hdc in next st, 1 hdc in next 17/20 sts, repeat (1 hdc in next 3 sts, 2 hdc in next st) 5 times, 1 hdc in next 20/23 sts. Join with sl st to top of beg ch-2 (74/80)
👉 Change to double strand of upper material yarn and continue with upper.
2. Upper – Side of the Shoe
1. Rd: Work 1 sc in each back loop only around (66/74/80)
2. –4. Rd (for size 25/26, only up to Rd 3): Work 1 sc in each st around (66/74/80)
💡 Tip: If you want the crochet slipper to sit higher on the foot, secure the working yarn with a stitch marker so you can continue the rounds later. Otherwise, join with a sl st to the first sc and weave in the yarn end.
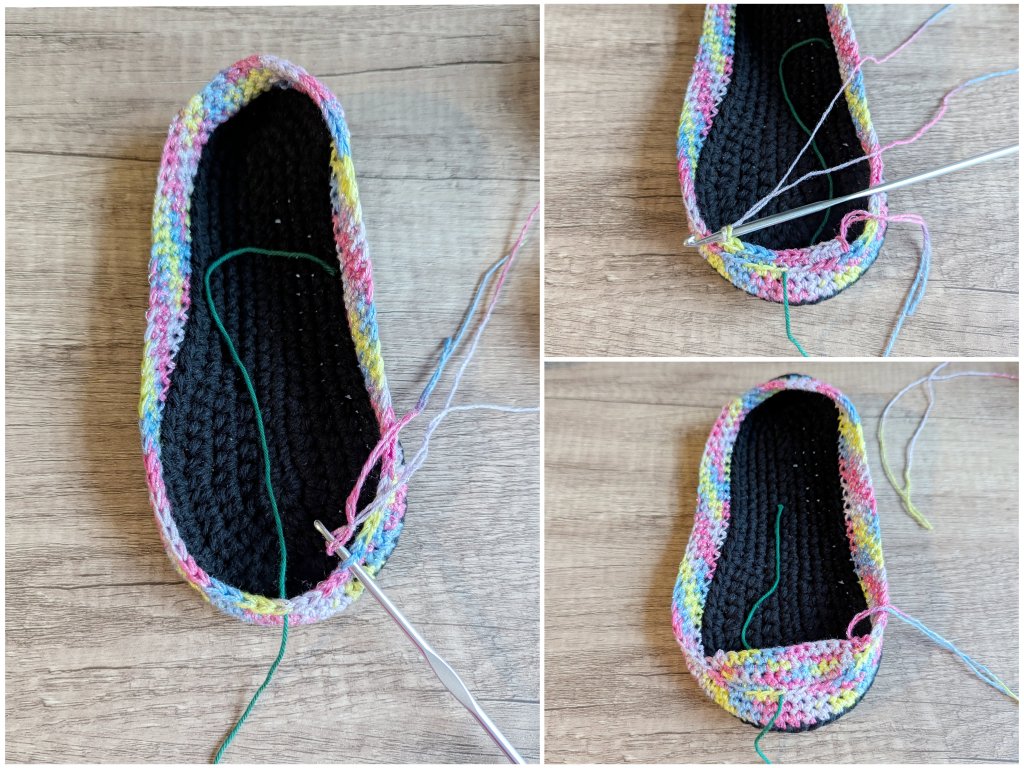
3. Upper – Toe Section
The toe is worked starting from the center front of the shoe in rows.
Place a stitch marker in the center stitch of the toe. Count 5 stitches to the right (toe pointing forward) and attach a new strand of yarn into the back loop of the 5th stitch right of the marker.
Row 1: Work 1 sc in each of the next 11 sts in back loops only, turn (11)
Row 2: Do not ch 1, skip the first st, work 1 sc in next 10 sts, then work 1 sc in the next 2 sts along the side, inserting into front loops only, turn (12)
Row 3: Do not ch 1, skip first st, work 1 sc in next 11 sts, then 1 sc in next 2 sts along the side, inserting into back loops only, turn (13)
Row 4: Do not ch 1, skip first st, work 1 sc in next 12 sts, then 1 sc in next 2 sts along the side, inserting into front loops only, turn (14)
Weave in yarn end.
Pause work on the shoe.
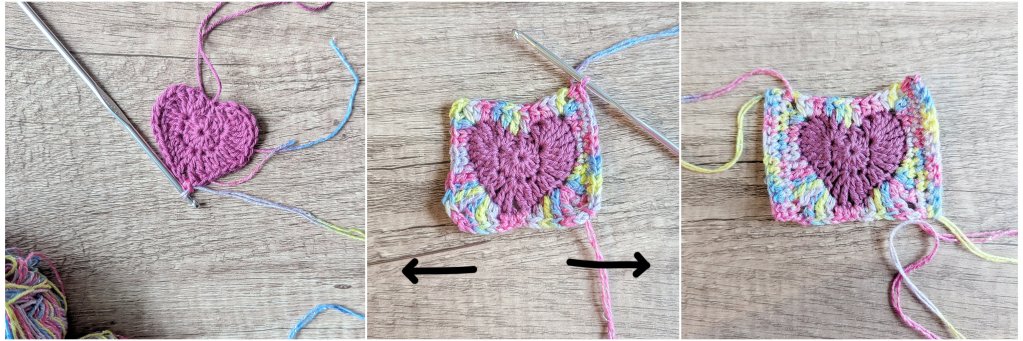
4. Granny Square
The choice of granny square is important and can significantly affect the shoe width. You can use any square granny square, but to avoid it sitting too prominently on the shoe, crochet it small and extend along the sides to turn the square into a rectangle.
Good options are a traditional granny square or this floral granny square (crochet only up to Rd 6, using ch 2 at corners instead of ch 3). I used this heart granny square from Adore Crea (without Rd 4) because my daughters love hearts. Essentially, any other pattern can be used as well.
Size reference for my granny square:
- The last row of the toe section is 14 sts long.
- My granny square is 12 sts per side (2 sts shorter).
- I added 2 extra rows along each side (1 row = 1 sc), with one row later sewn into the corner of the toe section.
- At the end, with the extra rows, my granny square matches the toe width of 14 sts.
💡 Tip: If you want a larger granny square motif than shown in the photo, crochet a 14-stitch square and skip the side-extension. Then you can work fewer rounds around the ankle to prevent the shoe from becoming too tight.
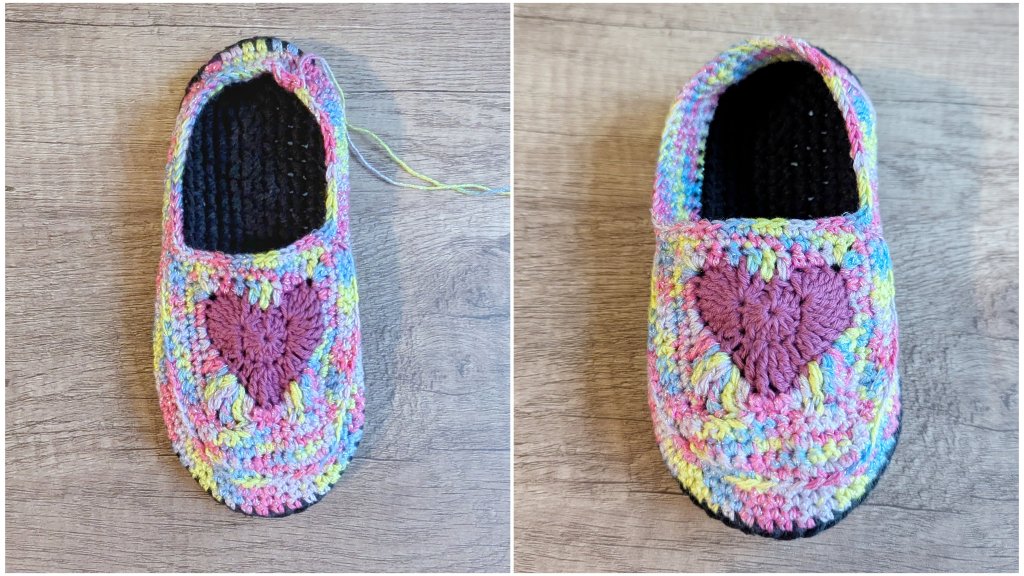
5. Attaching the Granny Square to the Toe
Sew the granny square to the bottom of the toe and along the sides of the shoe. Only insert the needle through one loop of each stitch to keep the seam thin.
For the sides, I stitched through the inner loops of the side stitches so that the outer edge of the loops remains visible, similar to the edges of the toe section.

6. Finishing
For size 25/26, you can crochet 1–2 rounds of single crochet around the ankle to make the shoe fit a bit snugger. For larger sizes, work 2–3 rounds (in the product photo, size 27/28 has 3 rounds added at the top).
Weave in the yarn end to finish.
To make the sole non-slip, brush a thin layer of liquid latex onto the bottom of the shoe and let it dry overnight.

I hope you enjoyed the pattern and that you have lots of fun with your handmade crochet slippers!