
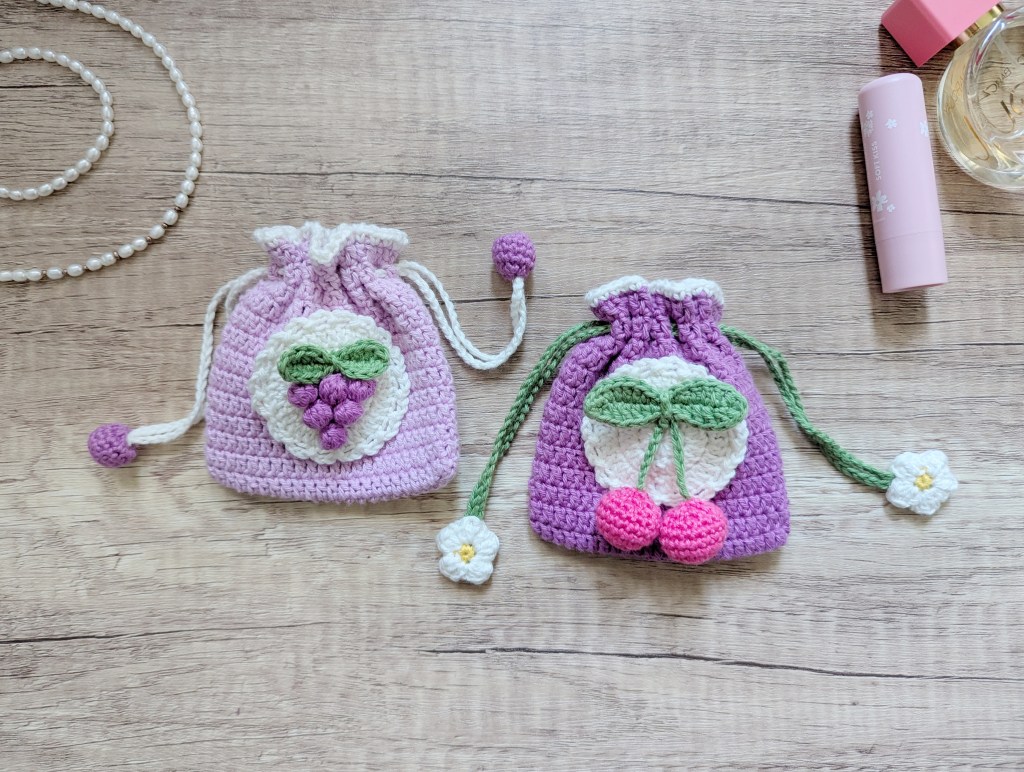
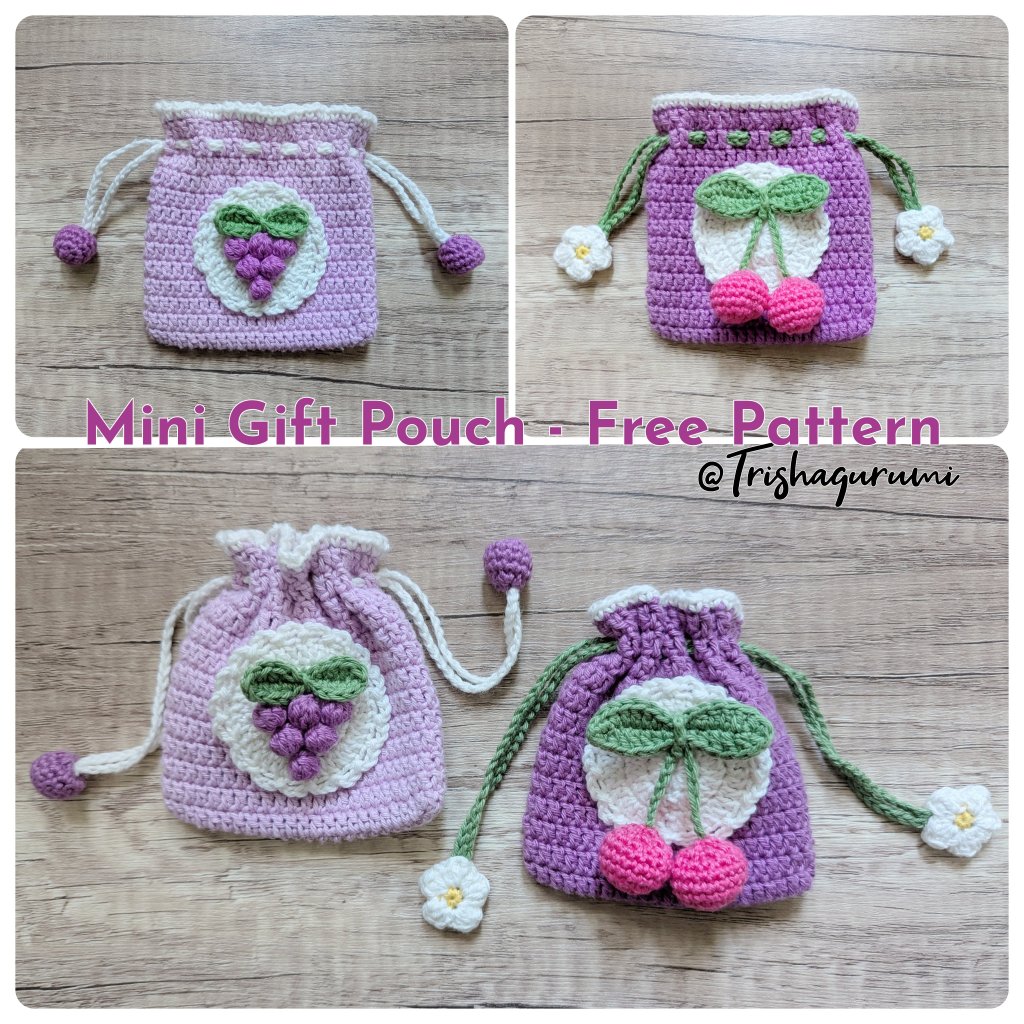
There’s something extra special about giving a handmade gift with a personal touch. These little crochet gift pouches with a fruit design are perfect for exactly that! Not only are they practical, but they also become part of the gift itself, adding a thoughtful handmade charm to any present.
The inspiration for these pouches came from browsing Pinterest, where I kept seeing adorable little crocheted bags. I immediately knew I had to try making my own. That idea eventually turned into these two summery designs: a playful cherry pouch and a more elegant grapevine version.
The cute fruit appliqués — a delicate grapevine 🍇 and a cheerful cherry 🍒 — instantly create a fun summer feel. One of the best things about this project is how customizable it is. Instead of cherries or grapes, you could crochet the recipient’s favorite fruit to make each pouch feel even more personal and unique.

Of course, these pouches are not just decorative — they’re practical too! They are perfect for storing small everyday items like earbuds, lip balm, gift cards, coins, or other little treasures. If you use fine lace-weight yarn, you can even make tiny versions that work beautifully as jewelry pouches for rings, earrings, or necklaces.
If you’d like to use the pouch as a sturdier everyday accessory, simply use a smaller hook size or crochet more tightly with single crochet stitches. This creates a firmer pattern that securely holds smaller items. In this version, the pouch also works wonderfully as a coin purse, key pouch, or small travel accessory.
One of the nicest things about this project is its versatility. By changing the colors, size, or appliqués, you can create endless variations. Make it slightly larger and it becomes a cute mini handbag; crochet it narrower and it turns into a fun phone pouch. Handmade accessories like these are especially popular with children and teenagers.
Another great advantage: these little pouches work up quickly! In less than three hours, you can have a finished pouch ready to use or gift. That also makes them a perfect last-minute handmade present.
You’ll find the free crochet pattern for these small gift pouches below. Step by step, I’ll show you how to crochet the basic pouch and decorate it with either a cherry or grapevine design. The project is beginner-friendly, with simple crochet techniques that are easy to follow.
I hope you enjoy crocheting and gifting these cute little pouches!

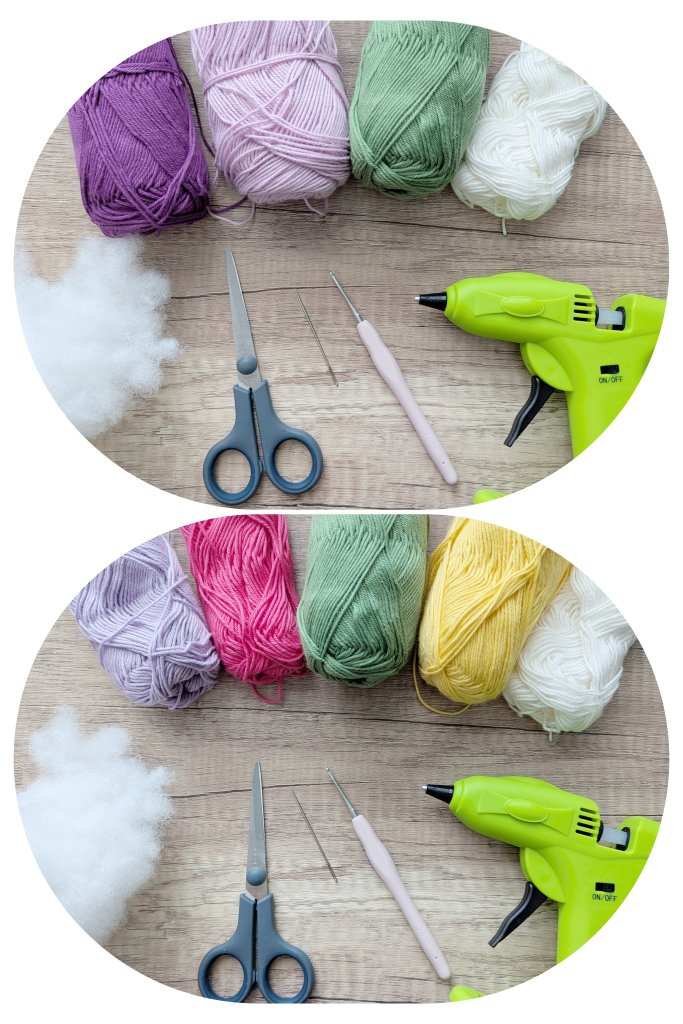
Material List
- Hobbii Friends Cotton 8/4 yarn (100% cotton, gauge: 21 sts × 26 rows = 4 x 4 inches / 10 x 10 cm)
- Yarn amount needed: less than 55 yards (50 m)
- 2.0 mm crochet hook
- Scissors
- Yarn needle
- Fiberfill
- A small piece of cardboard (approx. 3.1 x 3.1 inches / 8 x 8 cm)
- Hot glue gun or craft glue
Size
9 x 9.5 cm (3.5 x 3.7 inches)
Pattern Notes & Abbreviations (US Terms)
sc = single crochet | hdc = half double crochet | dc = double crochet | sl st = slip stitch |
ch = chain | st(s) = stitch(es) | R = row(s) | Rd = round(s) | rep = repeat |
FLO = front loop only | BLO = back loop only
1 dc x k … work 1 double crochet into each of the next k stitches.
1 dc-FLO x k … work 1 double crochet into the front loop only of each of the next k stitches.
1 dc-BLO x k … work 1 double crochet into the back loop only of each of the next k stitches.
2 dc x k … work 2 double crochets into each of the next k stitches (increase k times).
dc2tog … double crochet 2 stitches together.
dc2tog x k … work the next k pairs of stitches together using dc2tog (decrease k times).
Crochet Pattern
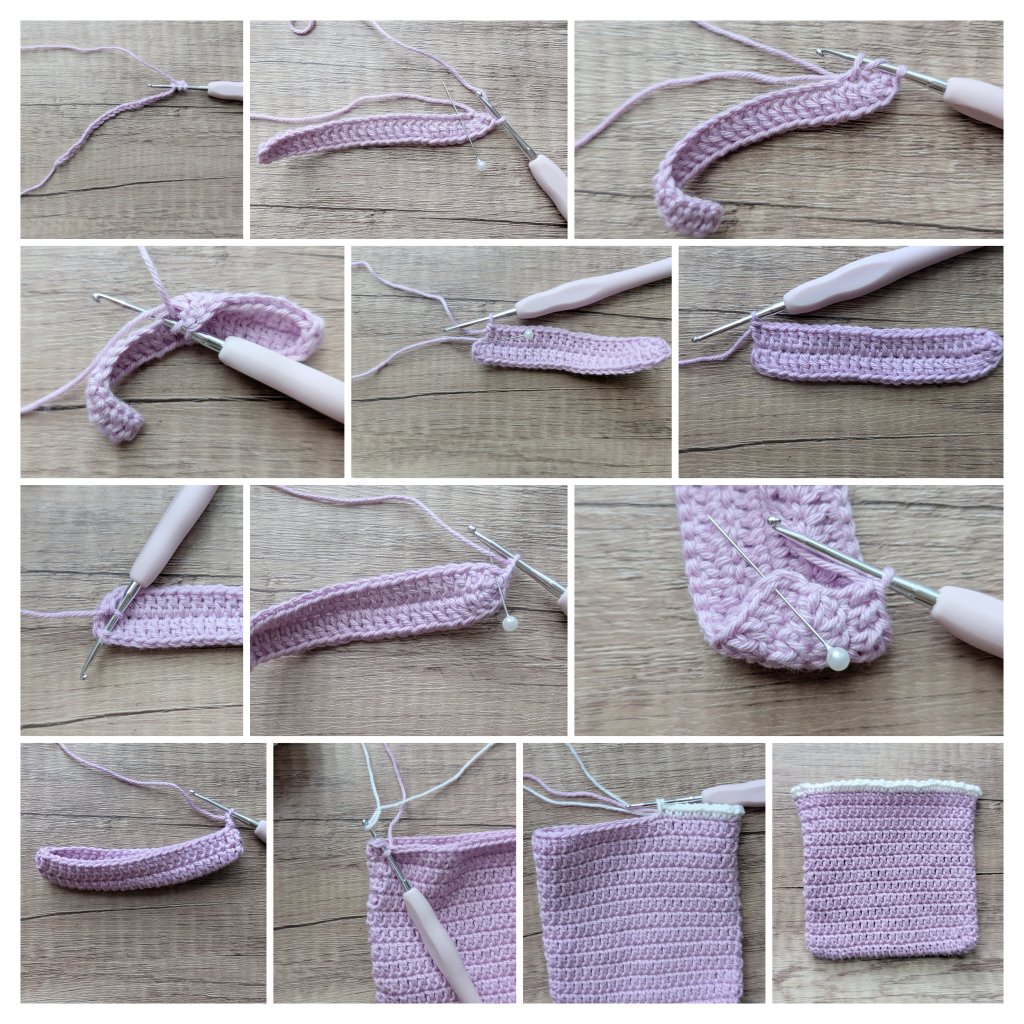
Crochet the Base Pouch
First, crochet the plain pouch without the front decoration. The pouch is worked in joined rounds.
Ch 23 + 2 turning chains.
1. Rd: starting in the 3rd ch from hook, work 1 dc in each of the next 22 chains (crochet into the front bumps/front loops of the foundation chain), 2 dc in the last chain, continue working along the opposite side of the foundation chain. Crochet over the beginning yarn tail to avoid weaving it in later: 1 dc in each of the next 21 stitches, 2 dc in the last stitch. Join with a sl st to the 1st dc of the round (48)
2. – 13. Rd: ch 2, work 1 dc into the same stitch as the sl st, 1 dc in each of the next 47 sts, join with a sl st to the 1st dc (48) (repeat for a total of 12 rounds)
Top Edging:
During the final join of the last round, change to white yarn.
Ch 1, work 1 sc into the same stitch, (ch 1, 1 sc in next st) repeat around. As you crochet, work over the yarn tails again to secure them neatly inside the stitches.
Fasten off and weave in the remaining end.
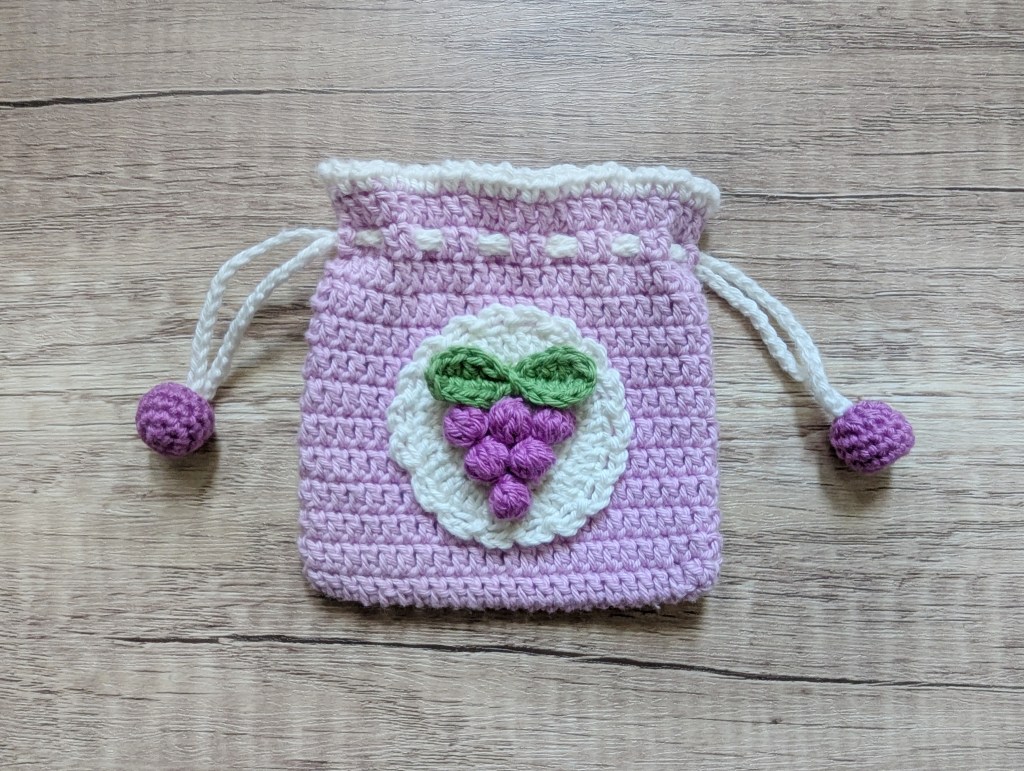
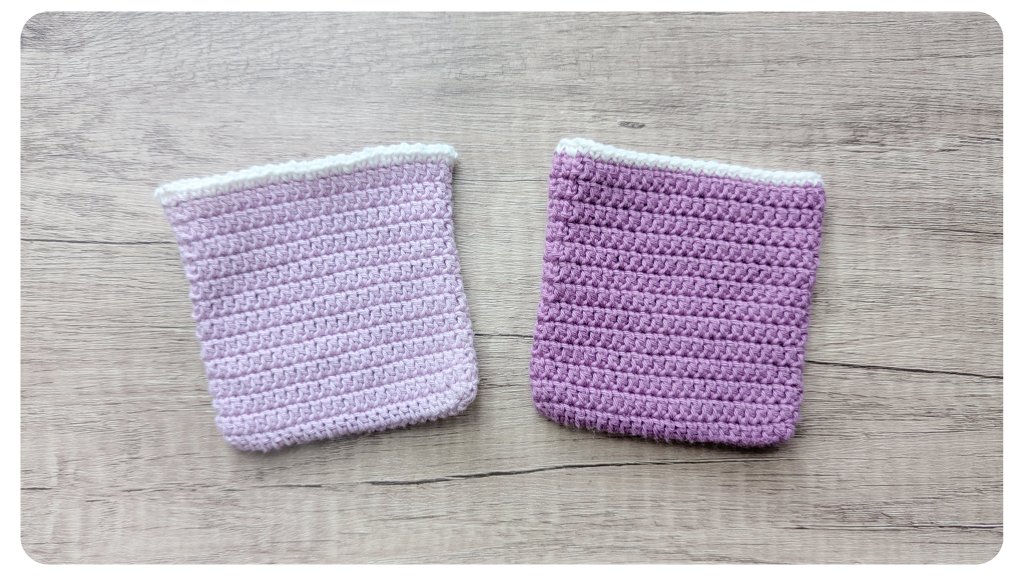
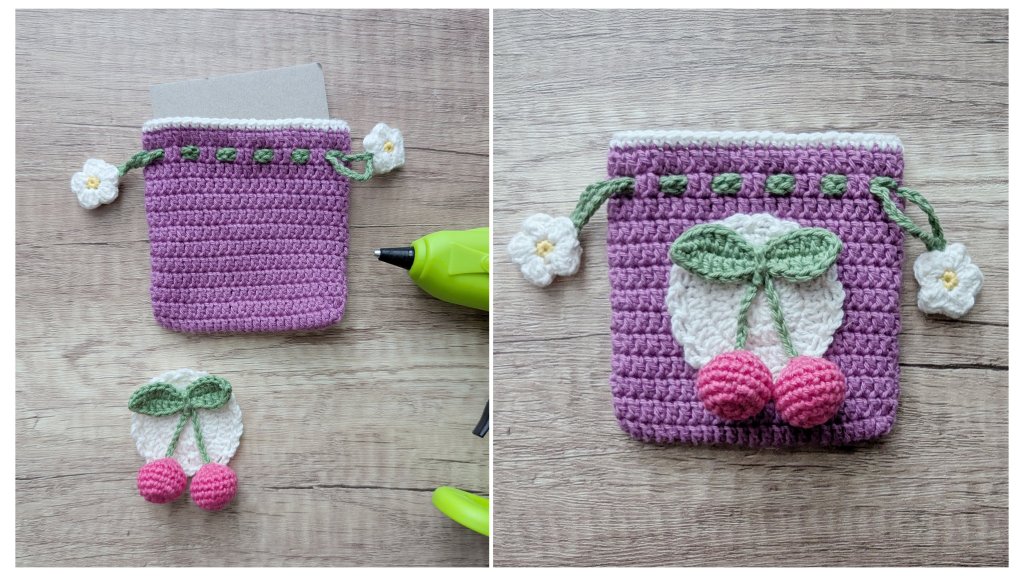
- Alternatively, you can crochet the top edging using only single crochet stitches instead of the (1 sc, ch 1) pattern.
This creates a cleaner and slightly sturdier finish — see the pouch on the right in the image below.
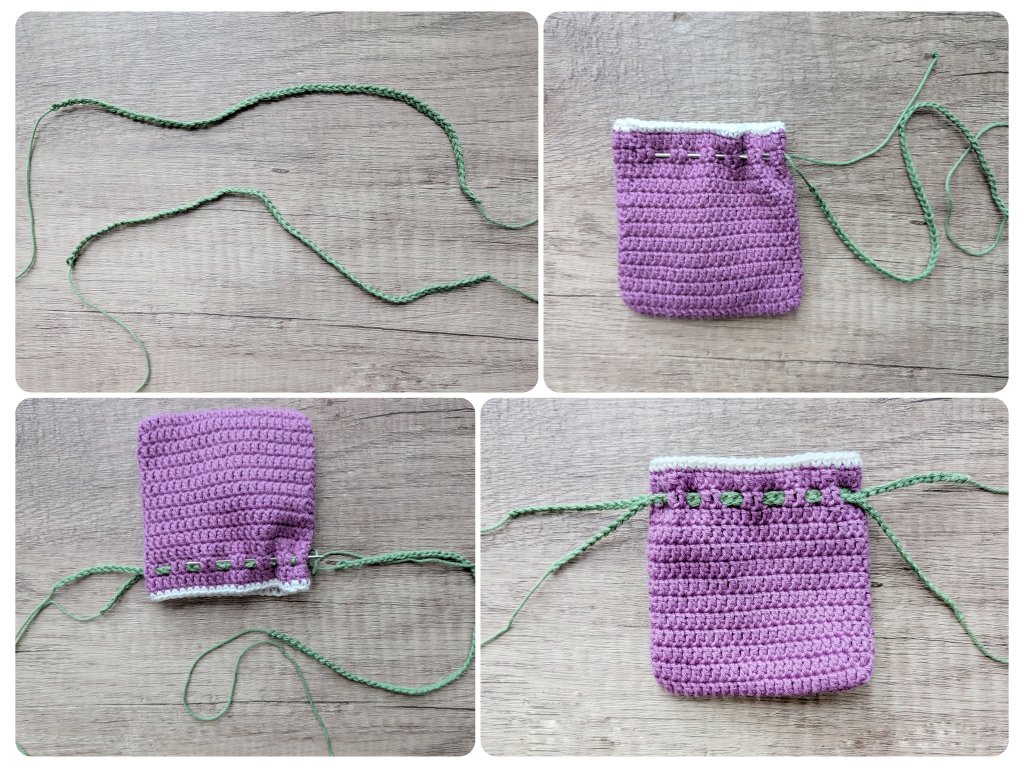
Drawstring
Ch 70.
Using a yarn needle, weave one end of the chain through the third-to-last dc round of the pouch (skipping 2 stitches each time). Continue all the way around until you reach the starting point again, then leave both yarn ends hanging evenly.
Make a second chain of 70 ch and thread it through the opposite side of the pouch in the same way.
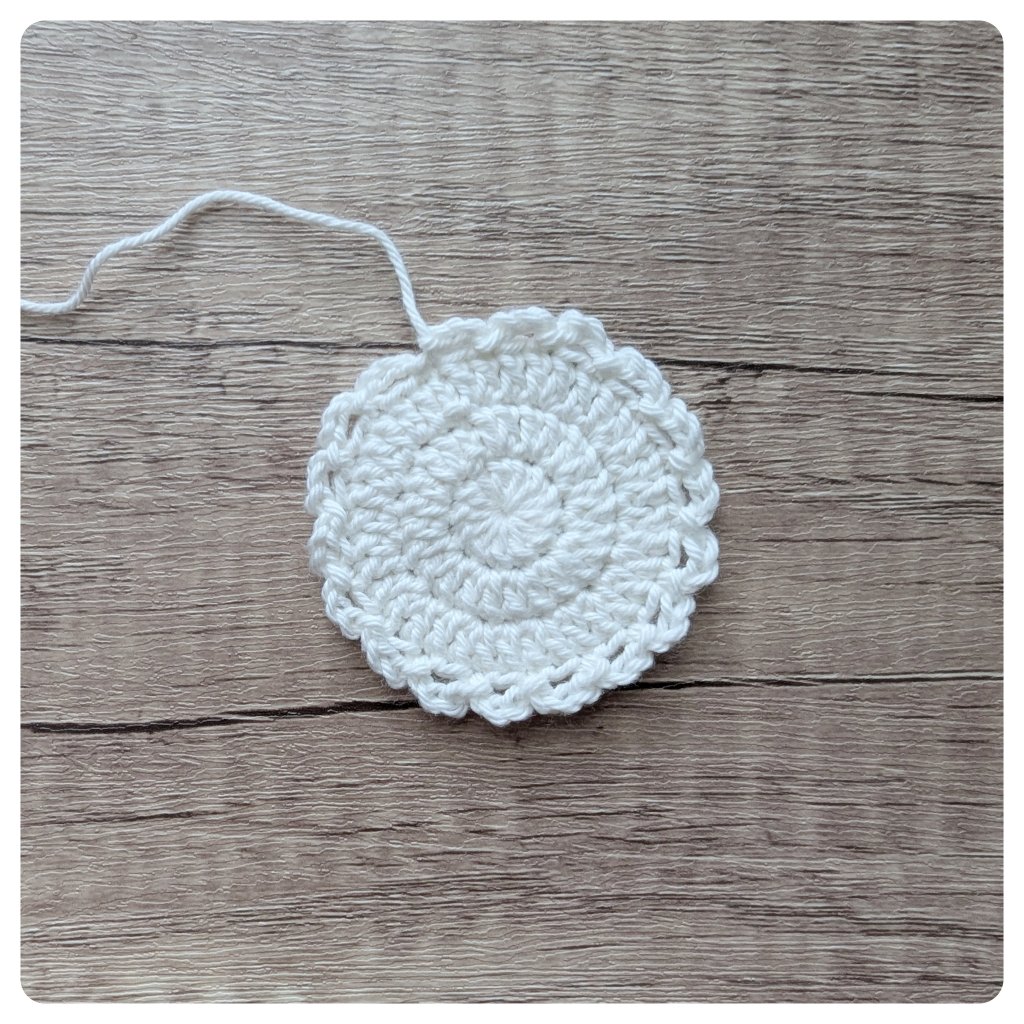
Circle Appliqué
The white background circle is worked in joined rounds.
1. Rd: ch 2, work 12 dc into a magic ring, join with a sl st to the first dc (12)
2. Rd: ch 2, work 2 dc into the same stitch as the sl st, 2 dc in each remaining stitch around, join with a sl st to the first dc (24)
3. Rd: ch 2, work 1 dc into the same stitch, 2 dc in next stitch, repeat (1 dc in next st, 2 dc in next st) around, join with a sl st to the first dc (36)
4. Rd: (ch 3, skip next stitch, sl st in following stitch) repeat until Rd-end
Fasten off and weave in the yarn end.
The fruit appliqués are crocheted next.
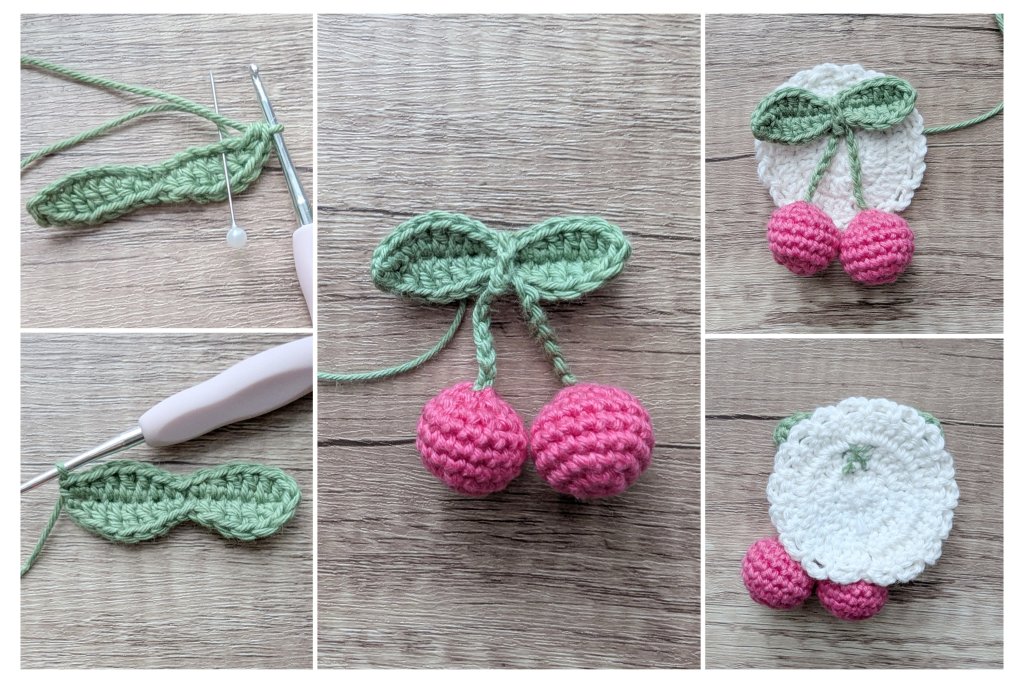
Appliqué 1 – Cherry
Each cherry appliqué consists of two cherries and a pair of leaves.
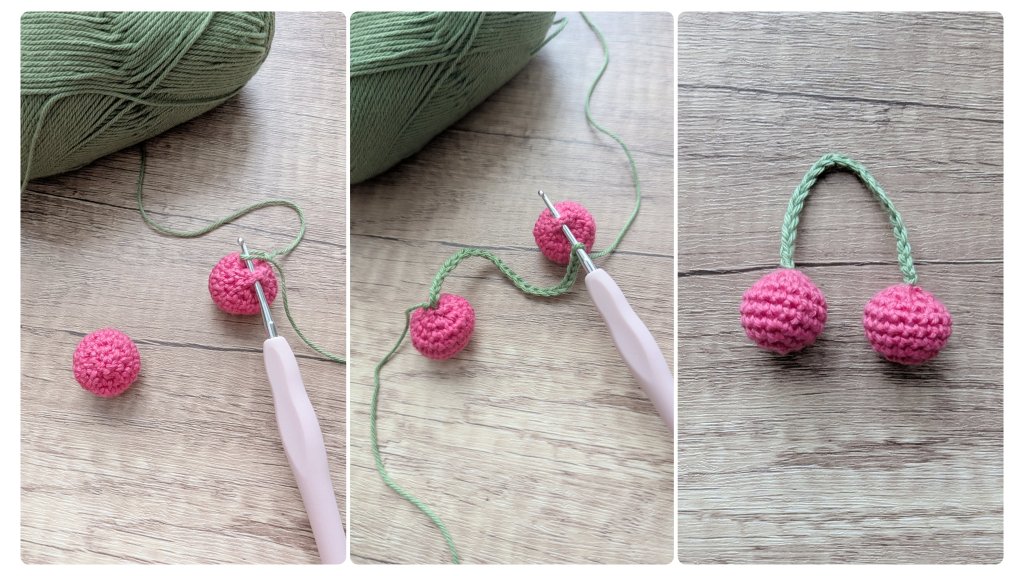
Cherry
The cherries are worked in continuous rounds.
1. Rd: 6 sc into a magic ring (6)
2. Rd: 2 sc in each stitch around (12)
3. Rd: (1 sc, 2 sc in next st) around (18)
4. – 6. Rd: 1 sc in each stitch around (18 sts for 3 rounds)
7. Rd: (1 sc, sc2tog) around (12)
Stuff the cherry lightly with fiberfill.
8. Rd: sc2tog around (6)
Fasten off.
To close the opening, thread the yarn end onto a yarn needle and weave it through the front loops of the remaining stitches. Pull tightly to close the hole securely.
Make a second cherry the same way.

Connect the two cherries with a chain cord:
Ch 22.
Thread each end of the chain through the last round on one cherry and tie a secure knot inside. Trim the yarn ends short and tuck them neatly into the cherries so they are hidden.
Leaf Pair
Ch 14 + 1 turning chain.
1. Rd: 1 sc, 1 hdc in next st, 1 dc in next 3 sts, 1 hdc in next st, 1 sc, 1 sl st, 1 sc, 1 hdc, 1 dc in next 3 sts, 3 hdc in last ch, continue on the other side of the chain: 1 dc in next 3 sts, 1 hdc, 1 sc, 1 sl st, 1 sc, 1 hdc, 1 dc in next 3 sts, 1 hdc, (1 hdc, 1 sc) in last st (30)
Weave in all ends.
Now knot the cherries onto the center of the leaf pair using their connecting chain and sew the appliqué onto the white circle.
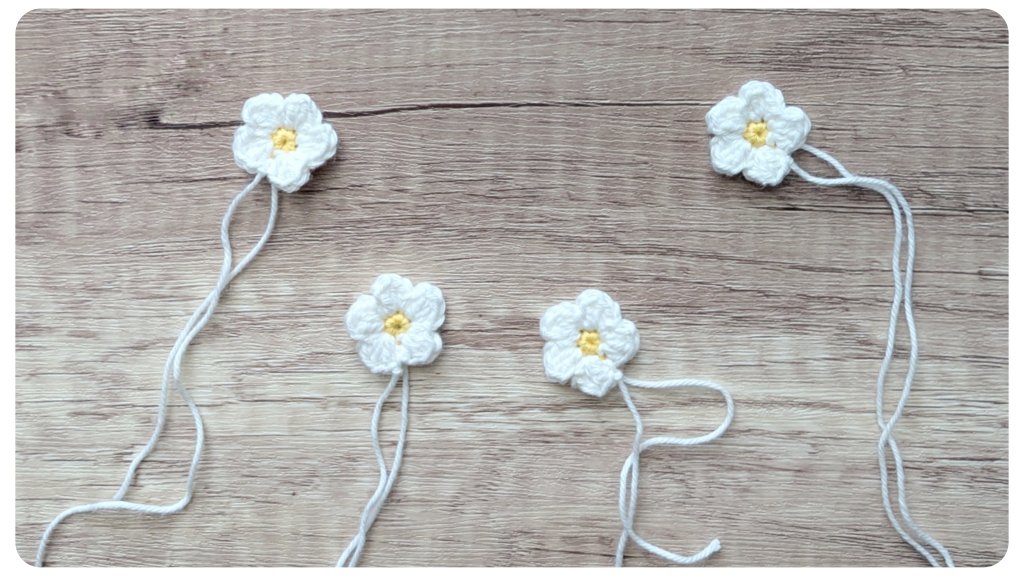
Flowers for Drawstring (make 4)
Start with yellow yarn.
1. Rd: 5 sc in a magic ring, sl st to the first sc, changing to white while completing the slip stitch (5)
2. Rd: (ch 1, 1 hdc, 2 dc, 1 hdc) in the same stitch as the sl st, sl st in next stitch repeat until the end of the round. Join with a sl st to the first sc.
Tie off the yellow yarn ends and trim them short. Leave the white yarn tails, as they will be used later to sew the flowers together.
Repeat 3 more times to make a total of 4 flowers.
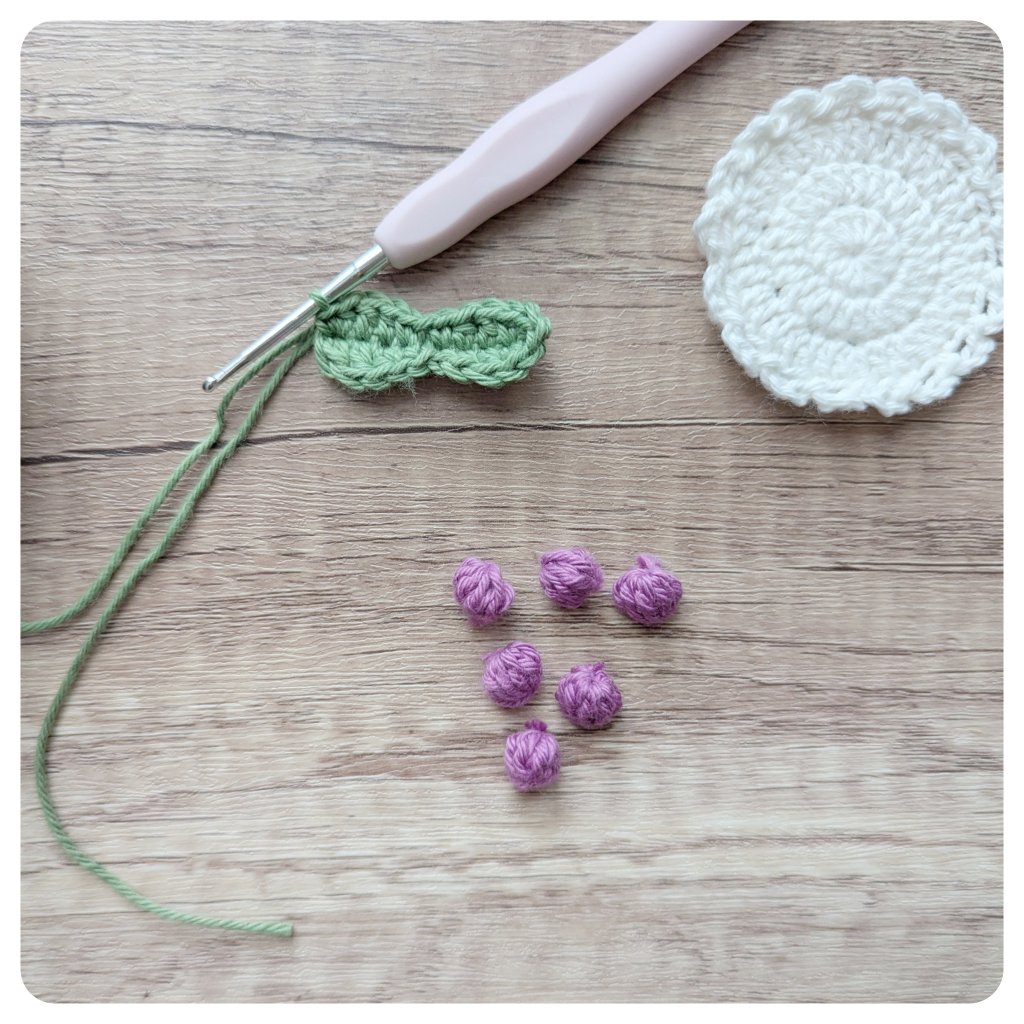
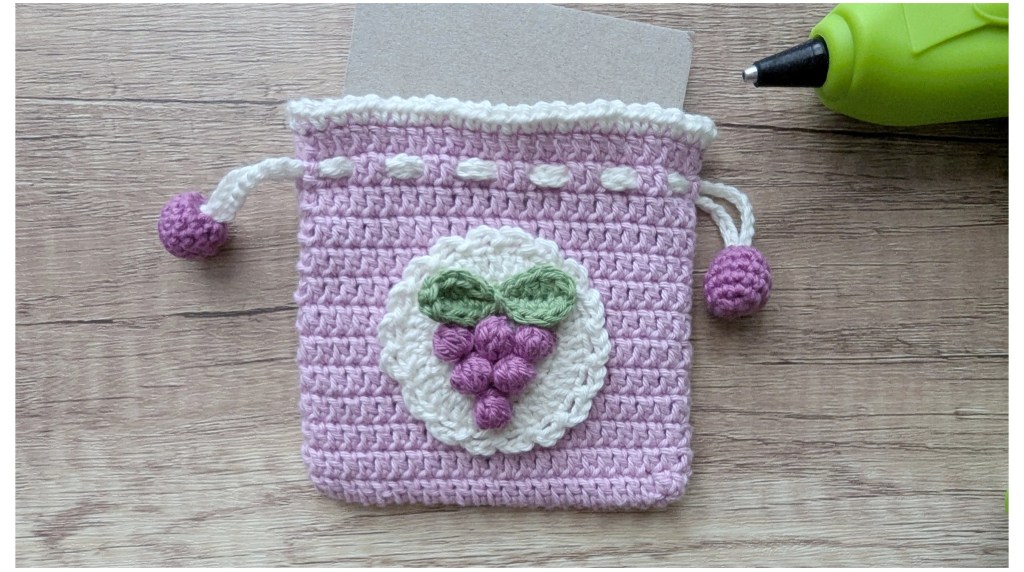
Appliqué 2 – Grapevine
The grape version consists of 6 separately crocheted bobble-style grapes and a leaf pair.
Grape (make 6)
Ch 3.
Work 1 bobble stitch into the 3rd ch from hook, ch 2, sl st into the same chain as the bobble stitch.
Tie the yarn ends together and trim them short.
Repeat 5 more times to make a total of 6 grapes.

Leaf Pair
Ch 10 + 1 turning chain.
1. Rd: 1 hdc in first ch, 1 dc in next ch st, 1 hdc in next st, 1 sc, 1 sl st, 1 sc, 1 hdc, 1 dc, 1 hdc, 3 sc in last ch, continue on the other side of the chain: 1 hdc, 1 dc, 1 hdc, 1 sc, 1 sl st, 1 sc, 1 hdc, 1 dc, (1 hdc, 1 sc) in last st (22)
Weave in the yarn ends.
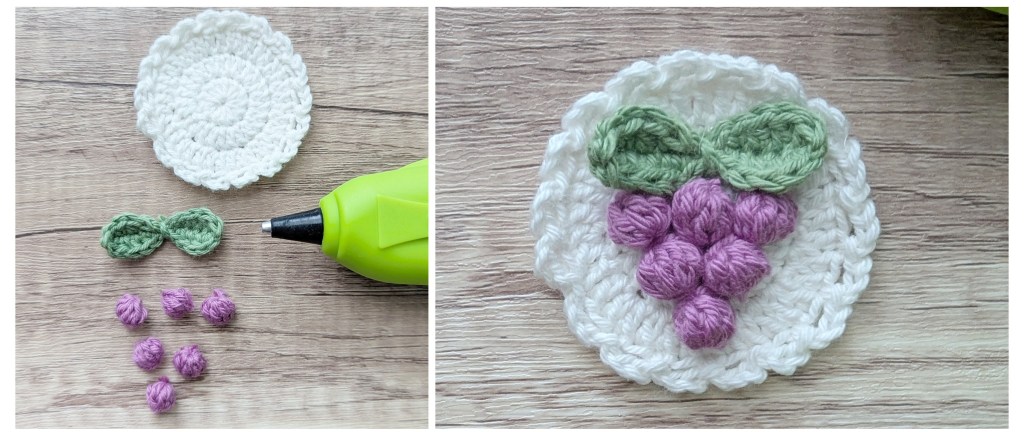
Using a new green yarn, wrap it several times around the center of the leaves. Tie the ends at the back and trim them short.
Now glue the 6 grapes and the leaf pair onto the white circle using hot glue.
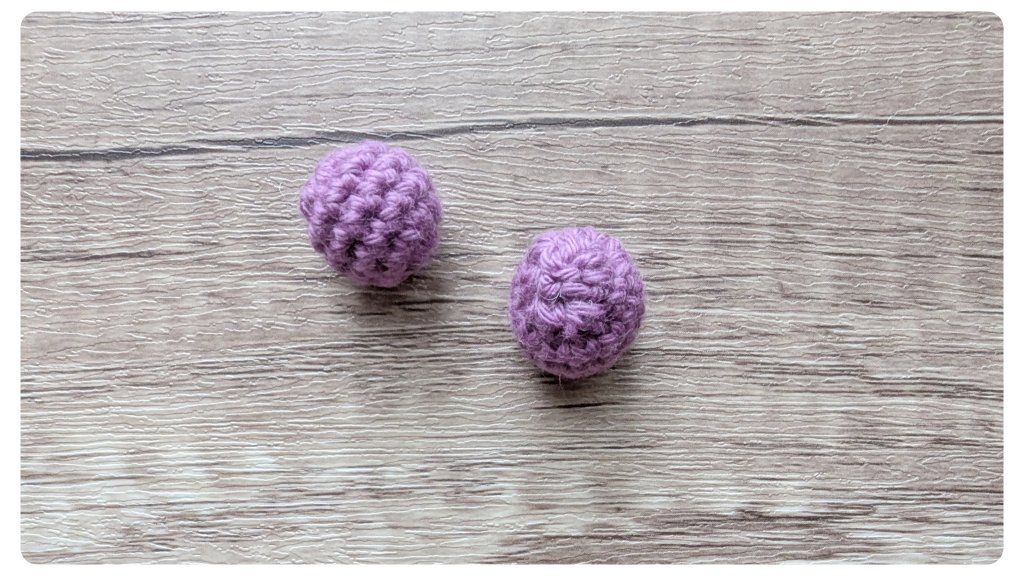
Small Grape for Drawstring (make 2)
1. Rd: 6 sc in a magic ring (6)
2. Rd: 2 sc in each stitch around (12)
3. – 5. Rd: 1 sc in each stitch around (3 rounds total) (12)
Fill the grape lightly with fiberfill.
6. Rd: sc2tog around (6)
Close the opening by threading the yarn end through the front loops of the remaining stitches using a yarn needle, then pull tightly to close.
Repeat once more to make a second grape.
Attaching Appliques
Now attach the appliqués to the ends on both sides of the drawstrings.
- In the grapevine version, the ends of the cord are pulled through a small grape on both sides and securely knotted.

- In the cherry version, the cord ends are glued inside between two flowers using hot glue. Afterwards, the flowers are sewn together using the yarn tails.

Finally, glue the appliqué onto the front of the pouch using hot glue. To prevent the glue from sticking to the inside of the pouch, first place a piece of cardboard inside before attaching the appliqué.

Your gift pouches are now finished!
I hope you love the result and had fun crocheting them!