Fall is crochet season 🍂
As the leaves slowly begin to change color, the air turns crisp, and the evenings start drawing in earlier, my favorite time of year begins: fall.
I love these weeks when the air outside finally feels fresh and refreshing again, while everything indoors becomes all the cozier. The warm socks come back out of the closet, the kids get tired a little earlier in the evenings, and suddenly there is a little more time for quiet evenings together – and, of course, for crocheting.
Fall is the season when I especially love reaching for my crochet hook. With the days getting shorter, I don’t mind taking on a slightly bigger project that keeps me company through several cozy evenings. And what could be more perfect for this time of year than a crochet jacket for fall?
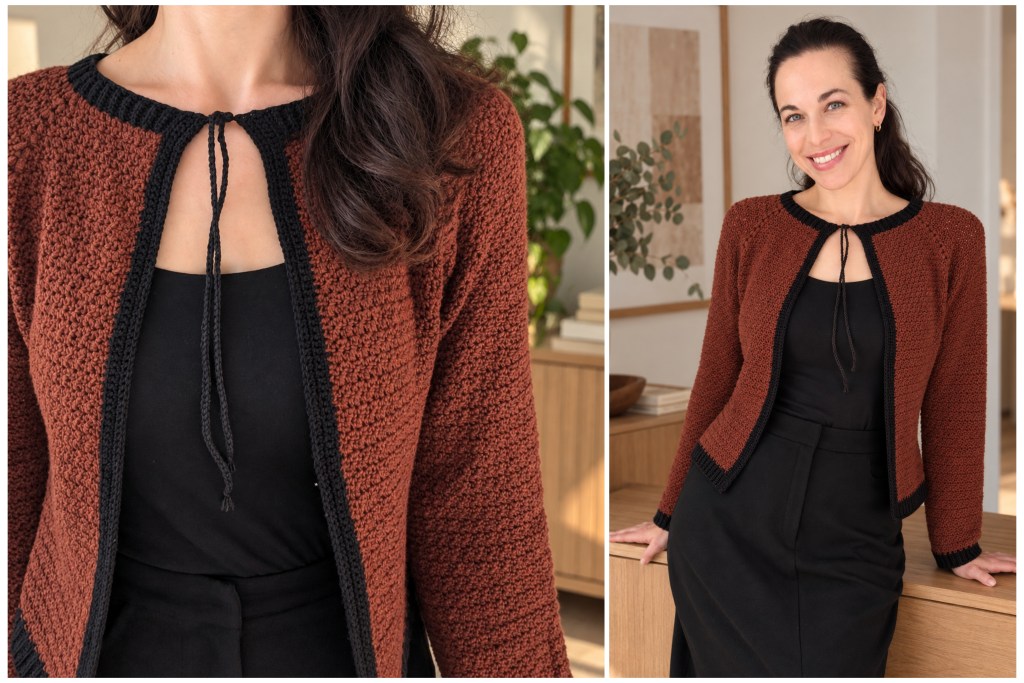
For this design, I chose a simple, classic shape that gets its distinctive character from the contrasting edging.
The distinct stitch pattern comes from the Lemon Peel Stitch.
Depending on the yarn and hook size you use, it can become either a slightly firmer, more structured crochet jacket or a softer, more relaxed crochet cardigan with a beautiful drape.
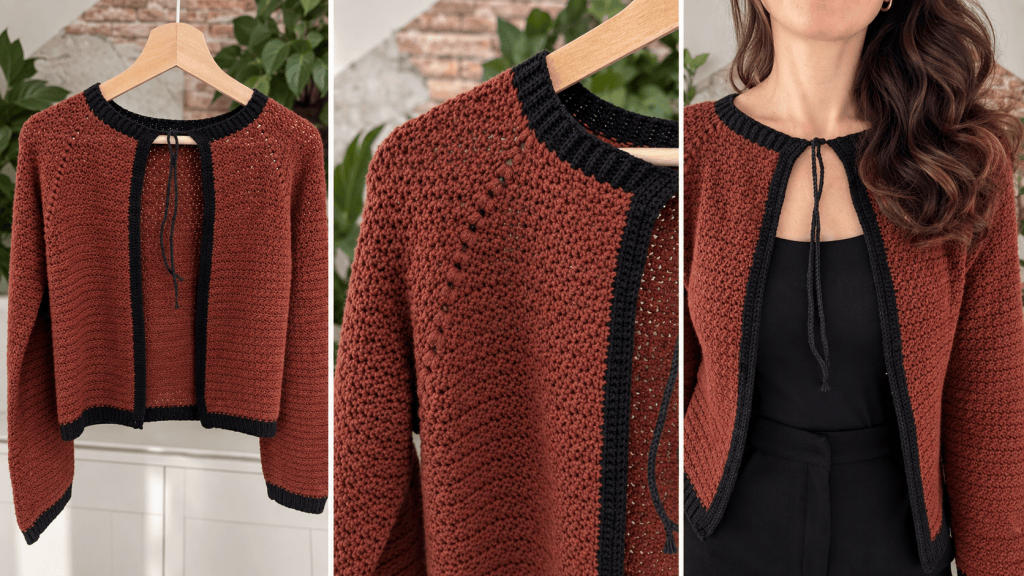
The elegant crochet cardigan falls to the hips and is fastened only with a tie cord at the neckline. The narrow front panels give it a light, feminine silhouette.

In this free crochet pattern, I’ll show you step by step how to crochet your own jacket or cardigan – a project for many relaxing fall evenings and a piece that will hopefully accompany you through many fall seasons to come.
Features of the Crochet Jacket:
- Open-front design;
- the front edging can also be extended to add a button closure
- Subtle U-shaped neckline
- Slim, long sleeves
- Easily customizable in length
- The overall style can easily be changed by choosing a different contrast color for the edging: black for classic elegance, taupe for understated luxury, or berry for a more feminine touch

You’ll find the free crochet pattern further down in this post. I hope you have lots of fun making your own!
Materials
- Super Fine / Fingering weight yarn (Category 1) in Chocolate, e.g. Friends Cotton 8/4 by Hobbii (100% cotton)
- Yardage needed: approx. 1,100 m / 1,203 yds (size S), equivalent to 7 skeins
- 2.5 mm crochet hook (for a firmer, more structured jacket. Use a larger hook for a softer cardigan with more drape)
- Scissors
- Yarn needle for weaving in the ends
Size
Size: S (M/L). Instructions for the larger sizes are given in parentheses.
Abbreviations
st(s) = stitch(es)sl st = slip stitchch = chainsc = single crochetdc = double crochetPS = puff stitchsc2tog = crochet 2 sts in a single crochet together (reduces stitch count by 1)FLO = front loop onlyBLO = back loop onlyRd = roundR = rowprev row = previous row
Crochet Stitch Pattern
The jacket is worked in Lemon Peel Stitch, alternating between 1 sc and 1 dc. In each following row, work 1 sc into each dc and 1 dc into each sc of the previous row.
This alternating stitch pattern creates a dense fabric with a subtle texture.
Stitches Used
- Chain stitches (ch)
- Slip stitches (sl st)
- Single crochet (sc)
- Double crochet (dc): Yarn over, insert the hook into the next st and pull up a loop, (yarn over, pull through 2 loops) twice.
- Yarn over slip stitch (yo sl st): Yarn over, insert the hook into the next st, yarn over and pull through the st and all loops on the hook at once.
- Puff stitch with 3 yarn overs: Yarn over, insert the hook into the next st and pull up a loop, pulling the loop higher than you would for a regular sc. (Yarn over, insert the hook into the same st, pull up a loop and elongate the loop) repeat 2 more times.
Instructions
- The jacket is worked in one piece from the top down.
- The sleeves are worked directly from the armholes. A contrasting cuff is added at the end of each sleeve.
- The edges of the jacket are then finished with one round of sc in the same contrasting color.
- Finally, a tie cord is crocheted onto the neckline to close the cardigan.

Neck Opening
Ch 108 (114/122) (multiple of 2).
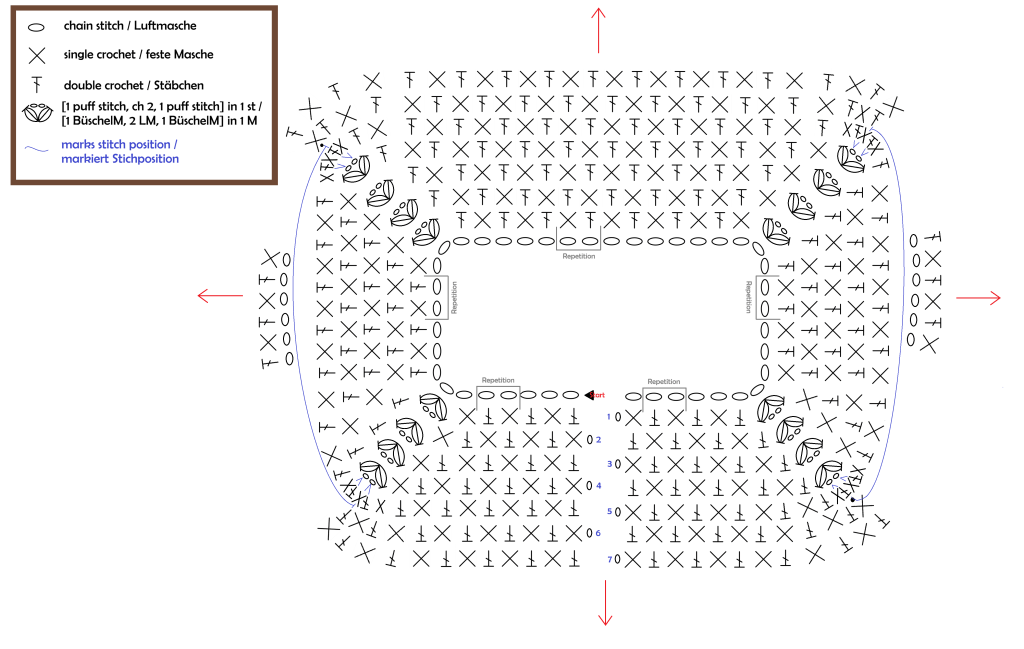
The foundation chain is now divided into five sections: half of the first front panel, sleeve, back, sleeve, and half of the second front panel. The transitions between the individual sections are formed by working [1 puff stitch (= PS), ch 2, 1 PS] into the same st. These form the corners.
Row 1: Ch 1, (1 sc, 1 dc) x 8 (8/9), [1 PS, ch 2, 1 PS] in the next st, (1 sc, 1 dc) x 10 (11/11), [1 PS, ch 2, 1 PS] in the next st, (1 sc, 1 dc) x 16 (17/19), [1 PS, ch 2, 1 PS] in the next st, (1 sc, 1 dc) x 10 (11/11), [1 PS, ch 2, 1 PS] in the next st, (1 sc, 1 dc) x 8 (8/9), turn.
Row 2: Ch 1, (1 sc, 1 dc) x 8 (8/9), 1 sc in the 1st PS, [1 PS, ch 2, 1 PS] in the ch-2 space, 1 dc in the 2nd PS, (1 sc, 1 dc) x 10 (11/11), 1 sc in the 1st PS, [1 PS, ch 2, 1 PS] in the ch-2 space, 1 dc in the 2nd PS, (1 sc, 1 dc) x 16 (17/19), 1 sc in the 1st PS, [1 PS, ch 2, 1 PS] in the ch-2 space, 1 dc in the 2nd PS, (1 sc, 1 dc) x 10 (11/11), 1 sc in the 1st PS, [1 PS, ch 2, 1 PS] in the ch-2 space, 1 dc in the 2nd PS, (1 sc, 1 dc) x 8 (8/9), turn.
Repeat the following pattern until you reach the desired length. Make sure to alternate between working 1 sc into each dc and 1 dc into each sc of the previous row. Work [1 PS, ch 2, 1 PS] into each ch-2 space at the corners. For better readability, the corners are highlighted in a different color in the written instructions.
Row 3: Ch 1, (1 sc, 1 dc) until you reach the PS including the PS, [1 PS, ch 2, 1 PS] in the ch-2 space, (1 sc, 1 dc) until you reach the PS including the PS, [1 PS, ch 2, 1 PS] in the ch-2 space, (1 sc, 1 dc) until you reach the PS, including the PS, [1 PS, ch 2, 1 PS] in the ch-2 space, (1 sc, 1 dc) until you reach the PS, including the PS, [1 PS, ch 2, 1 PS] in the ch-2 space, (1 sc, 1 dc) to the end of the row, turn.
Row 4: Ch 1, (1 sc, 1 dc) until you reach the PS, 1 sc in the 1st PS, [1 PS, ch 2, 1 PS] in the ch-2 space, 1 dc in the 2nd PS, (1 sc, 1 dc) until you reach the PS, 1 sc in the 1st PS, [1 PS, ch 2, 1 PS] in the ch-2 space, 1 dc in the 2nd PS, (1 sc, 1 dc) until you reach the PS, 1 sc in the 1st PS, [1 PS, ch 2, 1 PS] in the ch-2 space, 1 dc in the 2nd PS, (1 sc, 1 dc) until you reach the PS, 1 sc in the 1st PS, [1 PS, ch 2, 1 PS] in the ch-2 space, 1 dc in the 2nd PS, (1 sc, 1 dc) to the end of the row, turn.
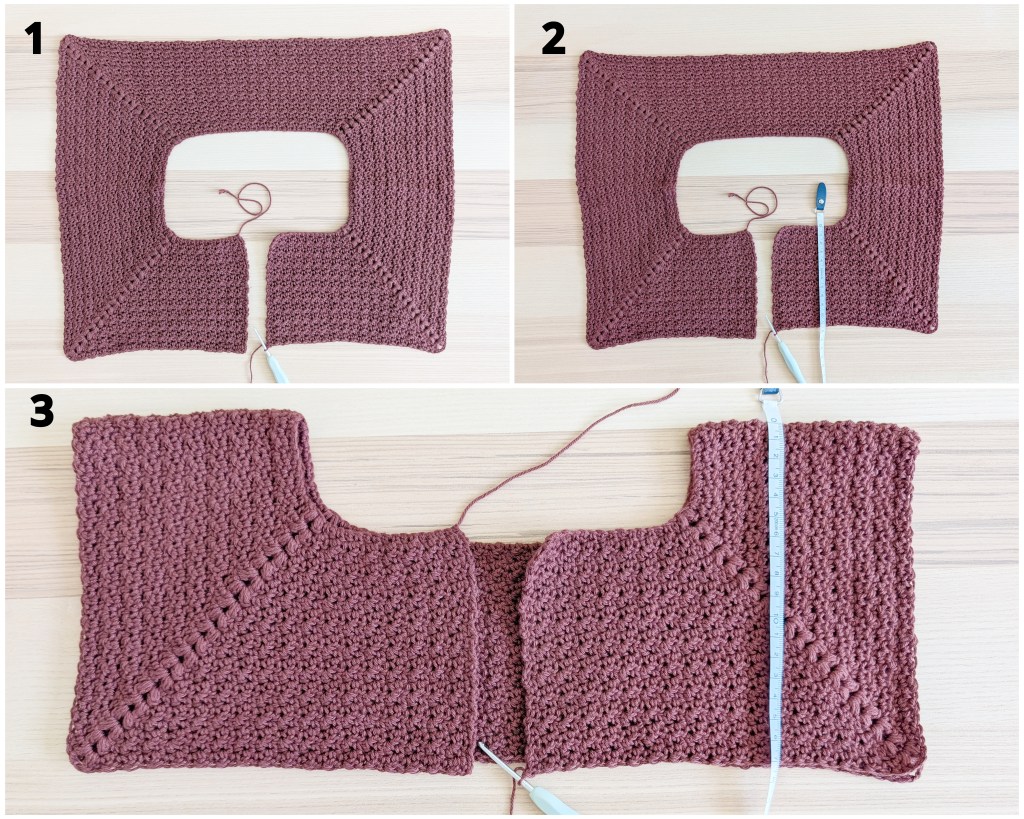
Repeat Rows 3 and 4 until you have worked a total of 18 (20/22) rows, or until the armhole depth measures approx. 16 (17/18) cm / 6.3 (6.7/7.1)”. (Image 3)
This corresponds to a width of approx. 10 (11.5/13) cm / 3.9 (4.5/5.1)” from the first to the last row (Image 2).
Work the final row in the same way as Row 4. After completing the final row, you should have 268 (274/282) sts.
Row 21 (23/25): Ch 1, alternate 1 sc and 1 dc until you reach the PS, including the PS. Then work [1 sc, 1 dc] into each ch of the ch-2 space (working a total of 4 sts into the 2 chs) (Image 4). Continue in this manner to the end of the row (Image 6).

Armholes
The armholes are created in the next row by joining the first two and last two PS corners with ch 6.
Row 22 (24/26): Ch 1, alternate 1 sc and 1 dc until you reach the 2nd st worked into the 1st ch of the corner. Work 1 dc in this 2nd st, then ch 6. Work 1 sl st into the 1st st worked into the 2nd ch of the next corner, then work 1 sc into the same st (Images 7–10).
Continue alternating 1 sc and 1 dc until you reach the next corner. Join the next two corners in the same way with ch 6, making sure to maintain the stitch pattern: work 1 dc into the 2nd st worked into the 1st ch of the next corner, ch 6, then work (1 sl st, 1 sc) into the 1st st worked into the 2nd ch of the last corner.
Continue alternating 1 sc and 1 dc to the end of the row (Image 11). Turn.
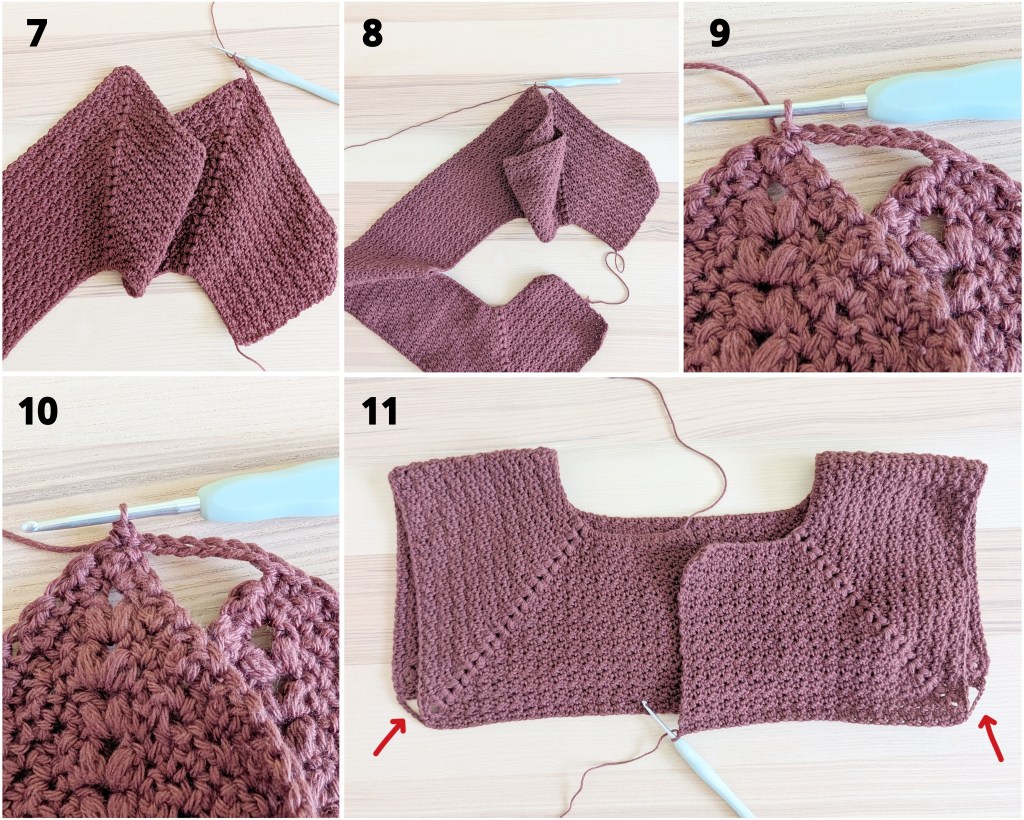
Row 23 (25/27): Ch 1, alternate 1 sc and 1 dc in each st and ch, skipping the sl st (Images 12–13).
The armholes are now complete. Continue working the body (Images 15–16).
For the body, continue in the established pattern, working 1 sc into each dc and 1 dc into each sc to the end of the row. Turn and begin each new row with ch 1.
Continue working the body to your desired length (in my case, approx. 3 cm / 1.2″ above the belly button). Keep in mind that an edging will be added later, which will make the cardigan slightly longer.
Fasten off and weave in the end.

Sleeves (2x)
Begin each sleeve in the center of the ch-space at the bottom of the armhole, directly underneath the arm.
Important: Work in the opposite direction to the last round of the armhole. This helps keep the transition from the body to the sleeve invisible.
The sleeves are worked in joined, turned rounds in Lemon Peel Stitch. Continue the established stitch pattern of the body: work 1 sc into each dc and 1 dc into each sc.
Begin each round with 1 sc and end with 1 dc. Join with 1 sl st in the first sc (= joining sl st), turn, and continue working back in pattern.
Repeat until the sleeve reaches the wrist. On the final joining sl st, change to black and continue directly with the sleeve cuff.
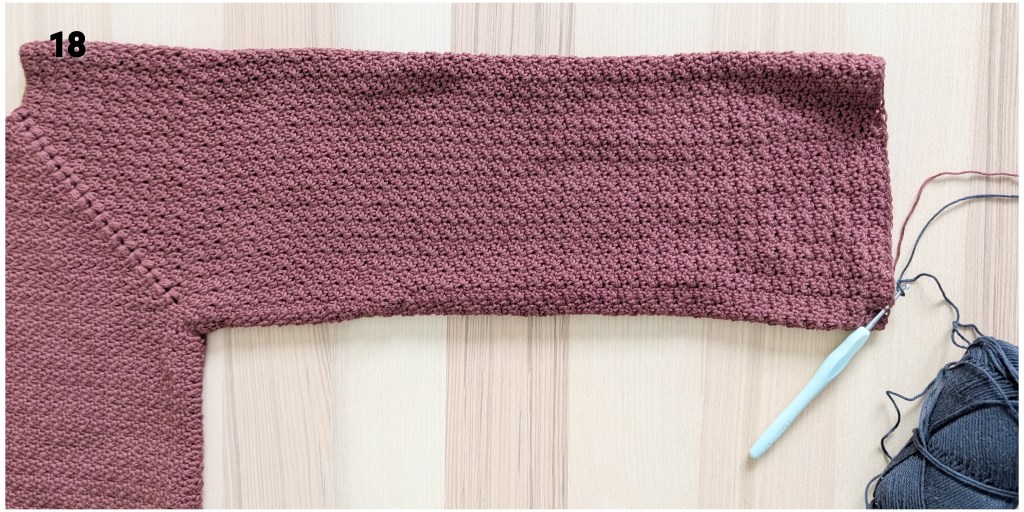
Sleeve Cuff
Ch 8 + 1 turning ch. This creates a sleeve cuff that is approx. 3 cm / 1.2″ wide.
Row 1: Work 1 sl st in each of the next 8 ch (work loosely), then sl st the next 2 sts of the sleeve edge together, starting with the base st of the foundation ch, turn without a turning ch.
Row 2: Skip the decrease st, 1 yo sl st in the BLO of each of the next 7 sts, 1 yo sl st in the last st, ch 1 and turn. (8)
Row 3: 1 sl st in the BLO of each of the next 8 sts, sl st the next 2 sts of the sleeve edge together, turn without a turning ch. (8)
Repeat Rows 2 and 3 until you reach the last st of the sleeve edge. Finish the cuff with Row 2 so that the working yarn is positioned at the outer corner.
Bring the first and last rows of the cuff together. Ch 1 and join both rows with sl sts, inserting your hook through the corresponding sts of both rows. Join 1 additional st below the cuff to close any gap at the base of the first row.

Edging
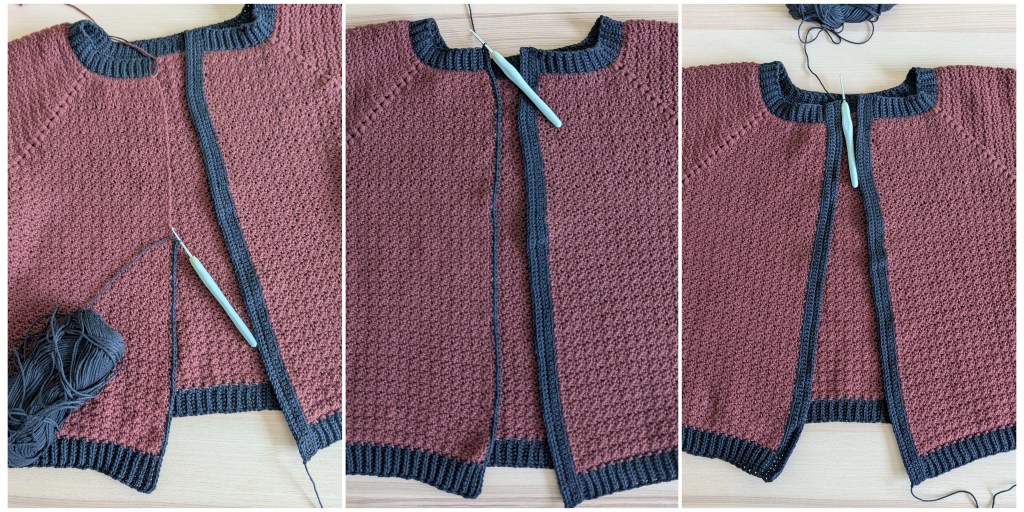
The edges of the cardigan are worked with black yarn.
Begin at the bottom of the body and work the hem along the entire lower edge.
Next, crochet around the neckline.
Finally, work along the two front edges of the cardigan separately – first one side, then the other.
1. Hem
First, work the bottom hem of the body. It is worked in rows of sl st BLO and yo sl st BLO, just like the sleeve cuffs.
With black yarn, join in the bottommost st on the left side of the body.
Ch 7 + 1 turning ch.
Row 1: Work 1 sl st in each of the next 7 ch (work loosely), then sl st the next 2 sts of the body edge together, starting in the same base st where the foundation ch was joined. Turn without a turning ch.
Row 2: Skip the decrease st, 1 yo sl st in the BLO of each of the next 6 sts, 1 yo sl st in the last st, ch 1 and turn. (7)
Row 3: 1 sl st in the BLO of each of the next 7 sts, sl st the next 2 sts of the body edge together, turn without a turning ch. (7)
Repeat Rows 2 and 3 until you reach the last st of the body. Finish the hem with Row 2 so that the working yarn is positioned at the outer corner.
Secure the working loop, but do not fasten off, as we will continue from here later.
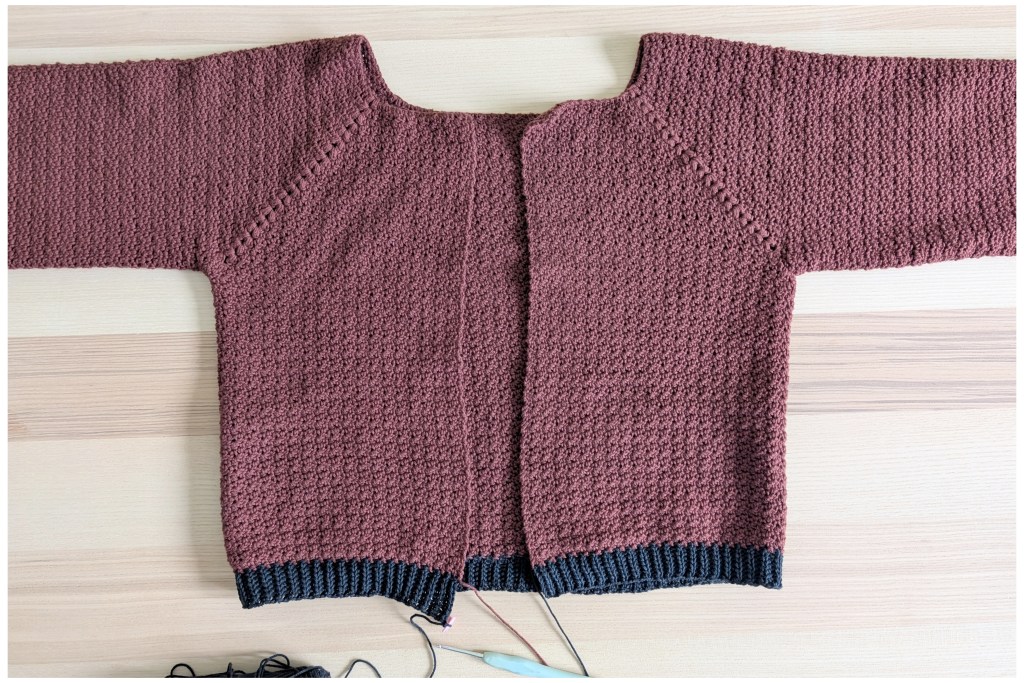
2. Neckline
With a new strand of black yarn, join in the outermost right corner st of the neckline. Work along the entire neckline in the same way as for the bottom hem, continuing to the outermost left corner st. Finish at the topmost st of the left front edge.
Ch 6 + 1 turning ch.
Row 1: Work 1 sl st in each of the next 6 ch (work loosely), then sl st the next 2 sts of the neckline edge together, starting in the same base st where the foundation ch was joined. Turn without a turning ch.
Row 2: Skip the decrease st, 1 yo sl st in the BLO of each of the next 5 sts, 1 yo sl st in the last st, ch 1 and turn. (6)
Row 3: 1 sl st in the BLO of each of the next 6 sts, sl st the next 2 sts of the neckline edge together. Turn without a turning ch. (6)
Repeat Rows 2 and 3 until you reach the last st of the neckline. Finish with Row 2 so that the working yarn is positioned at the outer corner again.
Secure the working loop, but do not fasten off, as we will continue from here later.

3. Edging the Left Front
Continue with the working yarn from the neckline edging (Section 2). Ch 1 and work in rows along the front edge, from the top down toward the hem:
Row 1: Work 1 sc in the BLO of each of the 6 neckline edging sts, then work 1 sc in each turning st and edge st down to the hem. Insert your hook through the outer loops only, rather than through the entire edge st, to make the transition less noticeable. Then work 1 sc in the BLO of each hem st. Ch 1 and turn.
Row 2: Work 1 sc in the FLO of each st until 1 st remains, 1 sc in the last st, ch 1 and turn.
Rows 3–4: Work 1 sc in each st across, ch 1 and turn. (2 rows)
Row 5 (toward the hem): Work 1 sl st in each st across.
Fasten off and weave in the end.
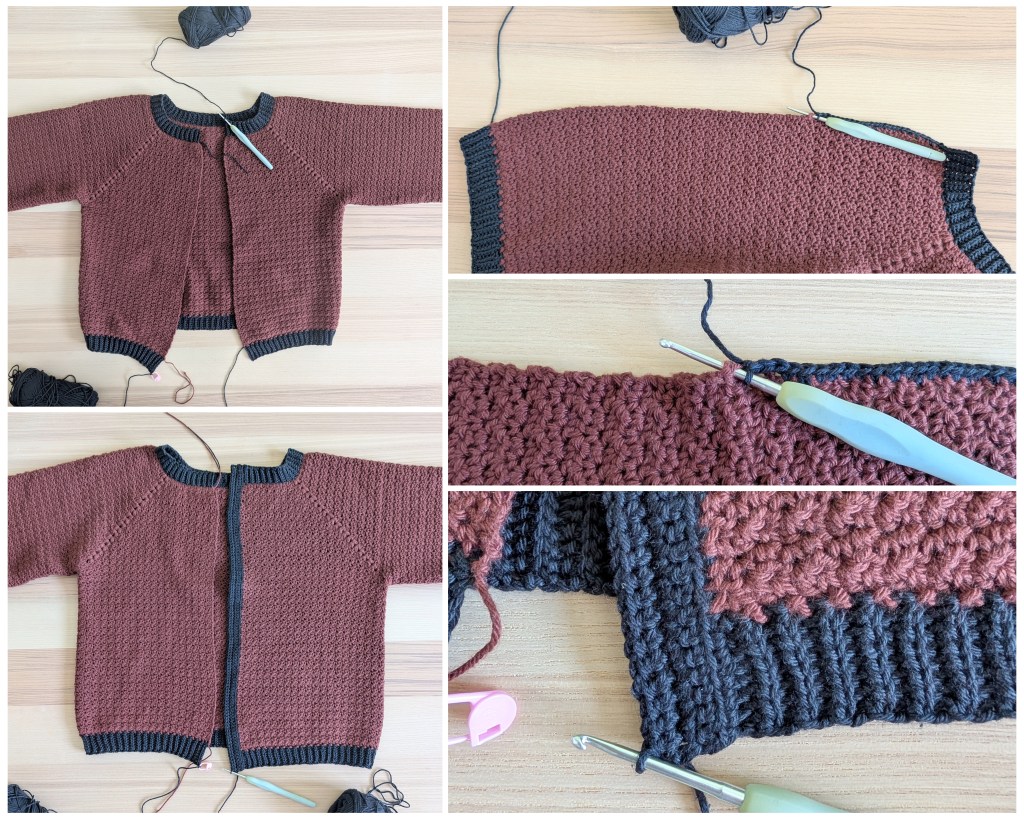
4. Edging the Right Front
Continue with the black working yarn from the hem (Section 1) and work along the right front edge in the same way as for the left front edge: 4 rows of sc, followed by 1 final row of sl sts.
Row 1: Ch 1, work 1 sc in the BLO of each of the 7 hem sts, then work 1 sc in each turning st and edge st up toward the neckline. Insert your hook through the outer loops only, rather than through the entire edge st, to make the transition less noticeable. Then work 1 sc in the BLO of each neckline edging st. Ch 1 and turn.
Row 2: Work 1 sc in the FLO of each st until 1 st remains, 1 sc in the last st, ch 1 and turn.
Rows 3–4: Work 1 sc in each st across, ch 1 and turn. (2 rows)
Row 5 (toward the hem): Work 1 sl st in each st across.
Fasten off and weave in the end.
Tie Cord
For the tie cord, use a lace-weight crochet yarn held double, or another thinner crochet yarn in black.
The images below show how to crochet the cord using two strands:
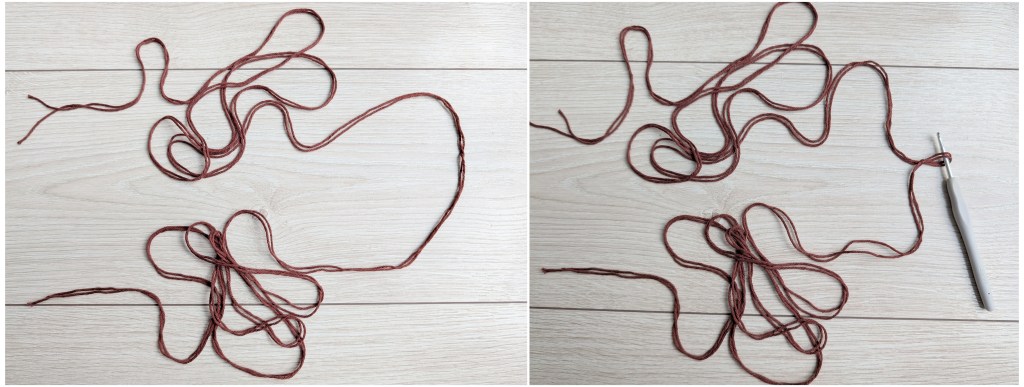
(1) Cut 2 strands of yarn, each approx. 2 m / 2.2 yds long. Hold both strands together and fold them in half. At the folded center, use both strands together to make a starting loop.
(2) Bring one of the two double strands over the crochet hook from front to back. Using the other double strand, pull through the two double-stranded loops on the hook (= 4 yarn loops). Then always place the strand you just brought over the hook downward, so you don’t mix up the two pairs of strands.
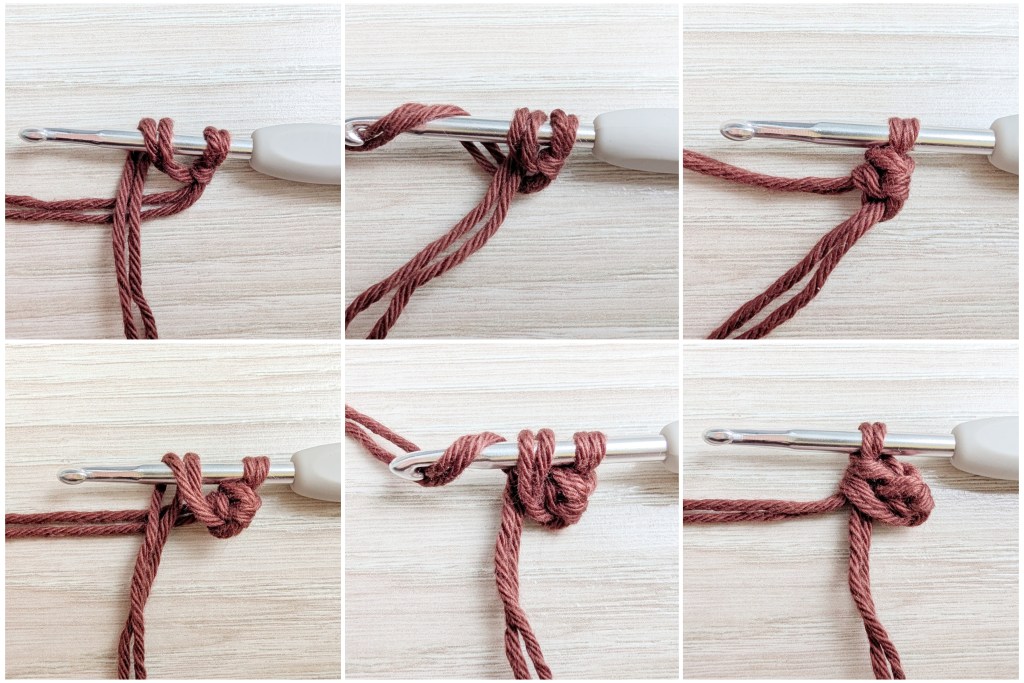
Throughout the entire cord, always yarn over with the same pair of strands and work with the same pair of strands.
Continue in this manner for 30 sts.
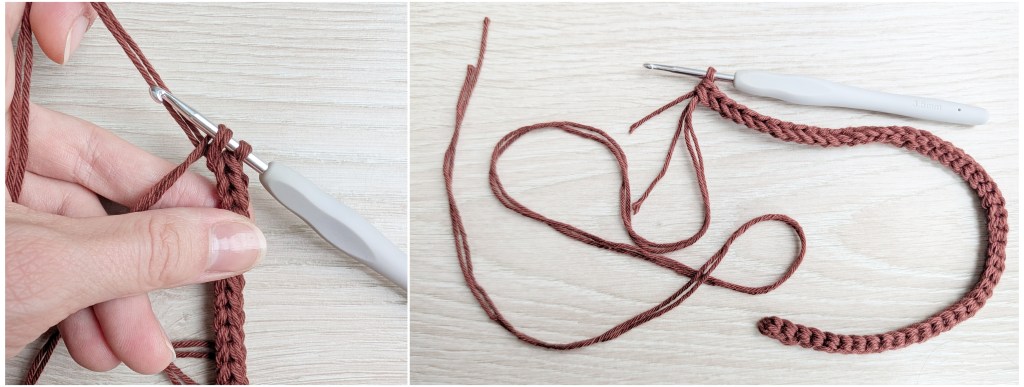
(3) Remove the hook, tie a knot as close as possible to the last st, trim the yarn ends to approx. 1.5 cm / 0.6″, and fray the ends.
Sew the base of the tie cord to the upper outer edge on each side of the cardigan.

Now all that’s left to do is block your cardigan, and your cozy fall cardigan – or elegant new crochet jacket – is finished!
I hope you enjoyed the pattern and that you’ll love wearing your new crochet piece!