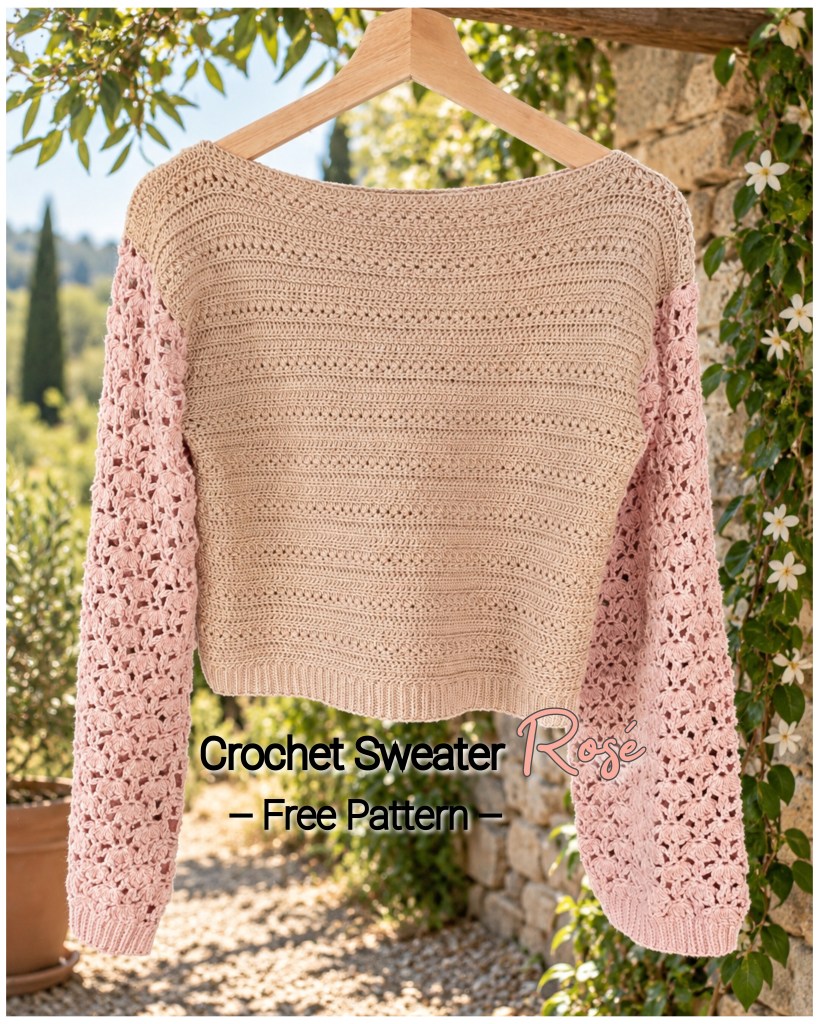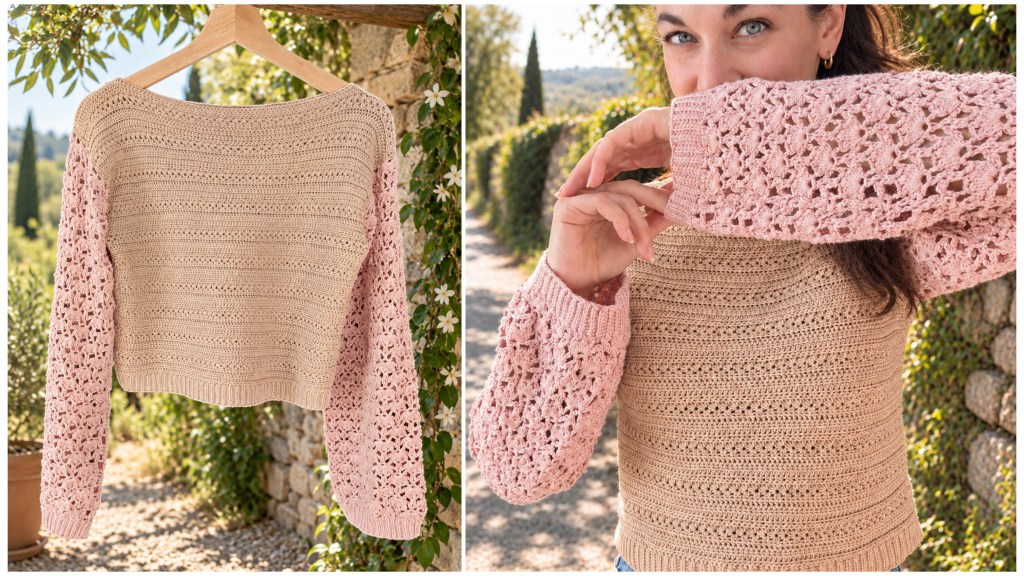
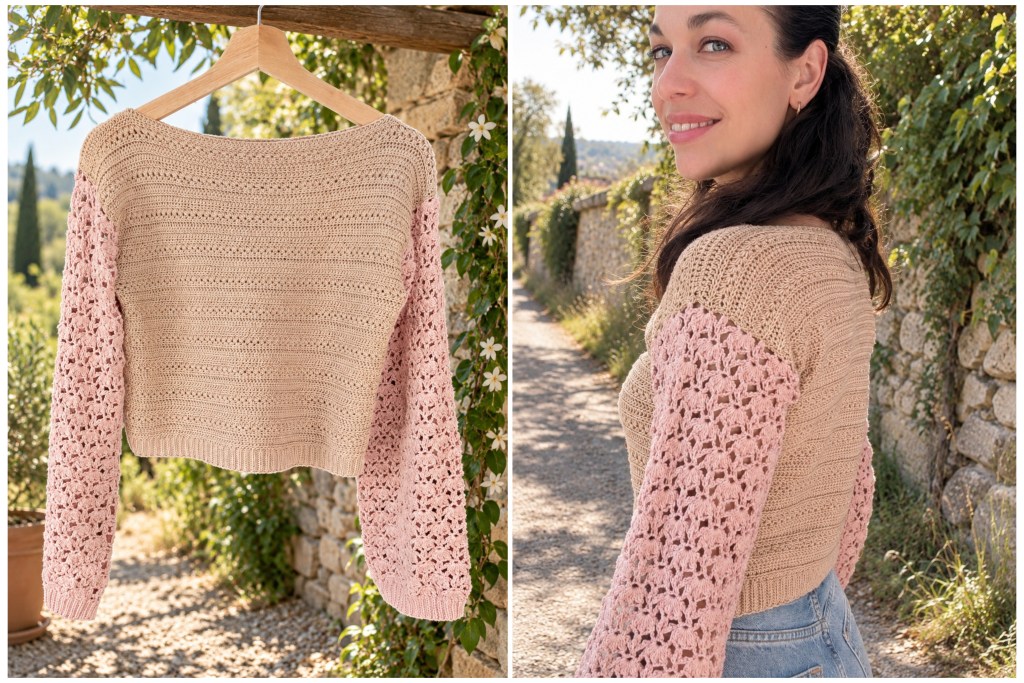
Sometimes a small challenge can lead to a whole new design idea. My crochet top was originally designed as a sleeveless top. When I later decided to add sleeves, I realized that I didn’t have enough of the original yarn left. Instead of buying more, I took the opportunity to use up some yarn I already had and deliberately chose a different color – creating a beautiful contrast with the body of the top.
Delicate dusty rose lace sleeves now complement the cream-colored body and give the top a completely new, romantic look. The combination of a contrasting color and an airy stitch pattern makes the sleeves look like an intentional design feature.
The sleeves are crocheted directly onto the finished top and completed with narrow cuffs in dusty rose. This makes it easy to transform a sleeveless crochet top into a long-sleeved sweater.
This idea can easily be adapted to other tops as well!
Harmonizing Patterns Without Being Identical
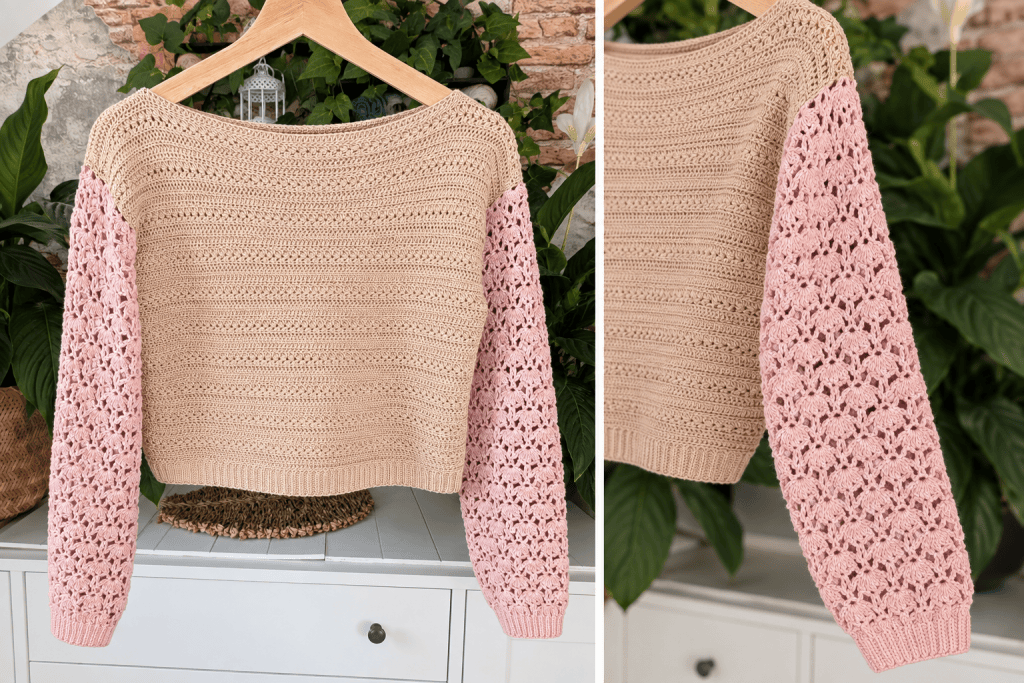
For the sleeves, I deliberately decided not to repeat the stitch pattern of the original top. Instead, they feature their own, much airier lace pattern. Although two different crochet patterns come together here, they complement each other beautifully: the horizontal textured stripes of the body create a calmer, more structured look, while the openwork sleeves add lightness and draw attention to the sleeves.
I also wanted the two different stitch patterns to share a common theme: while the pattern of the top resembles waves, the arches of the lace sleeves are reminiscent of seashells.
The dusty rose color emphasizes this contrast even further. Still, the body and sleeves don’t look like two separate pieces but come together to create a harmonious overall design. For me, it is precisely this combination of different stitch patterns and colors that gives the sweater its unique character.
At the same time, the character of the original “Coastal Cottage” Crochet Top remains: the original is a loose-fitting, sleeveless summer top with delicate textured stripes. The long sleeves give it a new, slightly more romantic look and make it perfect for wearing during the transitional seasons as well.
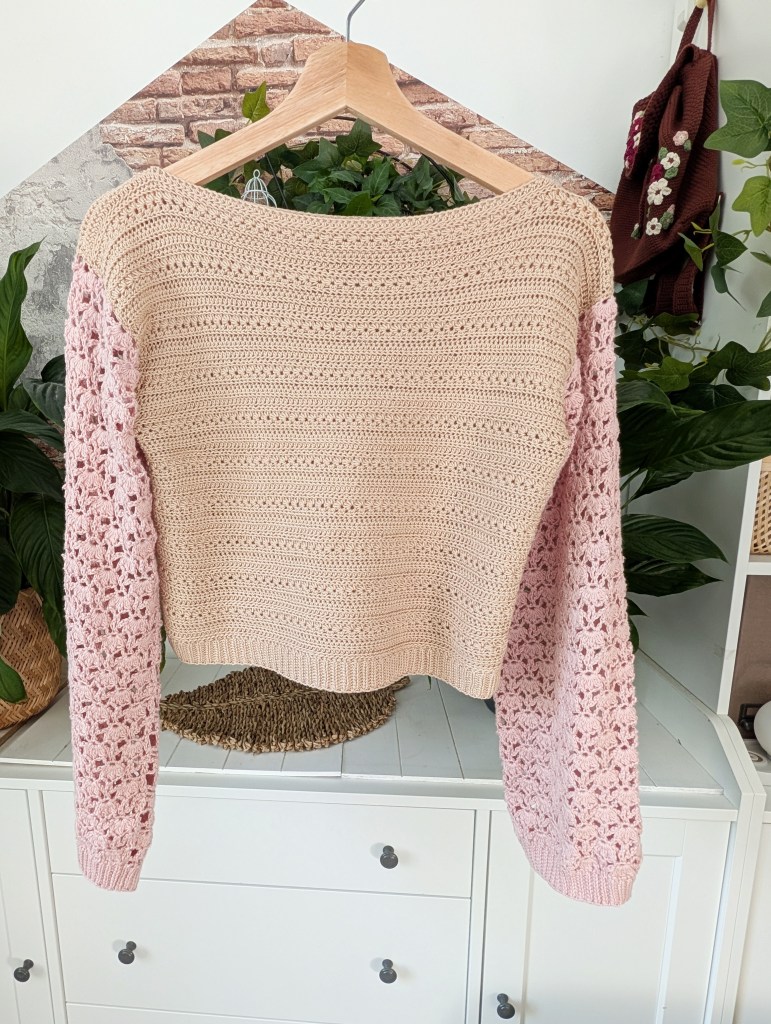
The original sleeveless summer top has been transformed into a completely new garment – allowing you to keep wearing your favorite piece right into fall or spring.
With this free crochet pattern, you can crochet the sweater yourself step by step. If you have already made the original “Coastal Cottage” Crochet Top or would like to skip straight to the sleeves, you can find the corresponding instructions from here onward.
Materials
- Super Fine / Fingering (Category 1) in caramel, e.g. Woll Butt Sonja (100% cotton)
- Yardage needed: approx. 680 m / 744 yd (size S), equivalent to 4 skeins.
- Super Fine / Fingering (Category 1) in Old Rose, e.g. Rainbow Cotton 8/4 (100% cotton)
- Yardage needed: approx. 640 m / 710 yd (size S), equivalent to 4 skeins.
- 3.0 mm crochet hook
- Scissors
- Yarn needle for weaving in ends
Size
Size: S (M/L). Instructions for the larger size are given in parentheses.
Abbreviations
st(s) = stitch(es)sl st = slip stitch(es)YO sl st = yarn over slip stitchch = chain stitch(es)sc = single crochethdc = half double crochetdc = double crochetch-sp = chain space (space created by chain stitches)sl st2tog = slip stitch 2 stitches together (decrease)FLO = front loop onlyBLO = back loop onlyRd = roundR = rowprev row = previous row
Stitch Basics / How-To
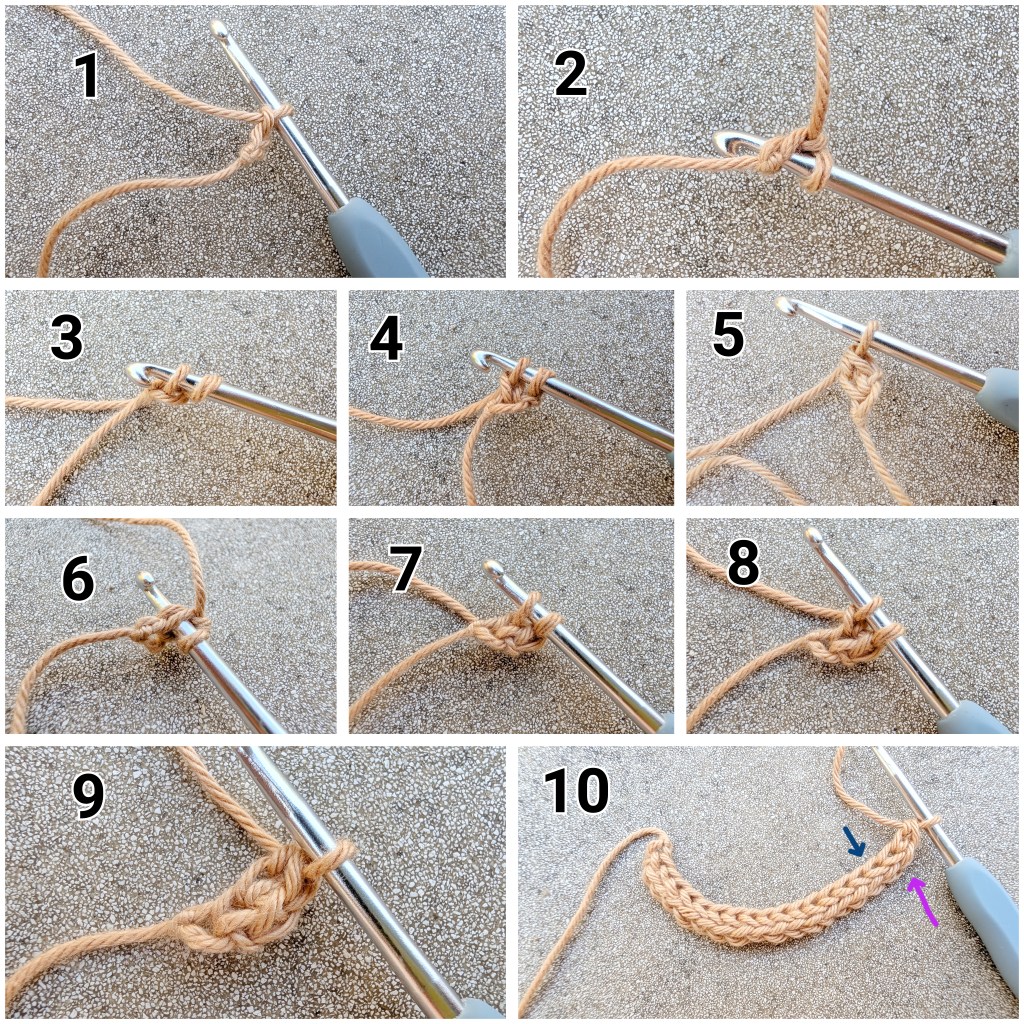
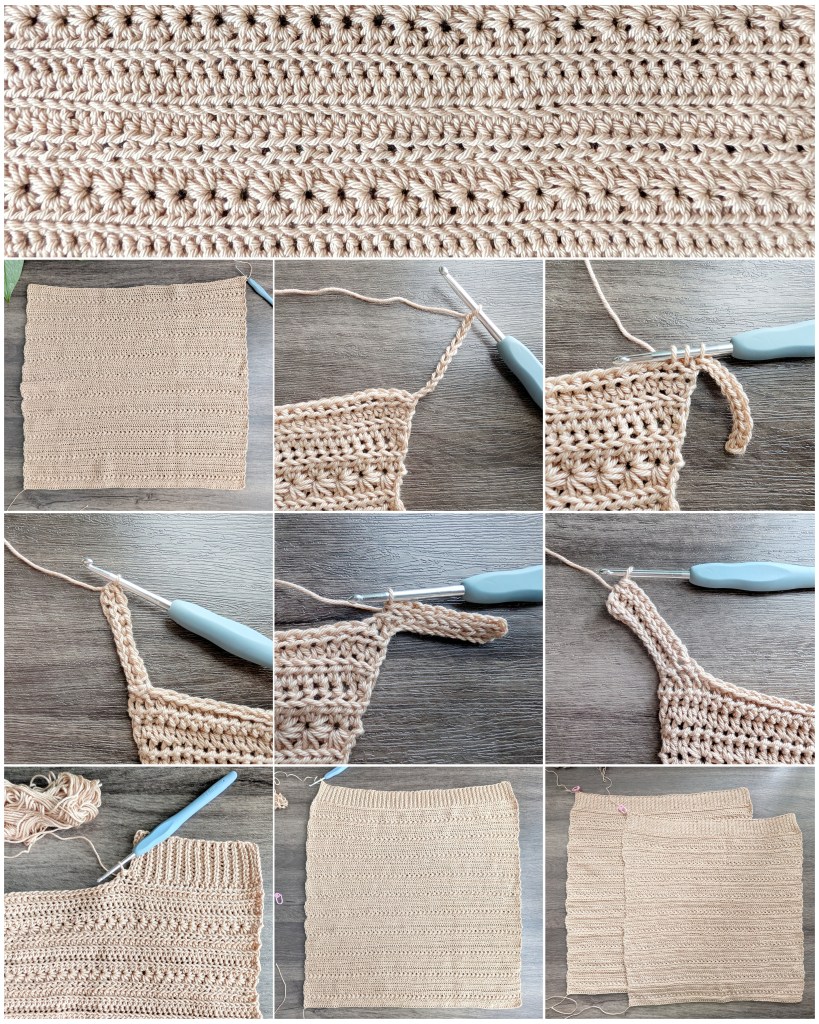
Foundation Single Crochet (FSC)
Image 1: Begin the foundation row by chaining 2.
Images 2–3: Insert your hook into the 2nd ch from the hook, working through the middle and back loops of the ch. Yarn over and pull up a loop. You now have 2 loops on your hook.
Image 4: Yarn over and pull through the first loop on your hook (this creates 1 ch). You still have 2 loops on your hook.
Image 5: Yarn over and pull through both loops on your hook. The first foundation sc is complete. You can see 1 st along the top edge and 2 sts along the bottom edge.
Image 6: To make the next foundation sc, insert your hook under both loops of the st at the bottom of the previous foundation st.
Image 7: Yarn over and pull up a loop. You now have 2 loops on your hook.
Image 8: Yarn over again and pull through the first loop on your hook (creating another ch). You still have 2 loops on your hook.
Image 9: Yarn over and pull through both loops on your hook.
Image 10: Repeat steps 6–9 until you reach the desired length, then turn your work. In the next row, work into the sts on the right side of the image, indicated by the purple arrow (= top edge). The loops on the left side of the image, indicated by the blue arrow, form the bottom edge.
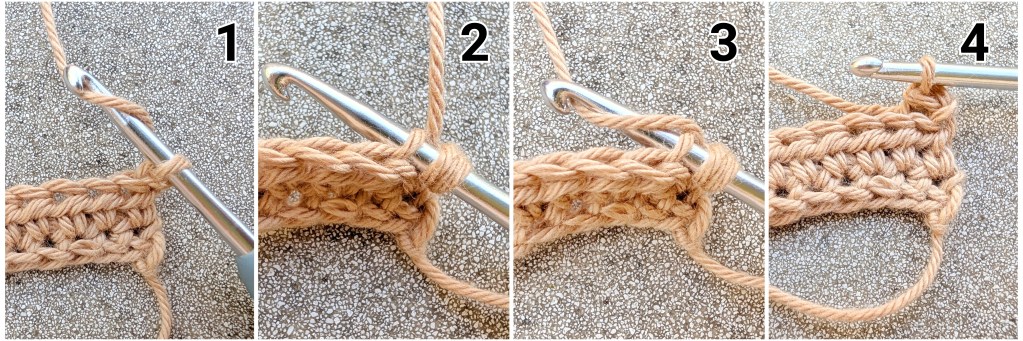
Yarn Over Slip Stitch (YO Sl St)
In this pattern, the yarn over slip stitches are worked either in the front loop only (FLO) or in the back loop only (BLO). See the comparison images below.
Yarn Over Slip Stitch in the Front Loop Only (YO Sl St FLO):
Image 1: Yarn over (2 loops on hook).
Image 2: Insert your hook into the front loop only of the next st.
Image 3: Yarn over and pull up a loop.
Image 4: Pull the loop through the front loop of the st and through both loops on your hook in one motion.

A Yarn Over Slip Stitch in the Back Loop Only (YO Sl St BLO) is worked in the same way, but insert your hook into the back loop only instead.
Star Stitch
Image 1: Begin the star stitch row with ch 3.
Image 2: Pick up 5 loops as follows: insert your hook into the 2nd ch from the hook and pull up a loop. Then insert your hook into the 3rd ch and pull up a loop. Next, insert your hook into each of the first 3 sts of the previous row and pull up a loop from each st. For this pattern, work in the back loops only (BLO).
Image 3: Yarn over and pull through all 6 loops on your hook.
Image 4: Ch 1 to complete the star stitch.
The colored line on the top of the images indicate the first star stitch.
Image 5: The red arrows indicate the 5 insertion points where you will pick up the loops for the next star stitch.
Image 6: For the first loop, insert your hook directly into the ch-1 space of the previous star stitch and pull up a loop.
Images 7–8: For the second loop, insert your hook under the horizontal strand directly below and pull up a loop.
Images 9–10: For the third loop, insert your hook into the same st and pull up a loop.
Images 11–12: For the fourth loop, insert your hook into the BLO of the next st and pull up a loop.
Images 13–14: For the fifth loop, insert your hook into the BLO of the following st and pull up a loop. You now have 6 loops on your hook.
Images 15–16: Yarn over and pull through all 6 loops on your hook.
Image 17: Ch 1 to complete the next star stitch.
Image 18: Continue working across the row in the same way: pick up 5 loops (for a total of 6 loops on your hook) – the first 3 loops through the previous star stitch and the last 2 loops through the BLO of the next 2 sts. Yarn over and pull through all 6 loops, then ch 1. Therefore, the last star stitch of the row also ends with ch 1.

Stitch Chart
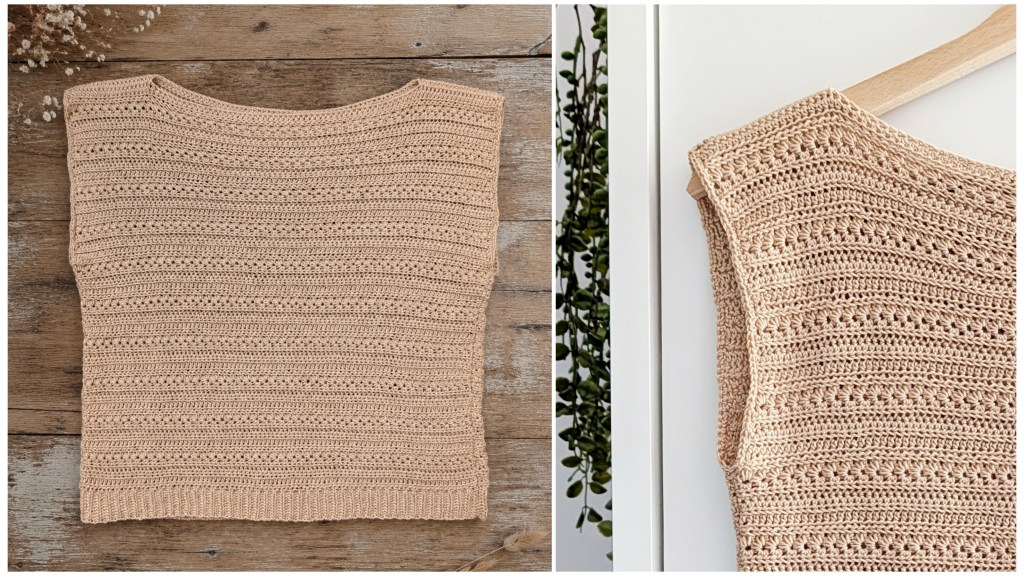
Stitch Chart A (for top without sleeves)
The crochet top is worked according to the stitch chart shown below. A detailed stitch chart explanation can be found beneath the chart.
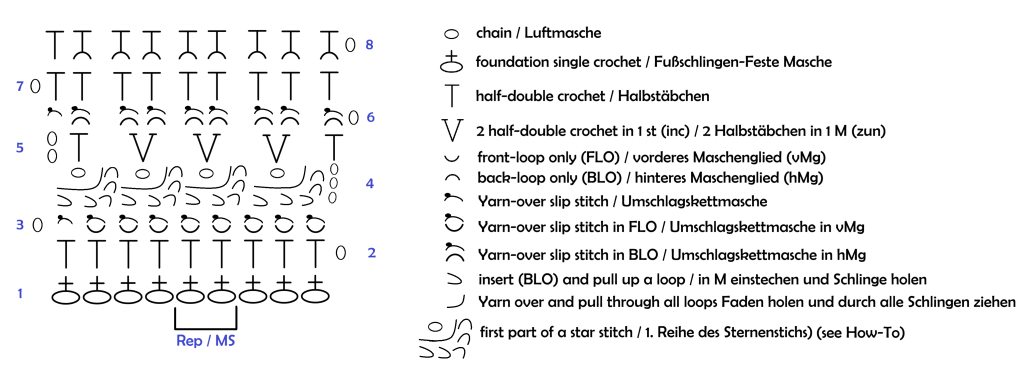
- Work in rows following the crochet chart. The rows shown in the chart represent both the right-side and wrong-side rows.
- When several stitches meet at the same point at the bottom of the chart, work all of them into the same stitch.
- The stitch sequence between the arrows forms the pattern repeat and is repeated continuously across the row.
- Begin with Foundation Single Crochet (FSC).
- Row 2: Ch 1, 1 hdc in each st across. Turn.
- Row 3: Ch 1, 1 YO sl st FLO in each st across until 1 st remains, 1 YO sl st through both loops of the last st. Turn.
- Row 4: Ch 3, work 1 star stitch by picking up the first 5 loops (through the 2nd and 3rd ch from the hook and through the BLO of the first 3 sts), ch 1. Repeat [1 star stitch (pick up the first 3 loops through the previous star stitch and the last 2 loops through the BLO of the next 2 sts of the previous row; see How-To), ch 1] to the end of the row. Turn.
- Row 5: Ch 2 (counts as 1 hdc), 1 hdc in the ch-1 of the previous row, 2 hdc in each star stitch eye (the ch-1 of each star stitch), 1 hdc in the last st after the final star stitch eye. Turn.
- Row 6: Ch 1, 1 YO sl st BLO in each st across until 1 st remains. Work 1 YO sl st into the 2nd ch of the previous row. Turn.
- Row 7: Ch 1, 1 hdc in each st across. Turn.
- Row 8: Ch 1, 1 hdc BLO in each st across. Turn.
- Repeat Rows 3–8 (6 rows) until the desired length is reached. Then work the hem; see the instructions below for further details.
Stitch Chart B (for sleeves)

The pattern consists of a 2-row repeat:
Row 1: Alternate between working (1 dc, ch 1, 1 dc) into each center dc cluster and (1 sc, ch 1, 1 sc) around the sc of the previous row, with ch 3 between each group.
Row 2: Alternate between working (3-dc cluster, ch 2, 3-dc cluster, ch 2, 3-dc cluster) into the ch-1 space between 2 sc of the previous row and 1 sc into the ch-1 space between 2 dc of the previous row, with ch 3 between each group.
The following stitches are used:
3-dc cluster (= also referred to as a bobble stitch): Work 3 incomplete dc into the same st, then complete them together in the final step.
2-dc cluster (= a flatter bobble stitch; used only at the beginning of Row 4): Work 2 incomplete dc into the same st, then complete them together in the final step.
Pattern Adjustment
In my case, the armhole is 7 sts short of a complete pattern repeat. This would cause two identical cluster groups to sit directly next to each other at the round join, creating unnecessary bulk in this area.
To create a more even stitch pattern and prevent the sleeve from puffing out underneath the arm, I worked a flatter cluster at the beginning/end of the row (row 4). Instead of working the complete group [3-dc cluster, ch 2, 3-dc cluster, ch 2, 3-dc cluster], only a 2-dc cluster is worked into the first st.
This small adjustment is barely noticeable on the finished sleeve and creates a smoother transition underneath the arm.
The sleeves are worked in joined, turned rounds. At the end of each round, join with 1 sl st to the first st, then turn your work.
Rnd 1: Ch 4 (= 1 dc, ch 1), 1 dc in the same st. Continue working in the opposite direction: *ch 3, skip 3 sts, 1 sc in the next st, ch 1, skip 1 st, 1 sc in the next st, ch 3, skip 3 sts, 1 dc in the next st, ch 1, 1 dc in the same st; repeat from * to the end of the round, or until 3 sts remain. Ch 3, skip the last 3 sts, join with 1 sl st in the 3rd ch of the beginning ch-4. Turn.
Rnd 2: Ch 1, 1 sc in the previous ch-space (working slightly back into the round), ch 3, 1 sc in the next ch-1 space (between 2 dc), ch 3, *[3-dc cluster, ch 2, 3-dc cluster, ch 2, 3-dc cluster] in the next ch-1 space (between 2 sc), ch 3, 1 sc in the next ch-1 space (between 2 dc); repeat from * to the end of the round. Ch 3, join with 1 sl st in the first sc. Turn.
Rnd 3: Ch 1, 1 sc in the same st, ch 1, 1 sc in the next ch-3 space, *ch 3, 1 dc in the center 3-dc cluster, ch 1, 1 dc in the same st, ch 3, 1 sc in the next ch-3 space, ch 1, 1 sc in the next ch-3 space; repeat from * to the last st. Ch 3, join with 1 sl st in the first sc. Turn.
Rnd 4: Ch 3, 2-dc cluster in the same st, *ch 3, [3-dc cluster, ch 2, 3-dc cluster, ch 2, 3-dc cluster] in the next ch-1 space (between 2 sc), ch 3, 1 sc in the next ch-1 space (between 2 dc); repeat from * to the end of the round. Join with 1 sl st in the 2-dc cluster. Turn.
Rnd 5: Ch 4 (= 1 dc, ch 1), 1 dc in the same st, *ch 3, 1 sc in the next ch-3 space, ch 1, 1 sc in the next ch-3 space, ch 3, 1 dc in the center 3-dc cluster, ch 1, 1 dc in the same st; repeat from * to the end of the round. Ch 3, join with 1 sl st in the 3rd ch of the beginning ch-4. Turn.
Repeat Rnds 2–5 until you reach the desired length.

Crochet Pattern
- The top is made from two identical panels (front and back), worked in rows from the top down. The hem is added at the end.
- The two panels are then crocheted together at the shoulder straps and along the sides.
- The armholes are then edged with one round of sc.
- NEW: Finally, the sleeves are worked directly onto the armholes, starting at the armhole and continuing through the sleeve cuffs.
Start by making a gauge swatch using the stitch pattern of the crochet top (see Crochet Chart). Using a 3.0 mm crochet hook, the gauge measures in my case:
22 sts and 13 rows = 4 x 4 in (10 x 10 cm).

Front / Back Panel
Row 1: Begin with 95 (105/115) foundation single crochet (FSC) sts (the stitch count must be a multiple of 2 + 1). This technique replaces the foundation chain and the first row of single crochet in one step, creating a more flexible foundation row. Turn.
Row 2: Ch 1, 1 hdc in each st across, turn. (95 (105/115))
Repeat the following pattern until the desired length is reached:
Row 3: Ch 1, 1 YO sl st FLO in each st across until 1 st remains, 1 YO sl st through both loops of the last st, turn. (95 (105/115))
Row 4: Ch 3, 1 star st into the 2nd + 3rd ch from the hook + the BLO of the first 2 sts, ch 1, [1 star st into the previous star st + the BLO of the next 2 sts (see How-To), ch 1] repeat to the end of the row (work the last loop of the final star st through both loops of the last st instead of BLO only. End with ch 1), turn. (95 (105/115))
Row 5: Ch 2 (= 1 hdc), 1 hdc in the ch-1 of the previous row, 2 hdc in each star st eye, 1 hdc in the 3rd ch st (after the final eye), turn. (95 (105/115))
Row 6: Ch 1, 1 YO sl st BLO in each st across until 1 st remains, 1 YO sl st through both loops of the last st, turn. (95 (105/115))
Row 7: Ch 1, 1 hdc in each st across, turn. (95 (105/115))
Row 8: Ch 1, 1 hdc BLO in each st across until 1 st remains, 1 hdc through both loops of the last st, turn. (95 (105/115))
For size S, repeat Rows 3–8 a total of 11 times (~40 (41/42.5) cm / 15.7 (16 / 16.7) in), but check if the length fits and continue if you want the top to be longer. Keep in mind that, depending on the yarn you use, the top may have a slightly more relaxed drape after blocking.
For size M, work 4 additional rows: after completing the instructions for size S, work Rows 3–6 once more.
For size L, work 6 additional rows: after completing the instructions for size S, work Rows 3–8 once more.
Then work Row 2 once more. This means that, regardless of size, the final row is worked as Row 2.
Now continue directly with the hem.
Hem
The hem is worked along the foundation row of the front/back panel. At the end of every other row, the hem is joined to the foundation row by working 2 slip stitches of the foundation row together.
Ch 10 + 1.
Row 1: 1 sl st in each of the next 10 sts (work loosely), sl st2tog over the next 2 sts of the foundation row, turn (do not ch).
Row 2: Skip the decrease st, 1 YO sl st BLO in each of the next 9 sts, 1 YO sl st through both loops of the last st, ch 1 and turn. (10)
Row 3: 1 sl st BLO in each of the next 10 sts, sl st2tog over the next 2 sts of the foundation row, turn without a turning ch. (10)
Repeat Rows 2–3 until you reach the last st of the foundation row. Finish with Row 2, so that your working yarn ends exactly at the corner of the crochet panel.
Fasten off, or leave a yarn tail of approx. 40 cm / 16 in, which will be used later to crochet the panels together along the sides.
Repeat for the front panel.
Joining the Panels
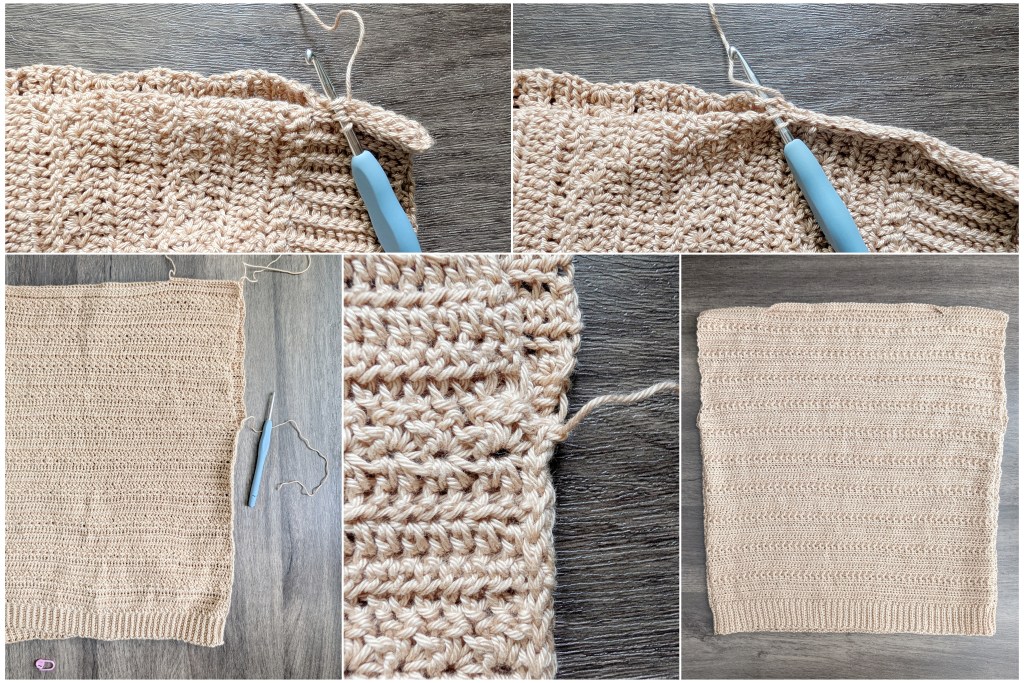
Place the front and back panels right sides together. The right side is the side where the star stitch row faces outward, while the row of 2 hdc worked after the star stitches faces inward.
Neckline
Join a new strand of yarn and join 21 (26/32) sts on each side (approx. 8 (10/12) cm / 3.1 (3.9/4.7) in) by single crocheting the two panels together. Work from the armhole edge toward the neckline.

Armholes
For the side seams, use the yarn tail you left earlier. Rejoin the yarn, ch 1, then insert your hook through the first row of both panels at the same time and join them together with sl sts.
Work from the bottom edge (hem) upward for a total of 25 cm / 9.8 in, or until you are approximately 15 (16/17.5) cm / 5.9 (6.3/6.9) in below the straps. Finish the side seam in the 2-hdc row, just above the star stitch row.
The finished armhole should therefore measure approximately 15 (16/17.5) cm / 5.9 (6.3/6.9) in.
Edging the Armholes
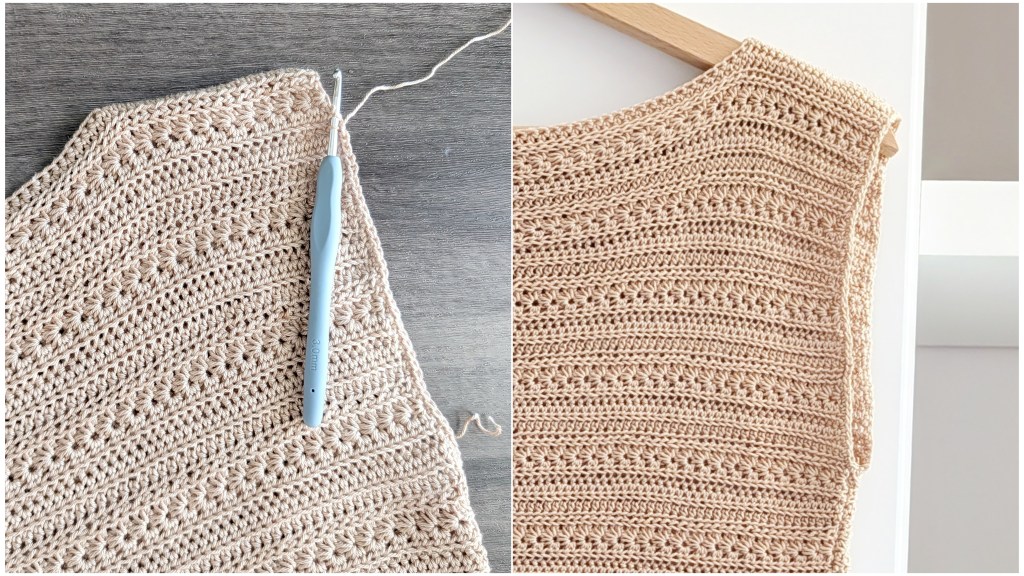
Join a new strand of yarn and work 1 Rd of sc evenly around each armhole.
Then weave in all remaining yarn ends securely.
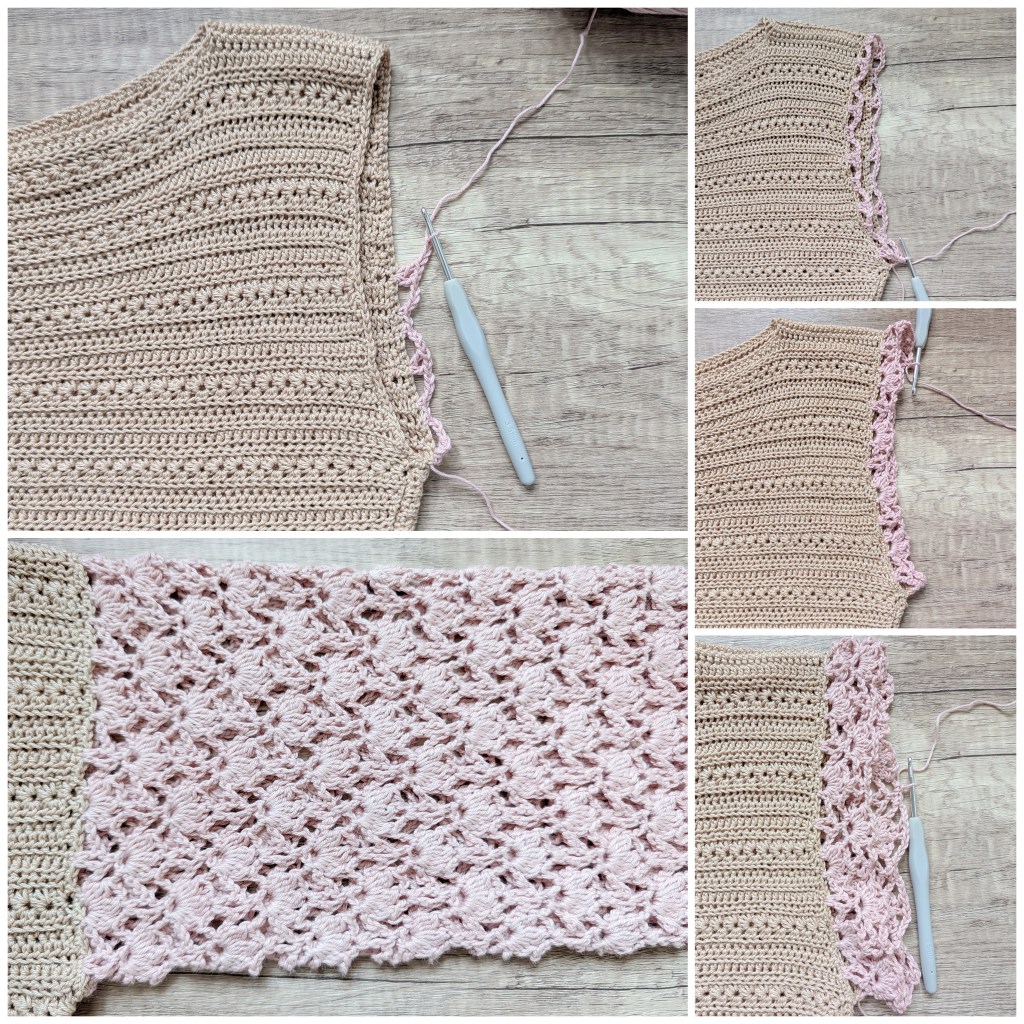
Crocheting the Sleeves onto the Armholes
The sleeves are worked according to Chart B.
Begin in the bottommost stitch of the armhole, directly underneath the arm. Work the sleeve in the opposite direction to the round of sc worked around the armhole. This is important to ensure that the right side of the dc clusters, which are worked in every second round, faces outward.
The sleeves are worked in joined, turned rounds. At the end of each round, join with 1 sl st to the first st, then turn your work.
1. R: Ch 4 (= 1 dc, ch 1), 1 dc in the same st. Continue working in the opposite direction: *ch 3, skip 3 sts, 1 sc in the next st, ch 1, skip 1 st, 1 sc in the next st, ch 3, skip 3 sts, 1 dc in the next st, ch 1, 1 dc in the same st; repeat from * to the end of the round, or until 3 sts remain. Ch 3, skip the last 3 sts, join with 1 sl st in the 3rd ch of the beginning ch-4. Turn.
2. R: Ch 1, 1 sc in the previous ch-space (working slightly back into the round), ch 3, 1 sc in the next ch-1 space (between 2 dc), ch 3, *[3-dc cluster, ch 2, 3-dc cluster, ch 2, 3-dc cluster] in the next ch-1 space (between 2 sc), ch 3, 1 sc in the next ch-1 space (between 2 dc); repeat from * to the end of the round. Ch 3, join with 1 sl st in the first sc. Turn.
3. R: Ch 1, 1 sc in the same st, ch 1, 1 sc in the next ch-3 space, *ch 3, 1 dc in the center 3-dc cluster, ch 1, 1 dc in the same st, ch 3, 1 sc in the next ch-3 space, ch 1, 1 sc in the next ch-3 space; repeat from * to the last st. Ch 3, join with 1 sl st in the first sc. Turn.
4. R: Ch 3, 2-dc cluster in the same st, *ch 3, [3-dc cluster, ch 2, 3-dc cluster, ch 2, 3-dc cluster] in the next ch-1 space (between 2 sc), ch 3, 1 sc in the next ch-1 space (between 2 dc); repeat from * to the end of the round. Join with 1 sl st in the 2-dc cluster. Turn.
5. R: Ch 4 (= 1 dc, ch 1), 1 dc in the same st, *ch 3, 1 sc in the next ch-3 space, ch 1, 1 sc in the next ch-3 space, ch 3, 1 dc in the center 3-dc cluster, ch 1, 1 dc in the same st; repeat from * to the end of the round. Ch 3, join with 1 sl st in the 3rd ch of the beginning ch-4. Turn.
Repeat Rnds 2–5 until you have worked a total of 27 rounds.
Continue directly with the sleeve cuff after the last sl st.
Sleeve Cuff
Ch 8 + 1 turning ch. This creates a cuff that is approx. 3 cm / 1.2″ wide. Work clockwise.
Row 1: 1 sl st in each of the next 8 ch (work loosely), sl st the next 2 sts of the sleeve edge together (use each st and each ch-space only once to make the cuff narrower. For an especially snug cuff, you can switch to a smaller crochet hook), turn without a turning ch.
Row 2: Skip the decrease st, 1 yo sl st in the BLO of each of the next 7 sts, 1 yo sl st in the last st, ch 1 and turn. (8)
Row 3: 1 sl st in the BLO of each of the next 8 sts, sl st the next 2 sts of the sleeve edge together, turn without a turning ch. (8)
Repeat Rows 2 and 3 until you reach the last st of the sleeve edge. Finish the cuff with Row 2 so that your working yarn is positioned at the outer corner.
Bring the first and last rows of the cuff together. Ch 1 and join both rows with sl sts, inserting your hook through the corresponding sts of both rows. Join 1 additional st below the cuff to close any gap at the base of the first row.
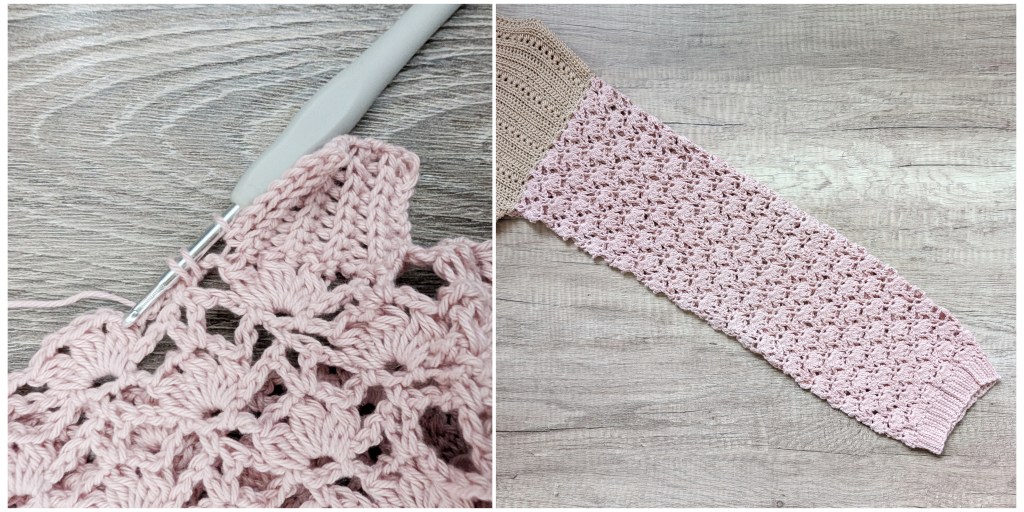
Now all that’s left to do is block your top, and your romantic crochet top is finished!
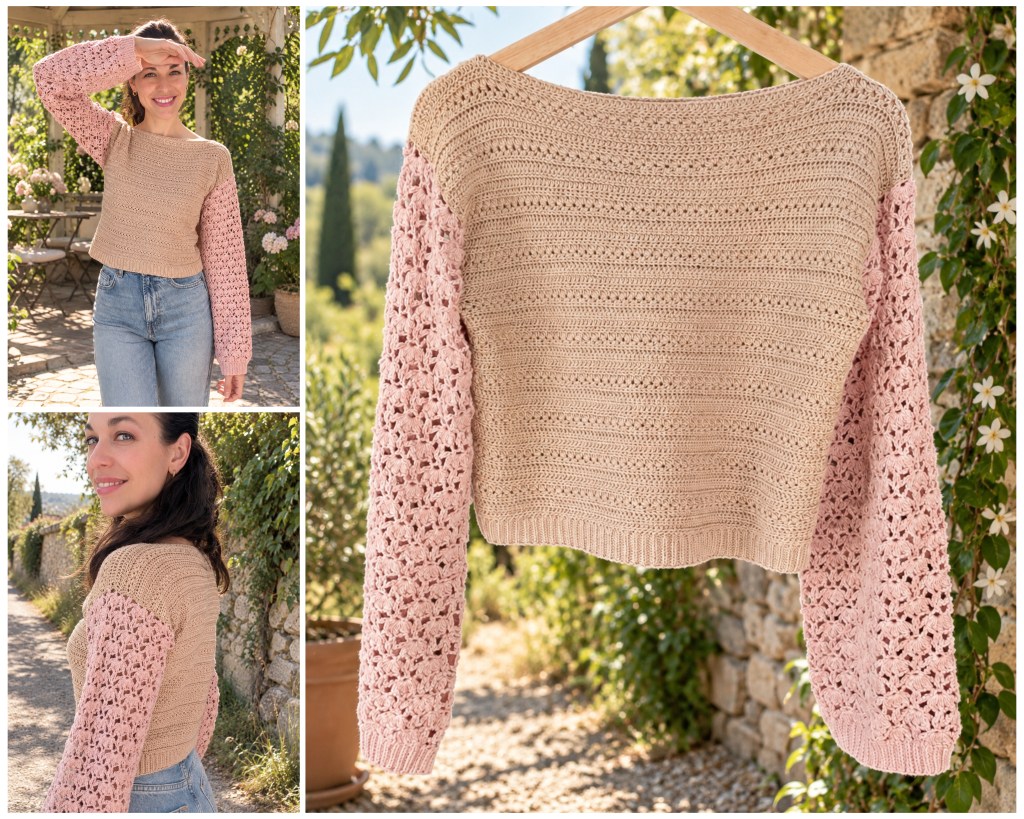
I hope you enjoyed the pattern and love wearing your new crochet top