


The summer may be coming to an end, but your crop tops are always in season. Still, there are days when even your favorite crop top feels too short or a little plain? Maybe the edges are starting to look a bit worn out? No worries with this tip from the DIY wardrobe ideas series– Part 3: crochet your own crop top trim made from Granny Squares!
With this self-crocheted Granny Square trim, you’ll turn your crop top into a true one-of-a-kind piece!
The trim consists of classic Granny Squares, which you can crochet in various colours to your liking. These small squares are connected with a crochet band, which you attach to the hem of your crop top. The best part: you can customize the colours, pattern, and size of the Granny Squares to suit your personal style perfectly.
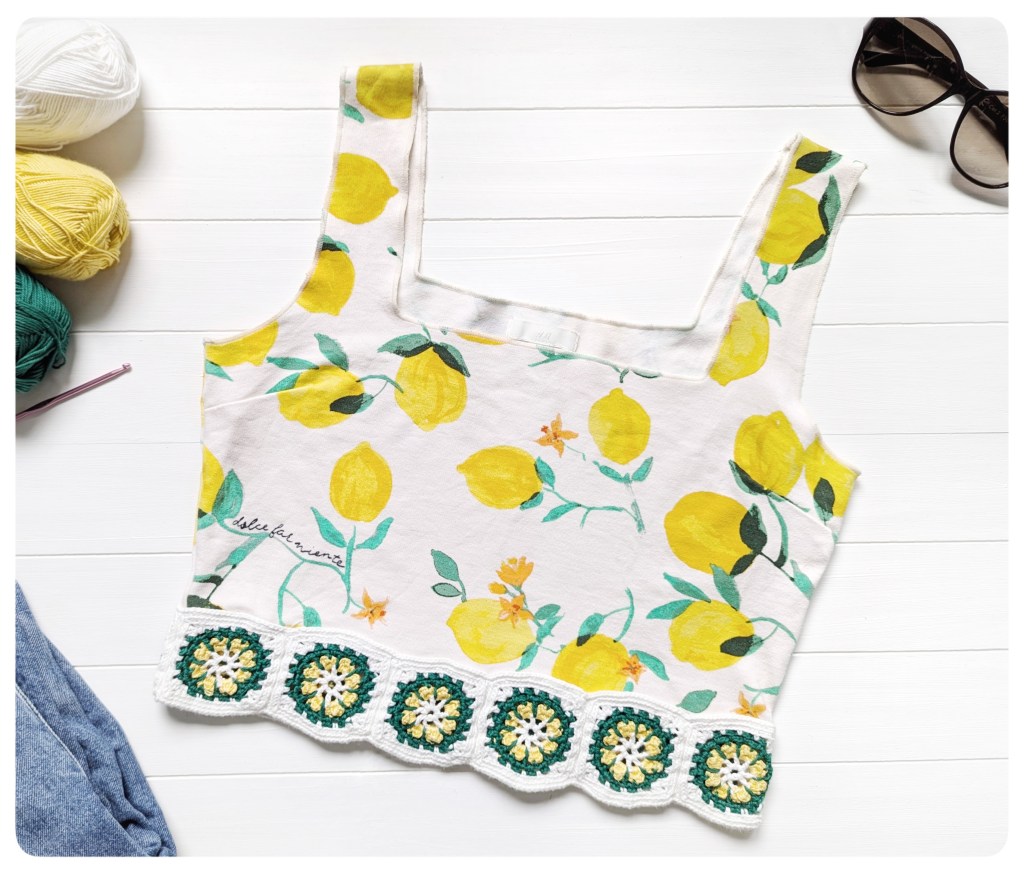
Two examples on how you can use Granny Squares to improve your Crop Top (in this post I show you how to create the left top):


Tip
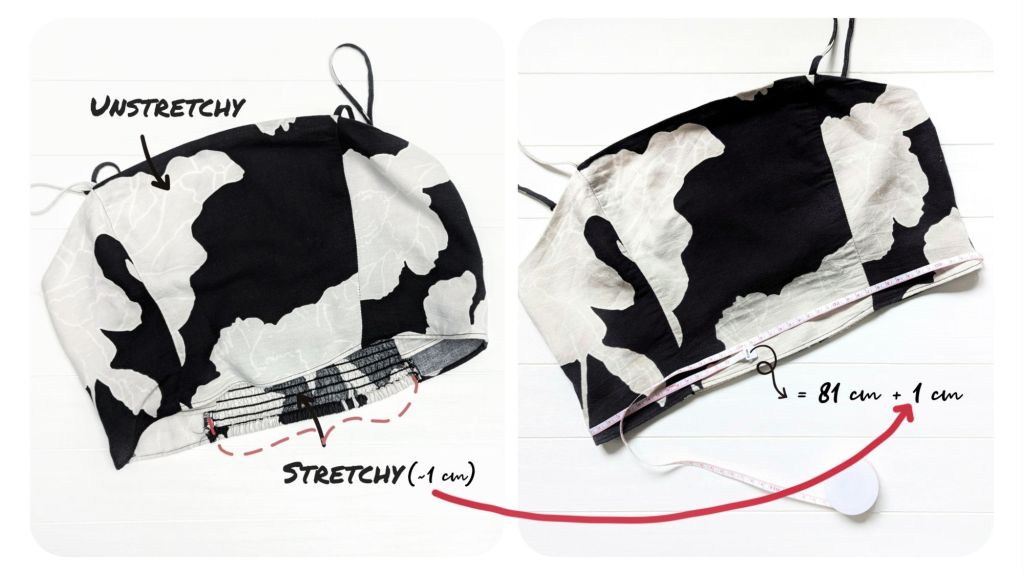
Tops made from non-stretch fabrics like linen work best. For stretchy fabrics, it’s recommended that the top doesn’t fit too tightly, so the fabric doesn’t stretch more than 1 cm in width. Otherwise, the crochet trim might over-stretch, and that won’t look good. So, it’s better to use a loose-fitting crop top or one that doesn’t stretch too much.
By the way, you can not only decorate the hem of your crop top with this crochet trim but also embellish the straps or neckline. Even pant legs, skirts, or dresses can be easily spruced up or lengthened with it! The possibilities are endless!
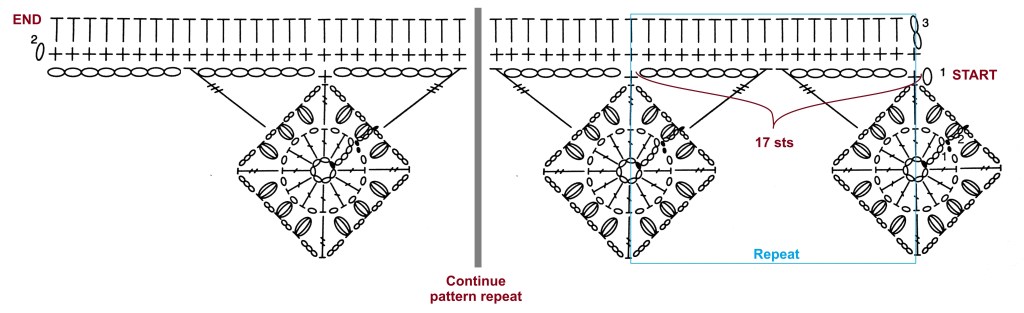
Granny Square Trim Crochet Diagram
I chose Granny Squares placed side by side, connected by a crochet band, which is sewn to the hem. Each Granny Square position takes up space of 17 stitches on the band (see crochet diagram below). The crochet band with the Granny Squares should span the entire circumference of the lower section of the top, but it is crocheted in rows and only joined into a round after being sewn to the top.
Note: I used lace yarn, but crocheted it double-stranded to prevent my Granny Squares from being too small.
Chain a multiple of 9 sts (1 motif for each repeat).
Motif (Granny Square)
For the abbreviations and way of writing the instruction see this extensive free Granny Square collection.
Base ring: ch 6, join with sl st to form ring
1.Rd (RS): ch 4 (count as 1 dc, ch 1), [1 dc into ring, ch 1] x 11, slip st to 3rd of ch-4 turning chain (creates 12 spaces to work in)
2.Rd: Slip st into next space, ch 3, puff stitch (of 3 hdc) (counts as puff st), *ch 2, puff st (of 4 hdc) into next space, ch 3, 1 tc into next dc, ch 3, puff st into next space, ch 2**, puff st into next space. Rep from * 2 more times and from * to ** again, slip st to 1st puff st
Header
With RS facing, join in yarn through the tc at corner of a Granny. Leave enough yarn at beginning to be able to connect the row-ends at the end and work a double treble crochet (dtc).
1. Row: Ch 1, 1 sc into same tc, *ch 7, counting along the edge of the Granny, skip next ch-3 space and next ch-2 space, 1 dtc into next ch-2 sp along motif edge, 1 dtc into the corresponding ch-2 space on next Granny, ch 7, working along the edge of the Granny, 1 sc into next tc on corner, counterclockwise from last dtc*. Rep from * until all squares have been joined, then ch 7, skip next ch-3 space and next ch-2 space, 1 dtc into next ch-2 sp along motif edge, ch 8, turn.
2. Row: Ch 1, 1 sc into each st, turn
3. Row: Ch 2, 1 hdc into each st, weave end in.
Here’s how it goes
Step 1 (Measure the top’s circumference):
Measure the bottom circumference (seam) of your crop top. If the top material fits tightly on the body and stretches a bit, put the top on first and measure its circumference along the hem while it’s being worn.
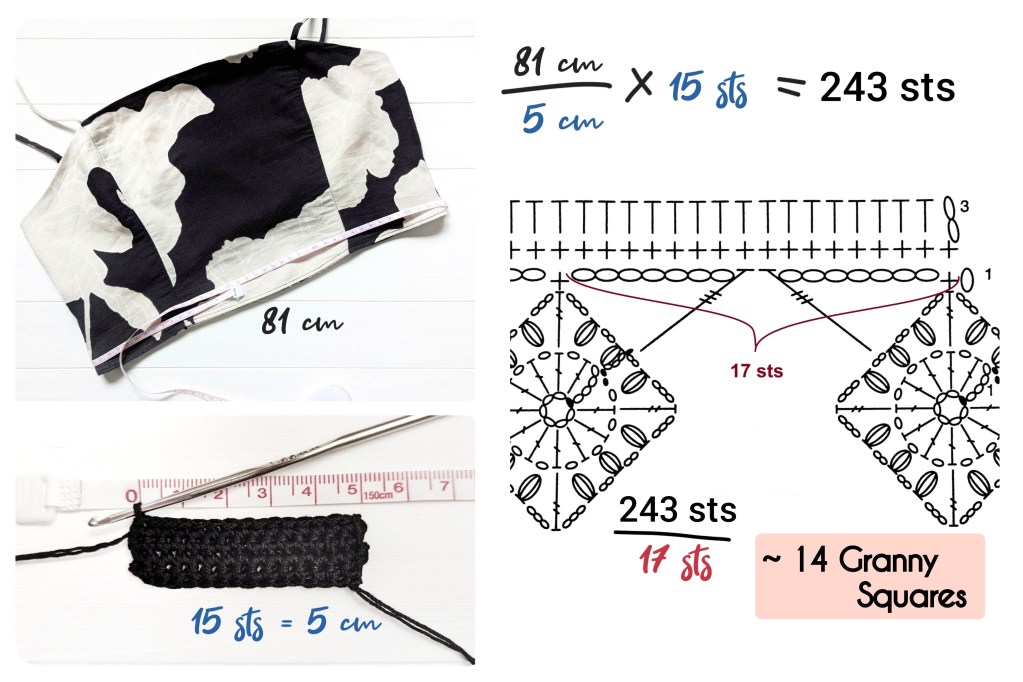
My crop top has a circumference of 81 cm (measured in an unstretched state), but as it has a smoked part on the backside which allows the top to stretch, I will consider an additional max. 1 cm stretch-allowance. Along this smoked part I’d keep the fabric stretched while sewing the trim on the hem.
Step 2 (Crochet a test and calculate the required number of Grannies):
Start by crocheting a piece of 15 stitches x 4 Rows. Measure the length of this band. My band has a length of 5 cm for the 15 stitches.
To calculate the required number of Grannies, you additionally need the following information:
1. The circumference of the crop top:
The circumference of the hem of my top is 81-82 cm. I will work with 81 cm, as my top doesn’t sit so tight that I will need to consider the stretch-allowance. Also, I could still stretch the crochet trim while sewing it on the top at the end.
2. The number of stitches for the circumference:
To calculate the required number of stitches for the circumference, take the circumference (81 cm), divide by the test size (5 cm) and multiply by the number of stitches for the test (15 sts): 81/5 * 15 = 243 stitches. Which means, I need to work 243 stitches to reach 81 cm.
Tip: if you are unsure about the right number of stitches for the circumference, work with a larger stitch (e.g. double crochet, treble crochet…) or with a pattern-combination with chain stitches, as those make the crochet trim more elastic than shorter stitches like a single crochet.
As seen in the crochet diagram above, each Granny takes up space of 17 stitches along the band. So the band has to be a multiple of 17 stitches.
3. The size of each Granny:
Now, bring the information from 1.-3. together: As each Granny needs 17 stitches space and my circumference needs 243 stitches, I need 14 Grannys for the band: 243 sts / 17 sts = 14,3 ~ 14 Granny Squares.
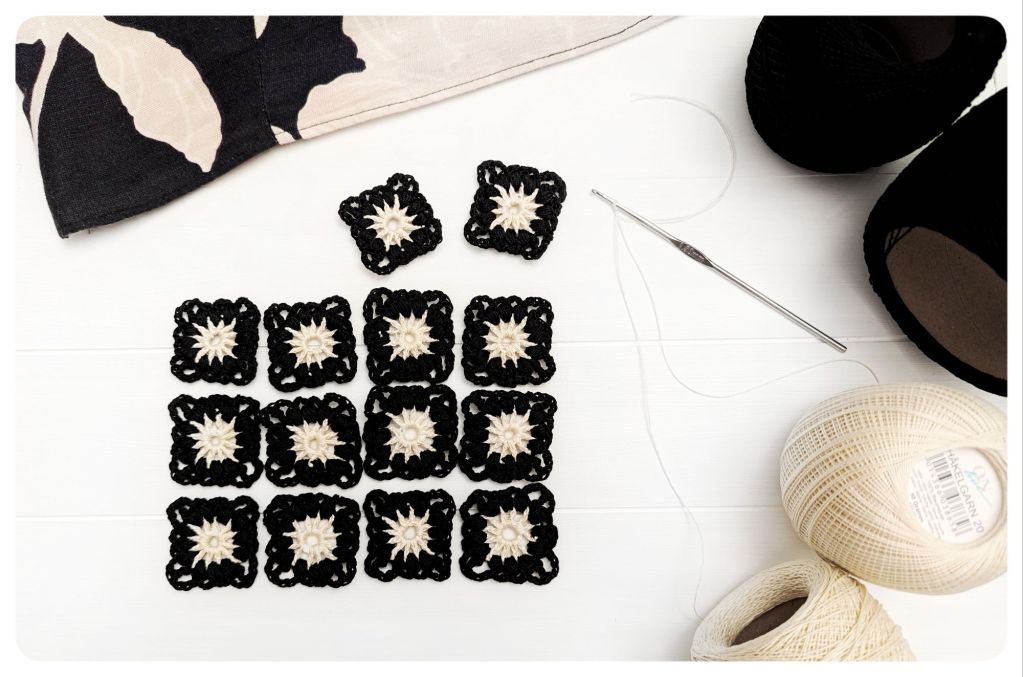
Step 3 (Crochet the granny squares):
Now, crochet 14 motifs or granny squares one after another. See the crochet diagram above for the Granny Square pattern.
I crocheted double-stranded, both the trim and the Granny Squares.
Step 4 (Join the granny squares):
Once you have enough granny squares, connect them with the header. Crochet this band in rows and join the granny squares directly into the chain stitch row at regular intervals, as shown in the crochet diagram above. The result is the completed Granny-Squares-trim.

Step 5 (Attach the granny square trim to the top’s hem):
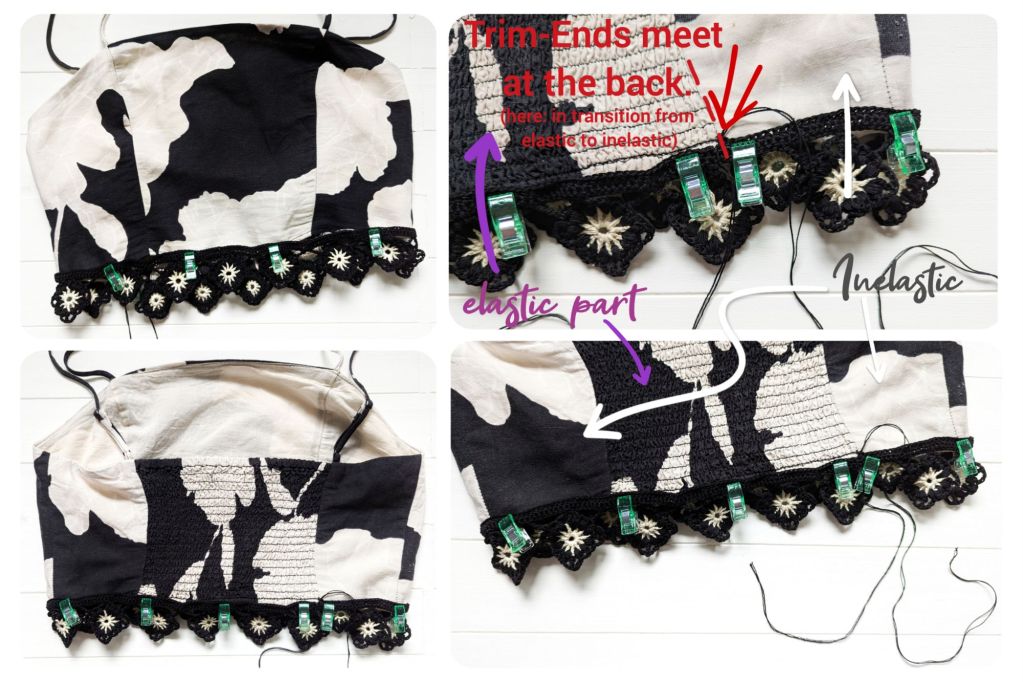
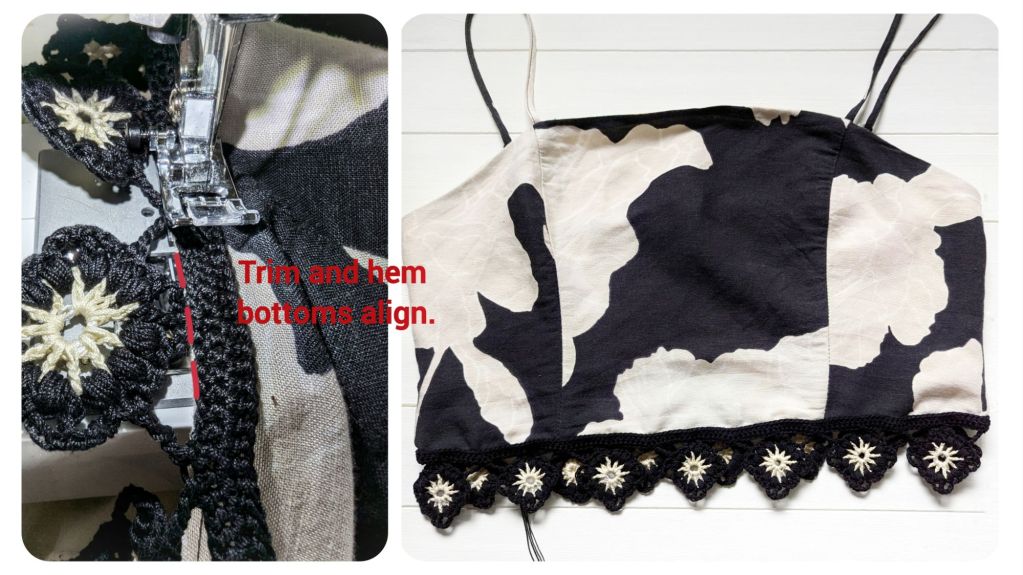
Next, secure the back of the granny square trim with clips directly to the hem on the right side of your crop top, so that the bottom of the trim’s header (1.R) aligns with the bottom of the top.
Attaching the header with clips prior to sewing allows you to set the ideal stretch beforehand. Make sure the beginning and end of the trim meet at the back of the top. However, only join the ends at the very end after step 7 – that way, you can still make adjustments if necessary (shorten the header or crochet a few extra stitches if it’s too short).
As my top has an elastic smoked part, I let the trim start and end at the transition to the smoked part, and I attached the header more loosely along the smoked part with clips than I did for the rest of the hem.
Step 6 (Sewing):
Now sew the trim onto the hem. If you want to attach the trim just temporarily to easily remove or replace it later on, sew it by hand. Use a straight stitch and sew above (optionally, also below) the trim to prevent the band from folding over at the top.
Step 7 (Join the trim ends):
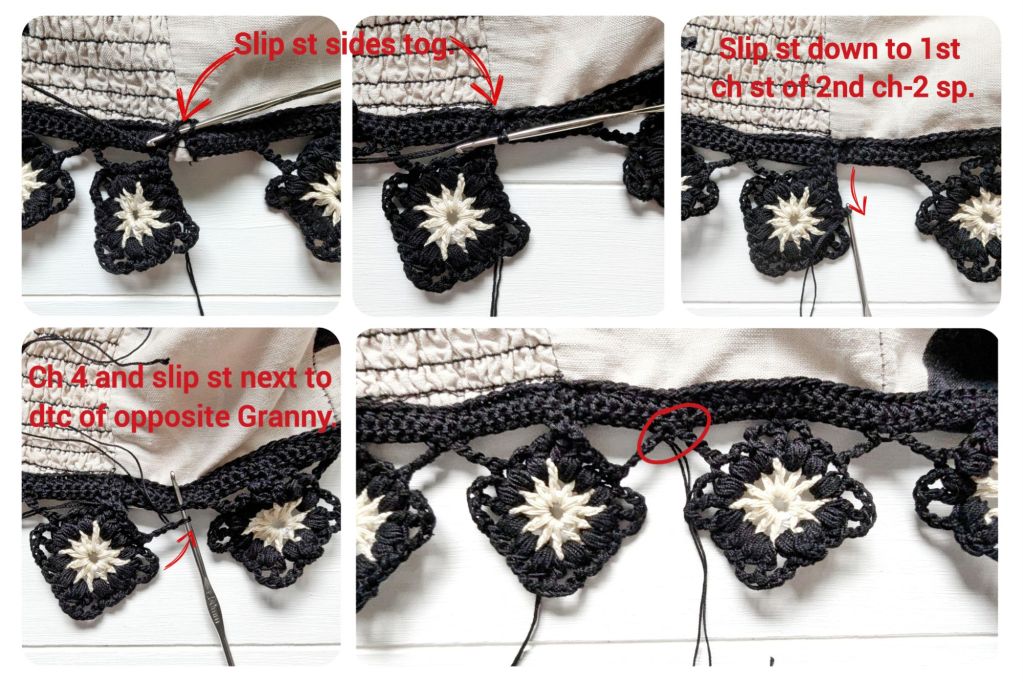
Now, we want to connect the header sides so that the ends don’t pull apart when the top gets stretched.
Resume the working yarn of the last row of the header and slip stitch the sides together. Then slip stitch along the edge of the left-side Granny in each ch and puff st down to the 2nd ch-2 space, then 1 slip stitch in 1st ch st of 2nd ch-2 space, now ch 4 and work a slip st in the stitch after the dtc of the right side. Weave the ends in.
Now you’ve finished your very own personalized crop top look.


If the idea of a Granny Square trim seems too complicated, you can simply sew the Granny Squares together along the sides to form a crochet band, and then sew the top edge of this crochet band to the hem.
I hope you enjoy the instructions and have fun trying it out!