

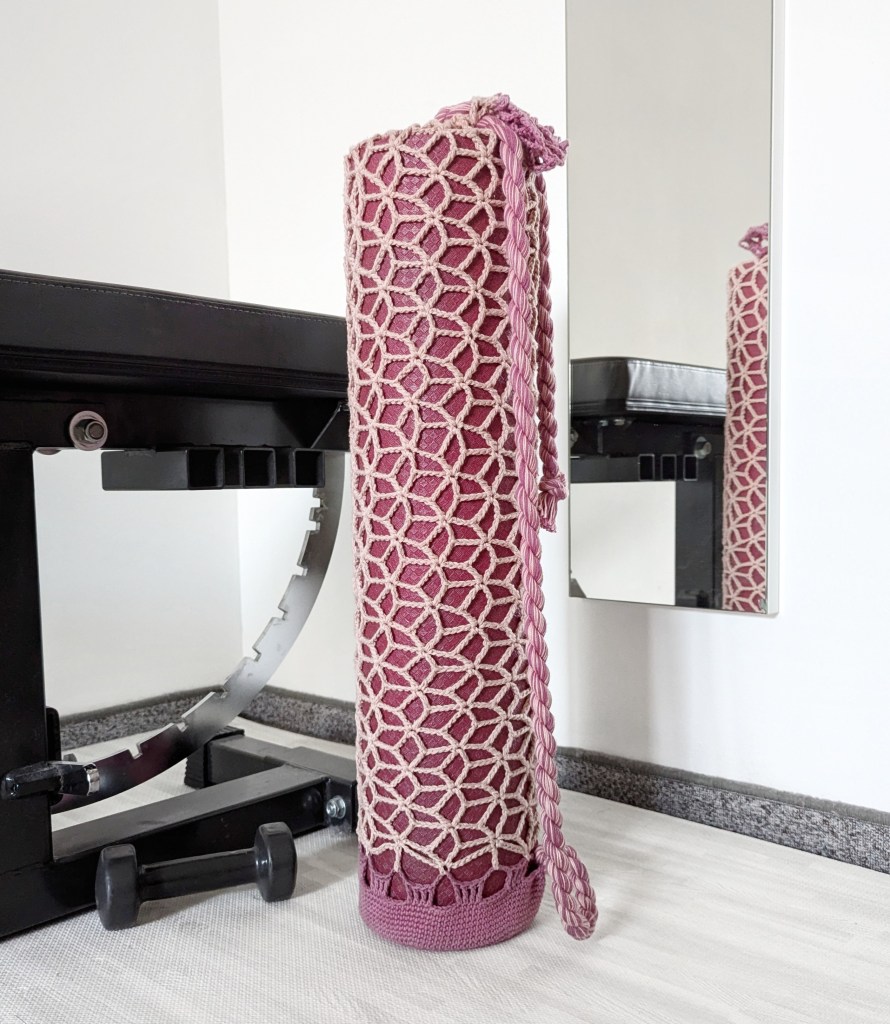
Looking for a stylish and functional way to carry your yoga mat? This crochet mat bag is the perfect accessory! Whether you’re heading to the studio or working out at home, this handmade bag will keep your mat secure while adding a touch of personal flair. The bag is designed with a simple star-net pattern, making it an ideal project for beginners and seasoned crocheters alike. Get the free pattern and some tips for your ideal bag size here!
From floor to cord – the crochet bag for your yoga or fitness mat is made with only yarn and a crochet hook.
So, grab your crochet hook, and let’s get started on crafting your own custom mat bag!
Introduction
The crocheted bag consists of a bottom and a star-pattern net, as well as a cord. You start from the bottom and continue with your net. The cord is attached at the end of your work.
I used the following material:
- for the bottom: medium yarn with a recommended hook size of 3 – 4 mm. I needed less than 1 yarn ball,
- for the net: a fine yarn (with a recommended hook size of 2.5 – 3.5 mm) which I crocheted with double strands to match the thickness of the bottom (because I wanted to use old yarn up. Ideally, you use one yarn brand for both the bottom and the net). I used 2 yarn balls for the entire net length and used the yarn of the bottom for the top of the net to reach my desired length,
- for the cord: fine yarn. I used 2 yarn ball in 2 colours to add a colour-twist,
- from bottom to top of the net, I used a crochet hook of 3.5 m
How to create the crocheted mat bag (general description, for the detailed pattern see below):
- First, measure the dimensions of your fitness mat while it is bounded: the diameter of your mat defines the number of increase rounds to work in the beginning, but add two or more increase rounds, otherwise the bag will be too tight. The length of your mat defines the number of rows to work for the net. Add a few more rounds of net to be able to bind the bag with the cord or add some space to grap your crochet bag.
- Start with the floor of the mat. Work a magic ring, then do regular single crochet increase rounds until you cover your desired mat diameter + some additional side space.
- Optionally, add a few rounds of single crochets to add a border to your bottom.
- Continue with your net (in star-pattern, see diagram below) and work all the way to cover your entire mat length plus 6 or more rounds of net.
- Create a long cord. I used this technique of twisting the yarn to be able to create a 2-colour-twisted cord but I needed to draw my (2-differently coloured) yarn strands (12 times) across my entire room (for 4-5 meters at least). Alternatively, you could crochet a simple 2-strands cord using this technique or a 3-strands I-cord using this technique. Or you could just use a long cotton band instead.
Abbreviations and General Pattern Description
The instructions are written in US Crochet Terminology.
Abbreviations: sc = single crochet | tc = treble crochet | sl st = slip stitch | st, sts = stitch, stitches | ch = chain | ch sp(s) = chain spaces | Rd = round
| k sc x t | work k number of sc sts in the next t sts; e.g. (1 sc, ch 1) x 3 means that you work 1 sc in the next st, then ch 1, and you repeat this for the next 2 sts (you increase the row count by 3 ch sts) |
Working into chain spaces
Indicates a free location typically created by several consecutive chain stitches. For example, “1dc, ch5, 1 dc” creates a space (of ch-5) between the dc-sts through which you could stitch hiding the ch-5 (wrapping ch-5 with the new sts).
- The bottom is worked in continuous spiral rounds. For the net, however, I shifted to work in closed rounds (ending each round in a slip stitch that I skip in the new round). You can do either way, but make sure that the bottom round for the cord is aligned.
- My fitness mat has a diameter of 14 cm (when it’s bound). Add 1 – 2 cm to give your mat some room in your bag (=calculated diameter). Start by working increase rounds of 6 increases per round until you reach your calculated diameter.
- My mat’s length is 63 cm. Again, add a few more cm to the length, because you want to properly close the mat or have some space to be able to grap the mat by the top of the net (=calculated length).
- To determine the number of ch sps for the cord-round (26.Rd):
Take the number of stitches of your last round (e.g. 108 sts). You need an even number of ch sps, so each block (defined by the ch sps and the sts in-between) must be equally large. I thought I needed 4-5 chs per ch sp to fit my preferred cord-thickness. And I felt that 4 stitches between the ch sps would look best. For 108 sts, 9 sts are an even divisor that I divided into 5 ch sts and 4 sts in-between (resulting in 12 blocks of ch sps and sts in-between). I used treble crochets (tc) as sts for the cord-round to fit the thickness of the cord. - To determine the 1.Rd of your star-net:
Each 5 ch sps (of the 26.Rd) are neighboring to 2 tc sts. So its 5 ch sps + 4 tc (2 tc on each side of the ch sps). resp. 9 stitch-blocks. Round to the lower even number: 8 => 8 ch sps will be the starting ground of your net. - To determine the star-pattern:
The star consists of “spread-outs” defined as (1 tc, ch k-1, 1 tc), of “points” defines as “1 sc”, and of the “tails” in-between the two, defined as ch k /2.
In my example, for ch 8 => (1 tc, ch 7, 1 tc), ch 4, 1 sc, ch 4
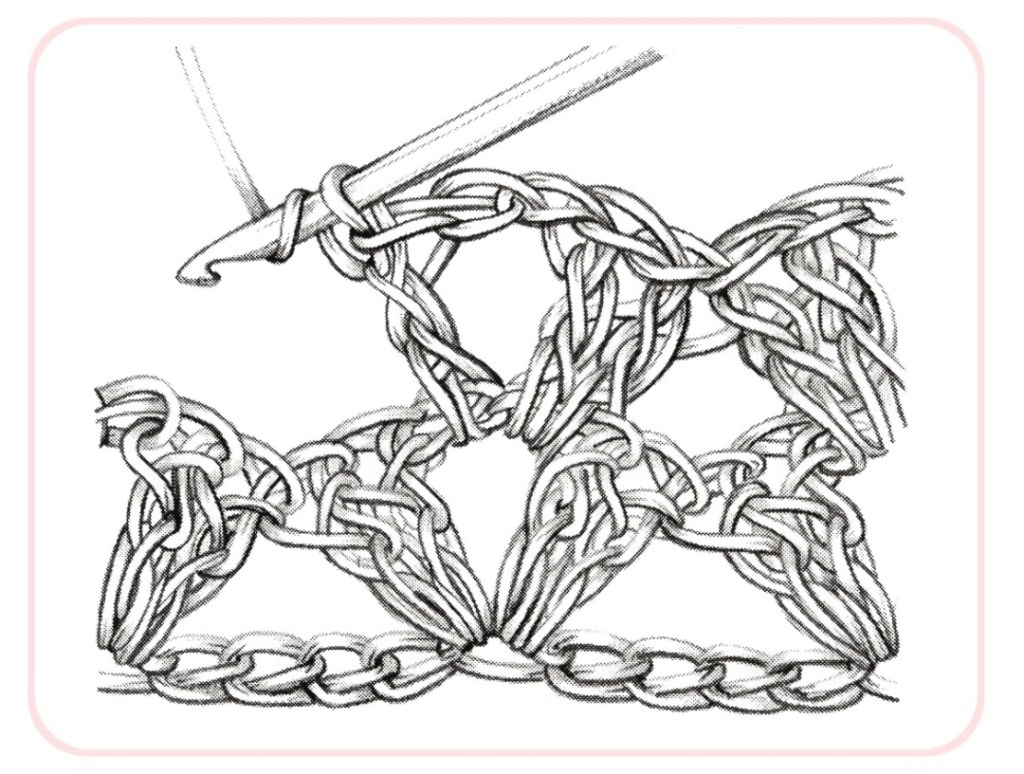
Crochet Diagram
Free Pattern
1. Rd: 6 sc in Magic Ring (6)
2. Rd: 2 sc x 6 (12)
3. Rd: (1 sc, 2 sc) x 6 (18)
4. Rd: (1 sc x 2, 2 sc) x 6 (24)
5. Rd: (1 sc x 3, 2 sc) x 6 (30)
… continue working increase rounds of 6 increase stitches per round until you reach the calculated diameter. I worked 18 increase rounds:
18. Rd: (1 sc x 16, 2 sc) x 6 (108)
Now, we work a few single crochet rounds:
19. – 25. Rd: 1 sc x 108 (7 rounds)
Now, we create the rounds for the cord as regular chain spaces (ch sps) through which the cord will be thread at the end.
26. Rd: ch 8 (count as 1 tc and ch 5), (skip next 5 sts, 1 tc x 4, ch 5) x 11, skip next 5 sts, 1 tc x 3, sl st in 3rd ch st from beginning – you have got 12 ch-sps.
The net is worked in a star-pattern. The 1.Rd of the star pattern defines the structure of the next rounds. To facilitate the reading, I count the net-rounds anew, though you continue your work:
1. Rd (=27. Rd…): 1 sl st in next 3 ch sts, change colour to net-colour (rose). Ch 11 (count as 1 tc and ch 8), (1 sc in next ch-5 sp, ch 8, 1 tc in next ch-5 sp, ch 8) x 5, 1 sc in next ch-5 sp, ch 8, 1 sl st in 3rd ch of next ch-11 sp.
=> This 1.Rd of the star-pattern consists of sc and tc sts. The star-pattern thereafter looks, on general, as follows: (1 tc, ch 7, 1 tc) for each sc st, 1 sc in each ch-7 sp or tc st, ch 4 between the sc and (…).
2. Rd: ch1, 1 sc in same st as ch-1, (ch4, 1 tc in next sc, ch7, 1 tc in same sc as before, ch4, 1 sc in next tc) x 5, ch4, 1 tc in next sc, ch7, 1 tc in same sc, ch4, sl st in 1st sc
3. Rd: ch 10 (count as 1 tc and ch 7), (1 tc in same sc as last st, ch4, 1 sc in next ch-7 sp, ch4, 1 tc in next sc, ch7) x 5, 1 tc in same sc, ch4, 1 sc in next ch-7 sp, ch4, sl st in 3rd of ch-10 sp.
4. Rd: 1 sl st in next 3 ch sts of ch-7 sp, 1 sc in same ch sp, (ch4, 1 tc in next sc, ch7, 1 tc in same sc, ch4, 1 sc in next ch-7 sp) x 5, ch4, 1 tc in next sc, ch7, 1 tc in same sc, ch4, sl st in 1st sc
5. Rd: ch 3 (count as 1 tc), (ch4, 1 sc in next ch-7 sp, ch4, 1 tc in next sc, ch7, 1 tc in same sc) x 5, ch4, 1 sc in next ch-7 sp, ch4, 1tc in base st of next ch-7 sp, ch7, sl st in 3rd ch st from beginning
6. Rd: work sl sts to your next sc st (= 4 sl sts), repeat 3. Rd (ch 10, …).
From now, repeat 4. – 6. Rd until you have reached your preferred/ calculated length.
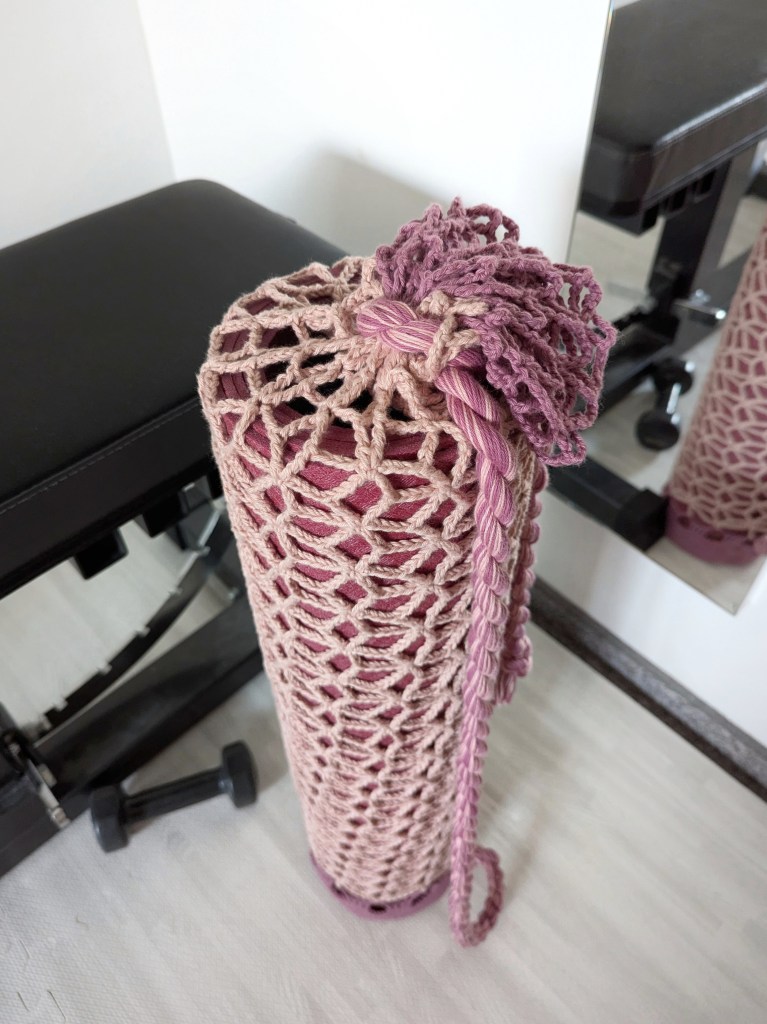
Weave the ends in and draw the cord from the 26. Rd through the top (leave a few rounds at the top). You can draw the cord through every ch sp across the 26. Rd or – as in my illustrations- through only 2 ch sps.
Your crochet mat bag is finished!
I hope you enjoy this pattern and your new crochet bag!