

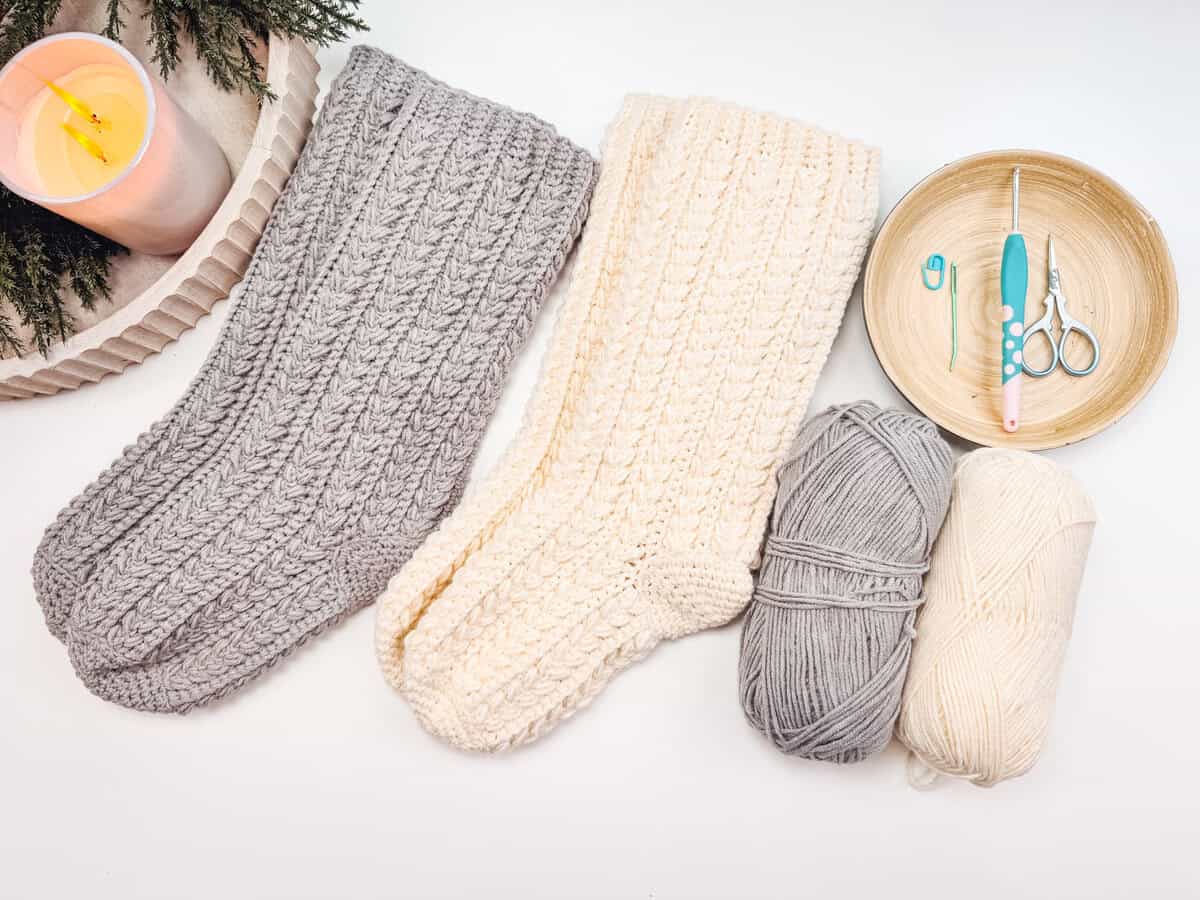
Crochet Socks – The Perfect Handmade Christmas Gift
Grandma always knew best: Christmas calls for handmade socks!
But don’t worry – this tradition is anything but old-fashioned today. Crochet socks have become a stylish and modern DIY project with a personal touch. Whether they’re soft and cozy in your favorite colors, feature cute patterns, allergy-friendly yarns, or just a fun and colorful vibe – making your own socks means gifting not only warm feet but also a bit of personality.
And the best part? Crocheting socks is easier than you think! They work up quickly, can be worn all year round, and make the perfect handmade gift for anyone who loves something practical, heartfelt, and homey – even if you’re short on time.
In this post, I’ll show you five simple and beginner-friendly ways to crochet socks – from horizontally worked designs to vertical patterns. There’s something here for every taste! Of course, more advanced methods exist (like those shaped heels inspired by knitted or sewn socks), but the versions below are intentionally simple and ideal for beginners.
💡 Note: These are creative guides to help you explore different styles – not detailed step-by-step instructions. However, each variation includes a free crochet socks pattern you can follow right away!
At the end of the post, you’ll also find tips on choosing the right yarn and stitch patterns so your socks turn out comfy, durable, and perfectly fitted.
So grab your hook, pick your favorite yarn, and get ready to crochet your own cozy pair of socks – the perfect DIY project for the holidays (or any time of year)! 🧦✨
Introduction
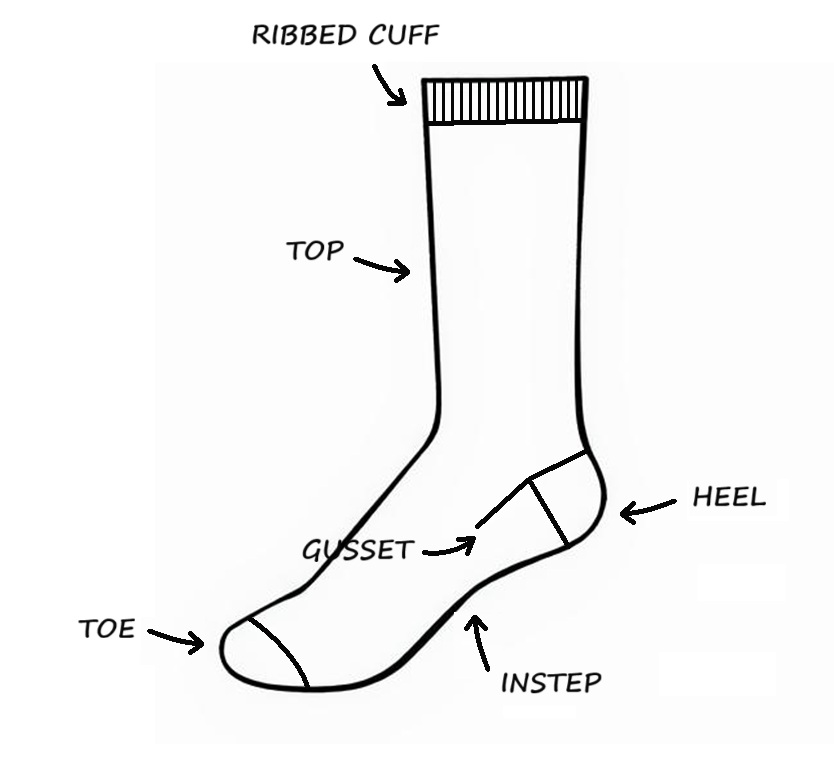
A sock can be divided into the following sections:
- Toe: The front part of the sock, covering the top of all the toes. It can be started in the round (as a magic ring) or flat (as a chain foundation).
- Foot (instep/upper foot): The middle section between the toe and the heel, usually worked straight. About 1–1.5 inches (3–4 cm) before the start of the heel, you can optionally add a gusset, which gives the sock some extra width across the instep.
- Heel: The back section, often worked separately from the rest of the sock.
- Leg (shaft): The part above the heel up to the cuff — essentially the “tube” of the sock.
- Cuff: The top edge of the sock, often worked to be elastic.
How to Measure Feet for Perfect Crochet Socks
To make sure your crochet socks fit perfectly, it’s important to measure the foot accurately. Here’s how:
- Toe Width (A): Measure the circumference at the widest part of the foot (usually across the ball). When starting the toe, crochet it about 3–4 stitches smaller so it fits snugly.
- Foot Length to Heel (B): Measure from the longest toe to about 1–1.5 inches (3–4 cm) before the heel (in a straight line over the instep). This length B is how far you will crochet from the toe to the heel.
- Instep Circumference (C): Measure around the highest point of the foot. This is especially important if you plan to add a gusset or use a stretchy stitch pattern. The sock should be about half of C in width at the heel so it slides on easily.
- Leg Circumference (D): Measure the widest point of the leg, up to where you want the sock to reach. This ensures the sock is neither too tight nor too loose.


💡 Tip: Exact measurements can be tricky, especially for kids or as a surprise gift for a friend. Sock blockers are a great way to check size, or you can trace the sole on cardboard: place the foot flat, trace the outline, and use it as a template while crocheting.
The 5 Crochet Sock Variations
Variation 1 – The Classic
The classic crochet sock is worked in four main stages: first the toe, then straight across the foot to the heel, and finally up the leg (shaft). The heel can be worked separately (as in this Variation 1: skipped initially and picked up later with a new yarn) or integrated (see Variation 2). At the end, you can optionally add a cuff (stage 5) for a neat or playful finish.
In this variation, the sock, including the heel flap, is worked in rounds (horizontally). Rounds can be continuous or worked in back-and-forth rows. The toe can be started with a magic ring or a chain foundation. The length of the chain should roughly match the distance between the second and third toe.
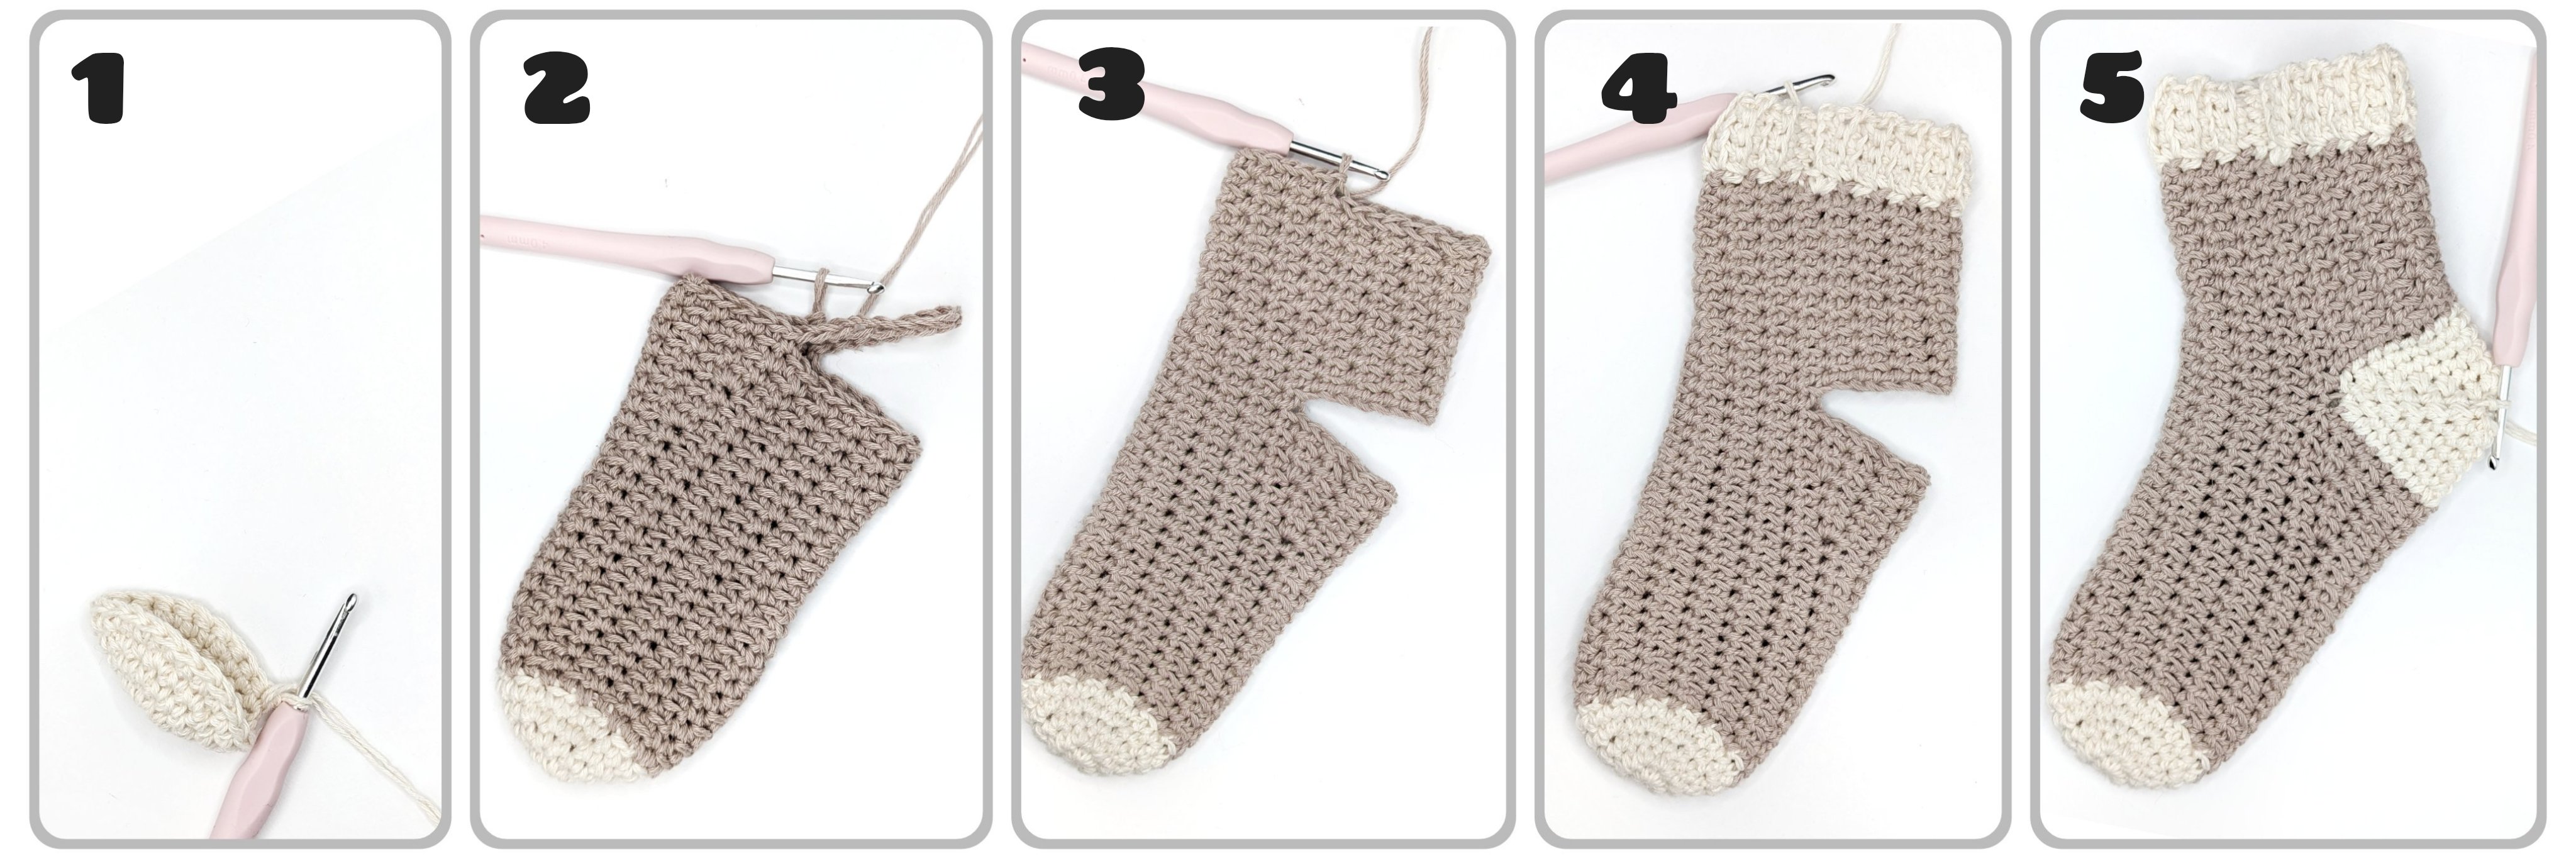
Image 1 – Toe:
The toe is usually started with a magic ring and worked in alternating increase rounds and regular rounds until all toes have enough space in the toe cap. Then continue working in regular rounds (see Image 2).
Crochet stitch used in the example photo: single crochets.
Image 2 – Foot / Instep:
Work the foot straight, without increases or decreases, until you reach the start of the heel (about 1 ½’’ / 3.8 cm from the back of the heel). Optionally, a gusset can be added in the next 2–4 rounds. The gusset makes it easier to slip the sock over the heel by widening the sock toward the heel. To do this, increase 2 sts on each side every 2–3 rounds. Repeat until the heel is reached and the width of the opening equals roughly half of the instep circumference (C). In Image 2, you can already see the transition to Image 3: the area is divided into a heel section and the continuation of the leg.
Crochet stitch used in the example photo: repetitions of (1 single crochet in next st, 1 single crochet in blo of next st).
Image 3 – Leg:
Work the leg continuously. First, skip the heel stitches and pick them up as a chain foundation. In the following rounds, work into these chains as well as the remaining foot stitches. If a wider leg is desired (e.g., for cozy boots), pick up more chains than stitches you skipped.
Image 4 – Cuff:
The cuff is essentially an extension of the leg and gives the sock a nice, elastic finish. After the last round of the leg (with new yarn if desired), pick up stitches along the top in chains and work in rows, alternating between the front and back loops of each stitch.
Crochet stitch used in the example photo: alternating rows of single crochet back-loops only and single crochet front-loops only.
Image 5 – Heel:
Pick up the heel with new yarn and work in back-and-forth rows or continuous rounds down to the heel tip. Decrease 2 sts at each side per row until the heel fits neatly into the sock and only about 6–10 stitches remain.
To keep your increases and decreases even, it’s best to mark the beginning of the round and the opposite midpoint with stitch markers.
Work your decreases just before and after each stitch marker to create a smooth, symmetrical heel shape.
Crochet stitch used in the example photo: single crochets.
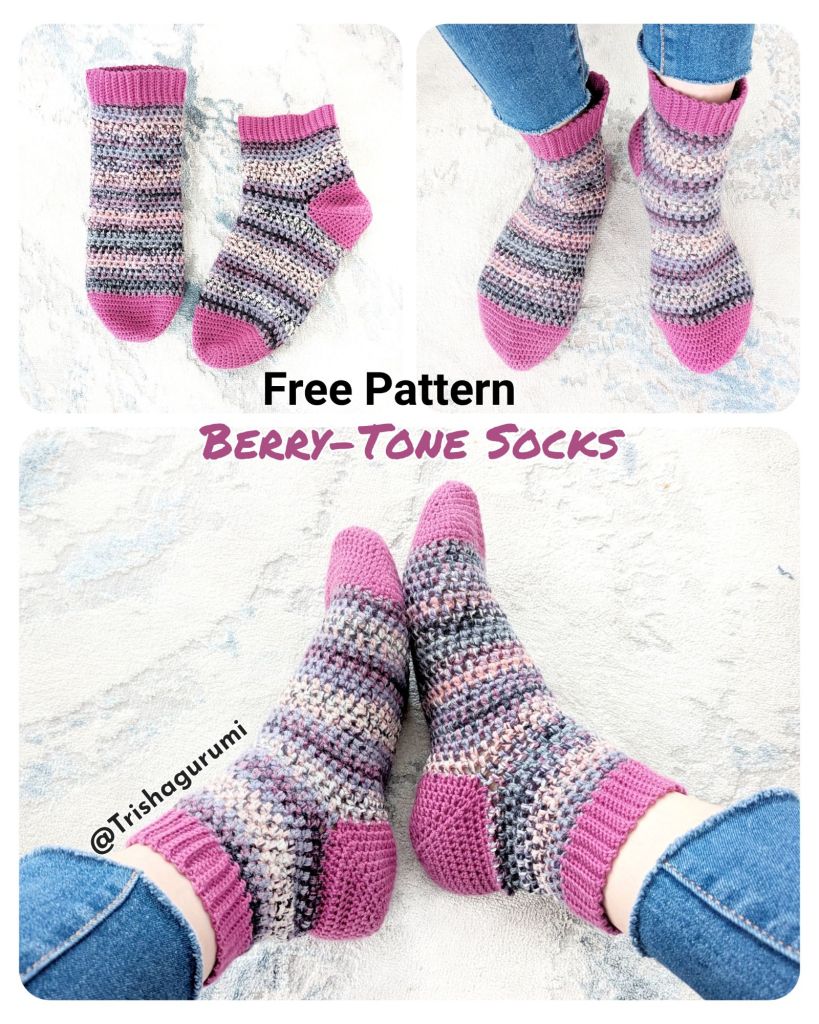
An example of this classic crochet sock is this free pattern for berry-colored house socks or these cozy waffle-textured socks from Lake Side Loops.

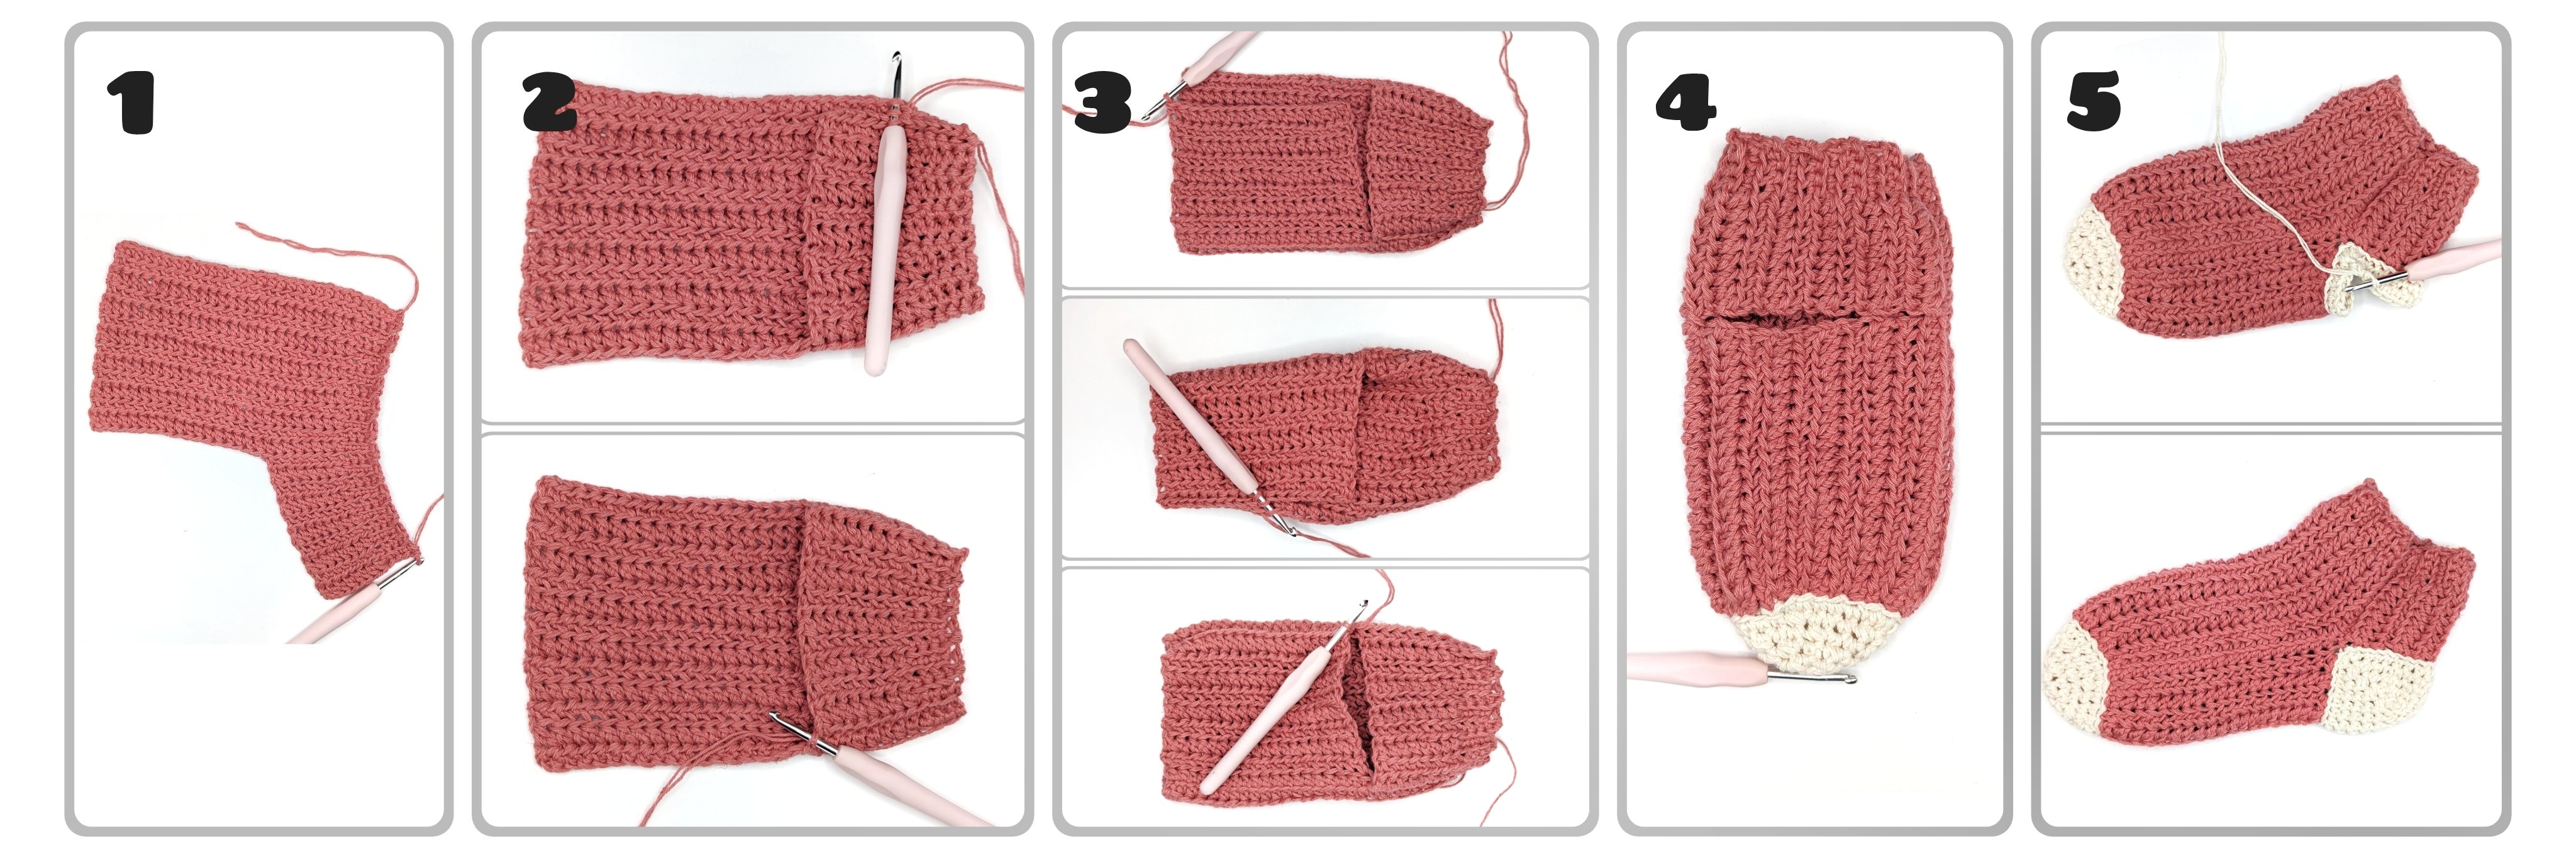
Variation 2 – The Classic with Continuous Heel
This variation is worked similarly to Variation 1, with one key difference: instead of working the leg first, you start with the heel and then continue with the leg afterward. So when you reach the heel, work it first (using a new yarn if needed) before continuing with the rest of the sock.

Image 1 – Toe:
Same as in Variant 1. Stitch used in the sample photo: single crochet (sc).
Image 2 – Foot / Instep:
Same as in Variant 1. At the beginning of the heel, continue directly with the heel section (see Image 3).
Stitch used in the sample photo: repeat (1 sc in next st, ch 1, skip 1 st); in the following round, work the single crochets into the chain spaces — this creates a woven texture.
Image 3 – Heel:
The heel is continued in rows using a new strand of yarn, joined on one side of the foot section.
First, crochet across about half of the foot stitches. Turn your work without making a turning chain, and skip the first stitch.
In each following row, skip both the turning chain and the first stitch again. Continue like this until only about 6–10 stitches remain — this forms the bottom curve of the heel.
This method of skipping the first stitch on each row creates a smooth, gradual decrease along both sides.
To close the heel, slip stitch into the side stitch located two rows below at the end of each row. This connects the heel back into a rounded shape until you reach the original round of the foot. From there, continue crocheting the leg (shaft) in rows or rounds, as directed in your pattern.
Stitch used in the sample photo: single crochet (sc).
Image 4 – Leg/Shaft:
Same as in Variant 1.
Image 5 – Cuff:
Same as in Variant 1. Stitch used in the sample photo: shell stitch pattern.
A beginner-friendly example of this crochet sock variation is this free Herringbone Socks pattern from Heart Hook Home.

Version 3 – The Vertical
This style is perfect if you want to use a stitch pattern that works vertically, such as the herringbone stitch.
The sock is made in four sections instead of five: the toe, the main body (foot and leg in one piece), the heel, and an optional cuff.
Start by crocheting the main body — that’s both the foot and the leg, and you can include the cuff if you like — in rows. The fabric should reach from the toe to the desired cuff height and wrap around half of the leg (from one side seam to the other). You’re essentially creating a rectangular panel that covers half of the leg’s circumference.
Next, continue from cuff height down to the heel in rows, leaving the heel area unworked (Image 1). Once your rectangle is wide enough to wrap fully around the leg, join the first and last row on the inside with slip stitches (Image 2).
Now crochet the lower portion (the sole) of the sock from the unworked edge of the rectangle. If you’d like a slimmer fit at the foot, simply work fewer rows. When done, join the sides from the inside with slip stitches again (Image 3).
Then, add the toe and heel in rounds. The toe is worked in spiral rounds with decreases every round (Image 4), and the heel is shaped similarly to Version 1, decreasing on both sides until it fits neatly into place (Image 5).
Crochet stitch used in the illustrations: half-double crochet in front-loops only (toe and heel worked in single crochets).
Alternatively, you can start the sock from the toe up. Begin with the toe cap in rounds, then switch to rows around the level of the little toe and crochet straight until you reach the cuff height. This forms a rectangular piece that runs from one side of the heel to the other and connects to the toe area. Continue as above — finishing the top portion first, then the bottom — and finally crochet the heel.
A great example of this vertical-style sock is the free pattern for cozy knee-high socks by Briana K Designs.
Version 4 – The Loop (or Tube Socks)
In this version, the crochet sock is worked entirely in rounds — either as continuous rounds or joined rounds (turning after each round, if you prefer), from the toe all the way up to the cuff. This method creates a seamless sock looking like a tube.
This approach works especially well with stretchy stitch patterns or open, lacy designs that naturally shape around the foot.
Depending on the stitch pattern you use, you can increase resp. decrease on the heel, so that the socks don’t fit too tight around the heel.
A stylish example of this style is the free pattern for sparkly Fishnet Socks by Knit Safari or these comfy tube socks by The Snugglery.
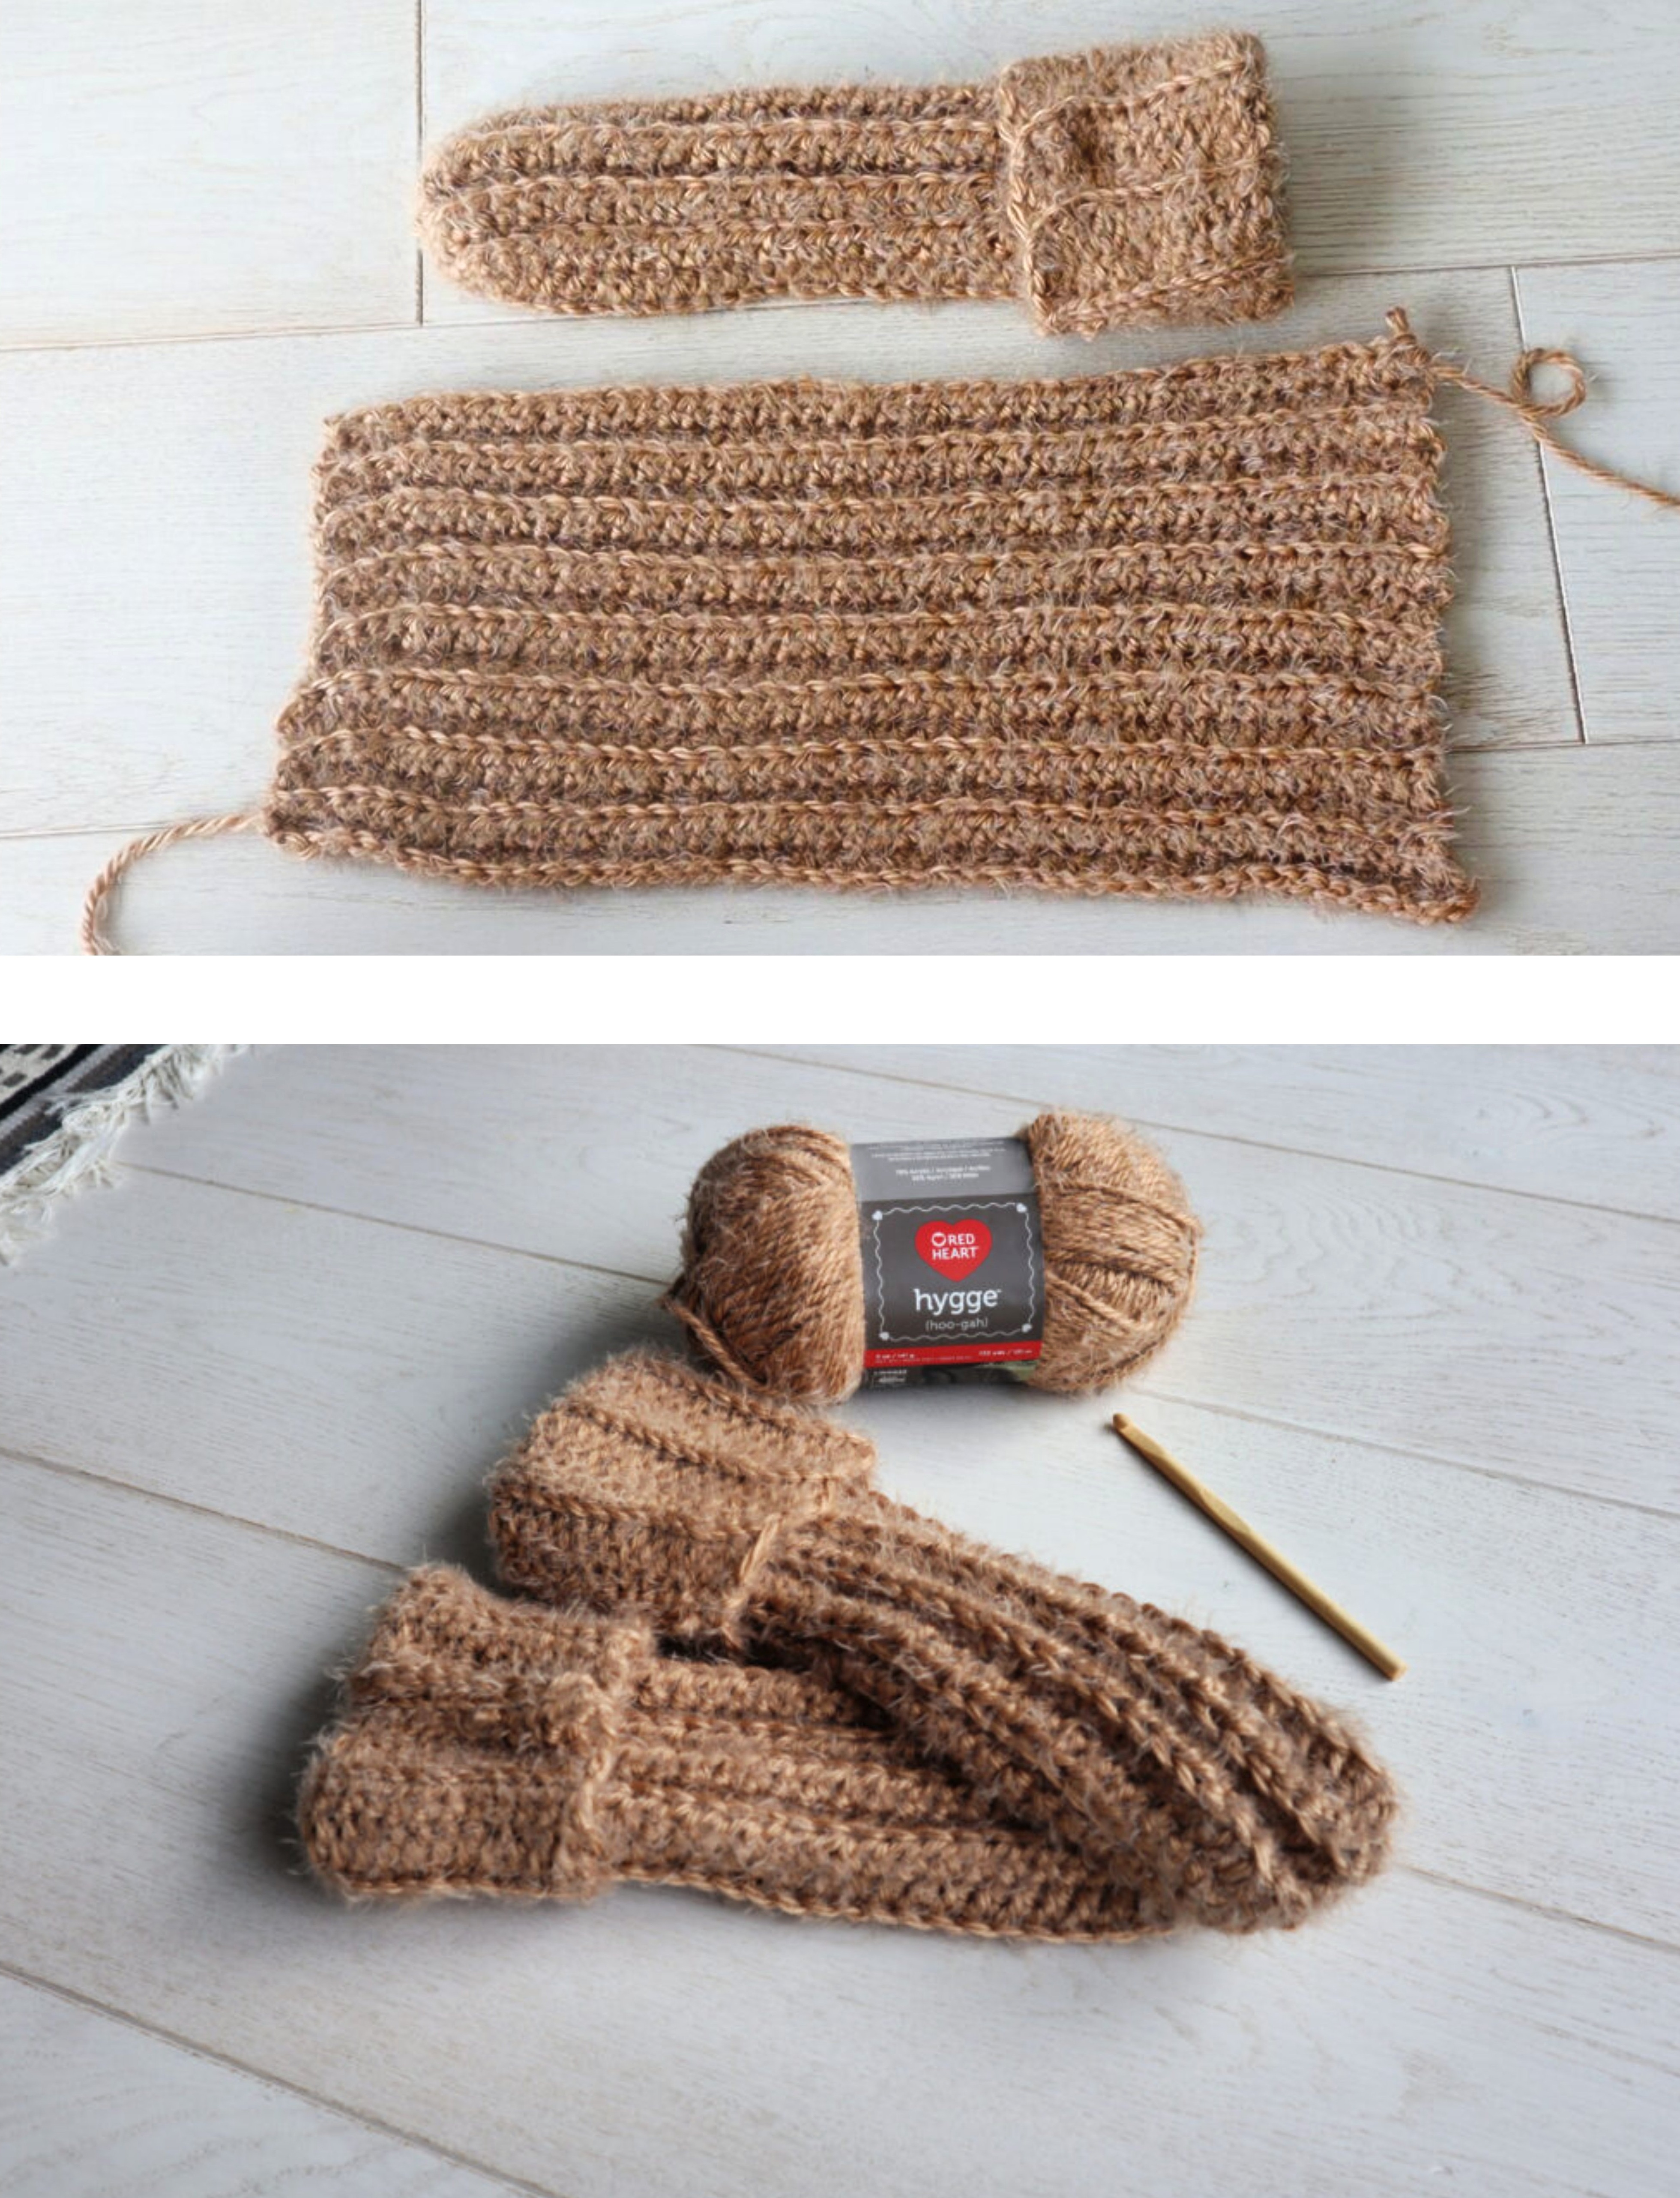

Version 5 – The Seam Sock
Okay, it’s not technically sewn — but this version is crocheted flat and then stitched together along the sides at the very end. The result is a distinctive look with a visible seam that gives the sock a handmade, “stitched” vibe.
At first, the look might seem a little unusual, but with a test sock or a sole template, this method works beautifully. It’s also a great option if you want to create a knit-like texture, similar to a diagonal-heel knit sock.
The Seam Sock is worked in rows and joined later to form the sock. You’ll start with the bottom of the foot, including the heel top, then continue along the sole toward the toe. After that, you’ll work the top of the foot, followed by the leg section and finally the cuff.


Image 1 – Heel:
The Seam Sock starts with the heel, worked from a chain foundation.
Begin by chaining the length from one side of the heel to the other.
Lay a sock flat with the heel on top and measure from one stretched heel edge to the other.
Then decrease 1 stitch on each side of every row until you reach the front edge of the heel.
If using a sole template, the last decrease row should match the outer heel edge.
Next, increase 1 stitch on each side of every row until you’re back to the original length — this marks the start of the sole.
Image 2 – Sole:
Begin by decreasing 1 stitch on each side of every row until you reach the desired sole width (measured at the widest part).
Then continue working straight until you reach the toe area.
Image 3 – Toe:
Work the toe the same way as the heel, but decrease 1 stitch at the beginning and end of every other row, until only about 6 stitches remain.
Now begin the instep, working in the opposite direction — increasing 1 stitch on each side every other row to shape the top of the foot.
Image 4 – Instep (Top of Foot):
Work the instep flat, mirroring the sole, starting without increases or decreases for a few rows.
Then increase 2 stitches per row until you reach the same stitch count as at the heel-to-sole transition.
This marks the start of the leg section.
Image 5 – Leg / Shaft:
At the beginning and end of each row, add foundation chains for the leg — each side should be half the length of the initial chain row.
Then decrease 1 stitch at each transition (where the added chains meet the instep) in every row, until the sock fits snugly around the leg.
Work a few more rows without decreases to reach your desired leg height, then finish with the cuff.
Image 6 / 7 – Assembly:
Sew all sides together from the inside, weave in the ends — and your sock is done!
Tips for Choosing Yarn and Stitches
Unlike knitted socks, crochet socks can sometimes end up a little stiff or tight — making them tricky to slip on. Here are a few simple tips to keep your handmade socks soft, stretchy, and comfy from the start:
- Stitch Type: The elasticity of your socks depends a lot on the stitches you use. Patterns made with half double crochets or double crochets have more stretch than those made entirely in single crochet. If you prefer using single crochet, try mixing it with chain stitches in a mesh or woven pattern — this gives your fabric more flexibility.
- Use a Larger Hook: Go up about 0.5–1 mm from the hook size recommended on your yarn label. A slightly larger hook creates a looser stitch texture, which makes your socks softer, stretchier, and more comfortable to wear.
- Choose the Right Yarn: Look for sock yarn — it usually contains a small amount of nylon, which adds stretch and durability. Soft merino wool or a polyacrylic blend can also work beautifully. Avoid stiff cottons unless they’re blended with something more flexible.
- Don’t Skip Blocking: Once your socks are finished, block them — you can use steam or a gentle wool soak. This helps relax the stitches, making the fabric softer, smoother, and easier to shape.
- Washing & Care: When picking your yarn, check the care instructions — especially if the socks will be machine washed. Pure wool usually needs handwashing and may shrink in the washer. If you’re gifting your socks and want them to last, go for a machine-washable yarn that can handle warm (40°C / 104°F) water. After the first wash, crochet socks can feel a little stiff, but don’t worry — they’ll soften up again once worn.
Have I missed an important tip? Share your favorite tricks for soft, stretchy crochet socks in the comments below!
