

Little did I know how hooked I’d get on crocheting my own socks!
They’re simple (perfect for beginners), quick to make, a fun way to experiment with new stitches – and super practical.
If amigurumis aren’t your thing and crocheting garments feels like too much of a commitment, why not try something in between? Crochet socks to the rescue!
Let’s be honest: you can never have too many socks.
And my absolute favorites? The ones I crocheted myself – cozy, comfy, and ideal as indoor socks instead of house slippers. (Or maybe I’m just getting older and finally appreciating the beauty of handmade things that are actually useful. Who knows?)
In just one month, I ended up making several pairs – some for myself, others as little gifts. It’s such an easy way to bring smiles to a few faces.
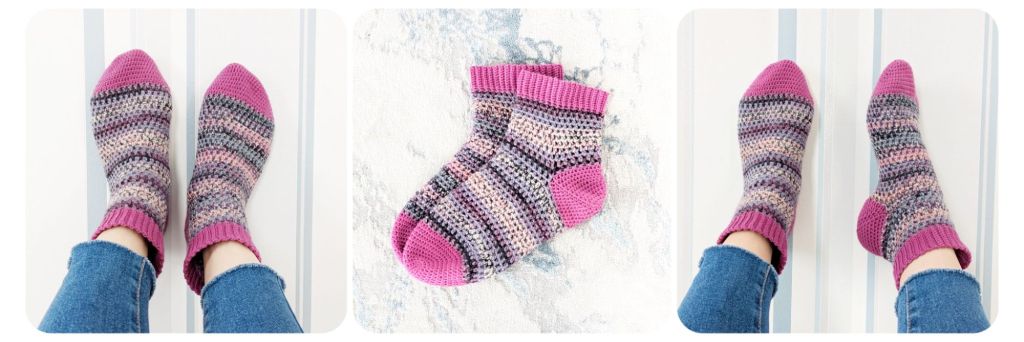
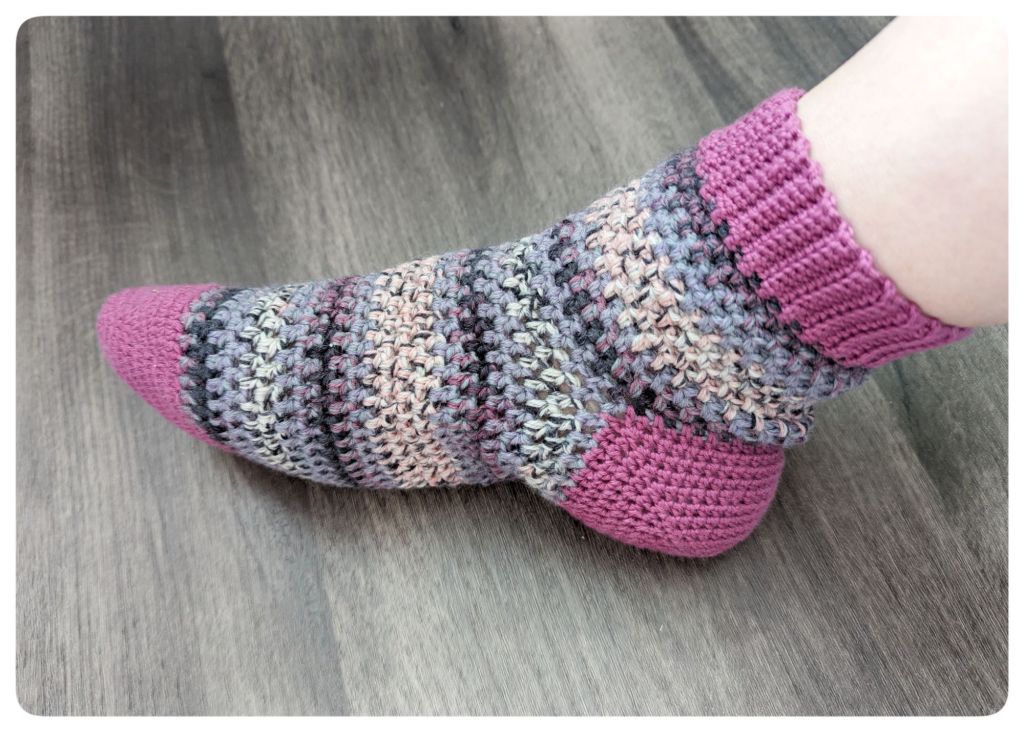
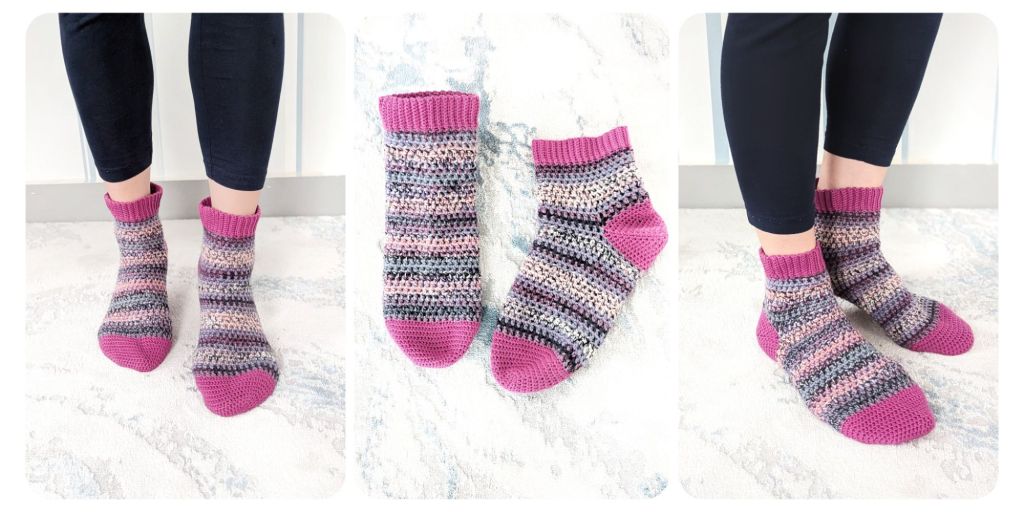
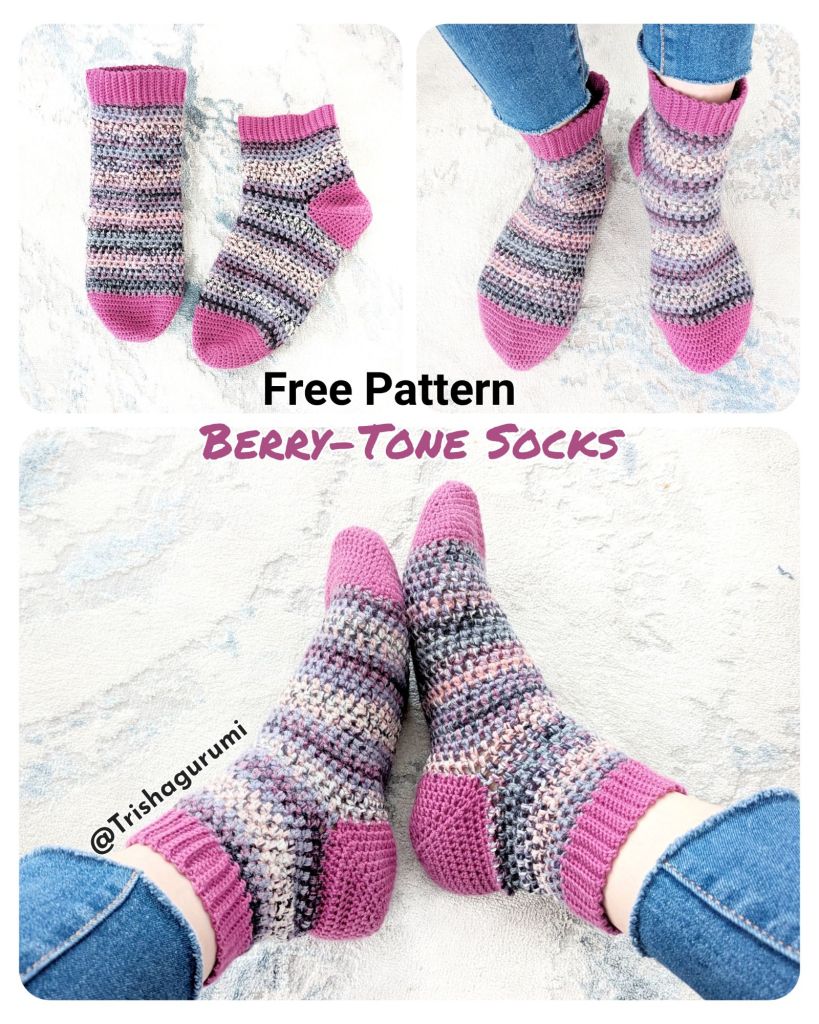
One of those pairs is featured here: these berry-toned crochet socks. 🍓
They work up quickly, and the mix of multicoloured yarn with a solid cotton yarn in a woven-style stitch gives them a unique, textured look.
This free pattern shows you exactly how to make the berry socks you see in the photos. The instructions are written for women’s EU size 39–40, but you can easily adjust the sizing.
And if you’re new to crocheting socks – don’t worry! I’ve included a sock fit guide to help you get the right measurements and adjust the pattern to your perfect fit.
Life’s too short for boring socks. Happy crocheting!

Yarn suggestions:

Typical sock yarn is made of wool or acrylic or a mix of both.
Cotton yarn is perfect too. It makes for soft, robust socks that are wool-allergy friendly and less slippery on laminate flooring. They are also more easily to be used with sock-stop paint.
A great yarn for socks is nylon too. It is a strong, highly elastic fibre, so you can create tight socks that can easily stretch over your heel. Nylon can be also perfectly blended with other fibres to add strength and a versatile colour pattern.
However, the best yarn for your crochet socks depends on the kind of socks you want to make:
🥿 Best for wearing with shoes: Lace or Fingering weight yarn (categories 0–1), especially merino/nylon blends.
🧦 Cozy at home: DK or Worsted, Light to Medium (thicker, great for crochet slippers or crochet boots).
🛋️ Ultimate comfort: Bulky or Extra Bulky yarn for warm winter slipper socks.
In my case I used 2 different yarn types, one cotton and one merino wool mix with polyamide. I used the cotton yarn for the toe, heel and ribbed cuff, the merino-polyamide yarn for the foot.
🧦 Crochet Sock Fit Guide
Crochet socks are thicker and less stretchy than knit ones, but you can still get a great fit with the right measurements and stitches. See below how you measure your socks and derive to the right number of stitches for your yarn.
📏 Key Measurements
- Instep Length (A): From the bottom of your toes to about 2–3 cm before your heel.
- Foot Circumference (B): Around the widest, thickest part of your foot. 👉 The actual measurement of the finished sock will be 1-2.5 cm less than this measurement.
- Leg Circumference (C): Measure the highest part of your leg where you would like the sock to reach up
- Leg Height (D): From point C down to the top of your heel.
📐 Sizing Tips
Crochet socks should be about 10% smaller than your foot for a snug fit. A snug fit prevents slipping or bunching.
👉 That means the sock circumference should be about 2–2.5 cm smaller than your actual foot.
👉 The sock length should be 1–1.5 cm shorter than your foot length. Don’t forget to block your socks at the end!
🔢 Stitch Calculation
Foot Circumference (B) × 0.9 (corresponds to -10%) = Sock Circumference
Sock Circumference × Gauge stitches per cm based on the yarn used ~ Total Stitches needed for your Foot Circumference B
➡️ When you crochet your socks from toe-up, like in this pattern, the stitches for the Foot Circumference is what you want to reach from the increase rounds of your toes, so working as many increase rounds for the toes until you’ve reached this stitch count for B.
🧮 Example (if your yarn type has a gauge of 26 sts for 10 cm):
- Foot Circumference = 25 cm (EU shoe size: 39)
- 25 × 0.9 = 22.5 cm (Sock Circumference)
- 22.5 × 2.6 sts/cm = ~58 stitches
🧩 Gusset Stitches
For toe-up socks, add stitches before the heel (gusset) to help the sock slide over the heel comfortably. These increases go on both sides of the foot.
👉 You don’t need gusset stitches if you crochet wider socks from the start, e.g. for thick house slippers.
Supplies for Crochet socks:

- crochet hook: 2.0 mm
- 2 stitch markers (I simply used 2 strands of yarn pieces as markers)
- yarn needle to weave in ends
- scissors
- tape measure
Yarn:
I used 2 types of yarn:
1) Rainbow Deluxe 8/4 by Hobbit in the colour Berry
– made of: 100% cotton
– yardage: appr. 120 m
2) Annabelle
– made of: 75% merino wool, 25% polyamide
– yardage: appr. 400 m
– I used 2 strands at once of the Annabelle yarn to create a thicker yarn and a more versatile colour pattern. Tip: work with the end strand and the inner strand of a skein at once.
🧵 Gauge:
10 x 10 cm =28 sts x 38 rows
🧦 Sock Size:
The instructions are for adult women’s EU size 39-40, but it can be adjusted to fit other foot sizes too. Make sure to regularly try the sock on and adjust it as you go.
✨ Special Stitches:
The pattern includes only basic crochet stitches, but it uses a stitch pattern of (ch 1, skip next st, 1 hdc in next ch-sp) for the foot. So you need to work the foot in an even number of stitches!
📚 Abbreviations:
Blo – back loop only
Sc – single crochet
hdc – half-double crochet
Sl st – slip stitch
St(s) – stitches
Ch – chain
Ch sp – chain space (the space created between two stitches)
Rd – round
R – row
📖 How to read the instructions:
2 hdc – work 2 hdc in 1 st
Hdc2tog – crochet the next 2 hdc sts together
Berry Tone Crochet Socks Instructions:
The socks are worked from toe-up, whereby we create an opening for the heel area and work the heel at the very end.
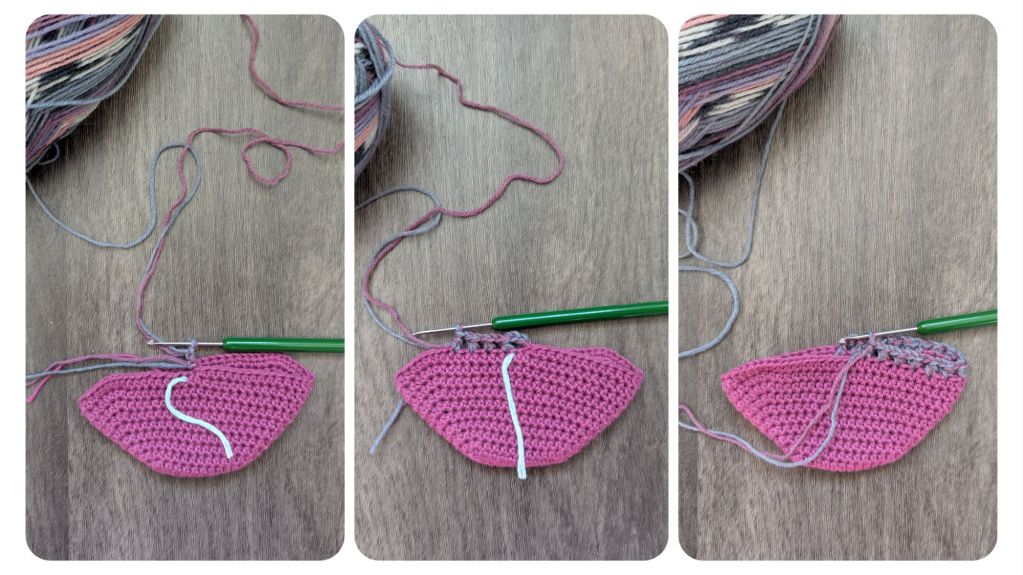
Toe of Sock:
Start with the berry tone cotton yarn.
Ch 12 + 1
1. Rd: start from 2nd ch st from hook, 1 sc x 11, 2 sc in last ch st, continue on other side: 1 sc x 11 (24)
2. Rd: (2 hdc, 1 hdc x 10, 2 hdc) x 2 (28)
3. Rd: (2 hdc, 1 hdc x 12, 2 hdc) x 2 (32)
4. Rd: 2 hdc x 2, 1 hdc x 14, 2 hdc x 2, 1 hdc x 14 (36)
5. Rd: 1 hdc x 2, 2 hdc x 2, 1 hdc x 16, 2 hdc x 2, 1 hdc x 14 (40)
6. Rd: 1 hdc x 3, 2 hdc x 2, 1 hdc x 18, 2 hdc x 2, 1 hdc x 15 (44)
7. Rd: 1 hdc x 4, 2 hdc x 2, 1 hdc x 20, 2 hdc x 2, 1 hdc x 16 (48)
8. Rd: 1 hdc x 5, 2 hdc x 2, 1 hdc x 22, 2 hdc x 2, 1 hdc x 17 (52)
9. Rd: 1 hdc x 6, 2 hdc x 2, 1 hdc x 24, 2 hdc x 2, 1 hdc x 18 (56)
10. Rd: 1 hdc x 7, 2 hdc x 2, 1 hdc x 26, 2 hdc x 2, 1 hdc x 19 (60)
You can continue increasing on each side of the sock until you’ve reached your foot circumference, measurement B. The toe part should perfectly fit your toe area. End the last increase round in a sl st in the last st, like this:
11. Rd: 1 hdc x 8, 2 hdc x 2, 1 hdc x 28, 2 hdc x 2, 1 hdc x 19, sl st in last st (64)
Continue working the foot part:
Foot part:
12. Rd: ch 2 while changing colour to 2 strands of the merino mix in the 1st ch (pay attention to the colour gradient for the 2nd sock), skip next hdc st, 1 hdc in next st, (ch 1, skip next hdc st, 1 hdc in next hdc st) repeat until end of round. In the last repetition end the round with 1 hdc in the base st of the sl st.
13. – onwards. Rd: (ch 1, 1 hdc in the next ch1-sp (skipping the hdc in-between) repeat until rd-end (x32)
Repeat 13. Rd until the sock reaches about 2-3 cm (1.5 inch) from the heel (in case you need to make a sock gusset). It’s best to try it on and add or remove rounds if needed. This creates the Instep, measurement A.
In case the socks fit tightly, you now crochet 2 more rounds in which you increase one stitch on each side of the sock for the sock gusset (so the socks can be pulled over the heel more easily). Otherwise (for thick house slippers, like in my case) repeat 2 more rounds of 13. Rd to get closer to the heel.
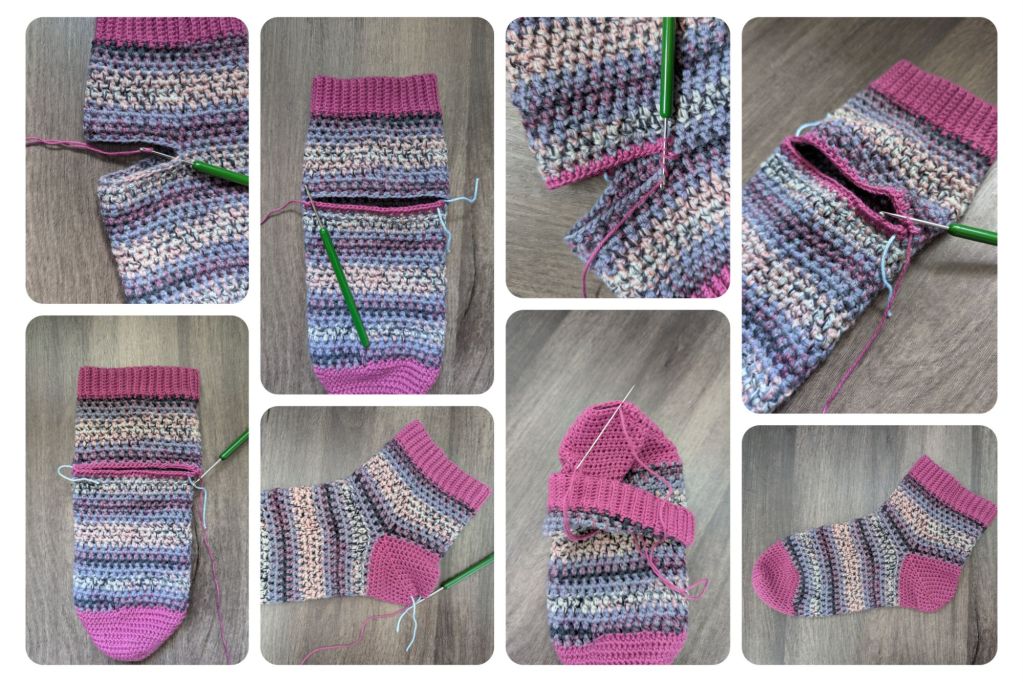
35. Rd: make sure that you’ve reached the side of the sock, otherwise continue working the stitch pattern until you’ve reached the side, and add another (ch 1, 1 hdc in next ch-sp) past the side. Now, we create the split for the heel:
Split for the heel:
Ch 28 and skip the next 28 sts, 1 hdc in the ch-sp after the 28 sts (the sts include hdc and ch-sps, so you’ve skipped 14 ch-sps), continue working the foot as before until Rd-end, that is (ch 1, 1 hdc in next ch-sp) x 16.
36. Rd: (ch 1, 1 hdc in next ch-sp), now work in the 28 ch sts with (ch 1, skip next ch st, 1 hdc in next ch st) along the chain (in my case, 14 times in total), (ch 1, 1 hdc in next ch-sp) along the foot (for another 16 times).
37. – 46. Rd: (ch 1, 1 hdc in next ch-sp) all way around
You can continue working the foot until you’ve reached your desired length. If you want your socks to reach much higher increase a stitch on each side every 2-3 rounds so that the socks fit the leg circumference, measurement C.
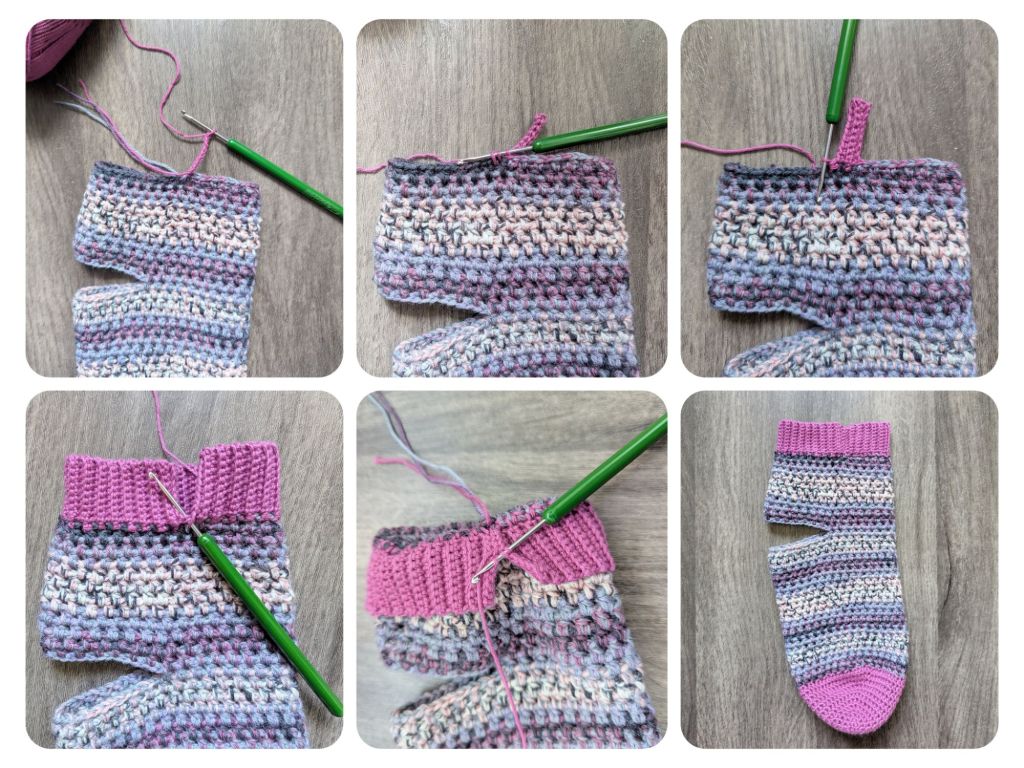
Add (ch 1, 1 sc in next ch-sp) x 2 to flatten the last Rd, in the last st change colour back to berry cotton.

Continue working the ribbed cuff (working in rows):
Ribbed Cuff:
Ch 9 + 1.
1. R: sl st x 9, sl st next 2 sts of the top of the sock together, turn
2. R: ch 1, skip the sl st from before, 1 scblo x 9, turn
3. R: ch 1, 1 scblo x 9, sl st next 2 sts from the top of the sock together, turn
Repeat 2. – 3. R another 30 times until you’ve reached the 1. R. In the last row, sl st in 1st sl st of the top of the sock, ch 1, turn the sock inside out and sl st the 1. R and last R (through the blo) closed.
Heel:
Work the heel in the cotton berry tone.
Start in the right corner st of the split (=35. Rd).
1. Rd: ch 2, 1 hdc in same st, place marker, 1 hdc in each ch-sp and hdc (no ch 1!) until the next corner st (=half of the heel sts, 28 sts), rotate,
Continue working on the other side of the split (on the ch side), 1 hdc in corner st, place marker, 1 hdc in the remaining (28) sts, sl st in 1st hdc st to level out the round (skipping the ch-2) (29 x 2),
2. Rd: ch 2, 1 hdc in same st, move up the marker, hdc2tog, 1 hdc until 3 sts before the next marker, hdc2tog, 1 hdc in next st, move up the marker, 1 hdc until 2 sts are left to the Rd-end, hdc2tog, sl st in 1st hdc (skipping, again, the ch-2)
Repeat the 2.Rd until 10-14 sts remain in total (check the fit of the heel and adjust by working more or less rounds).
Close the seam from inside the sock.
Weave all ends in.
Work the other sock in the same way.
Your Berry Tone Crochet Socks are finished!
I hope you enjoyed this pattern and you are happy with your new crochet socks.