


Summer is calling and you are looking for a new summer piece, easy to make and ready in no time? Then this free pattern might just be what you are looking for: a crochet bikini!
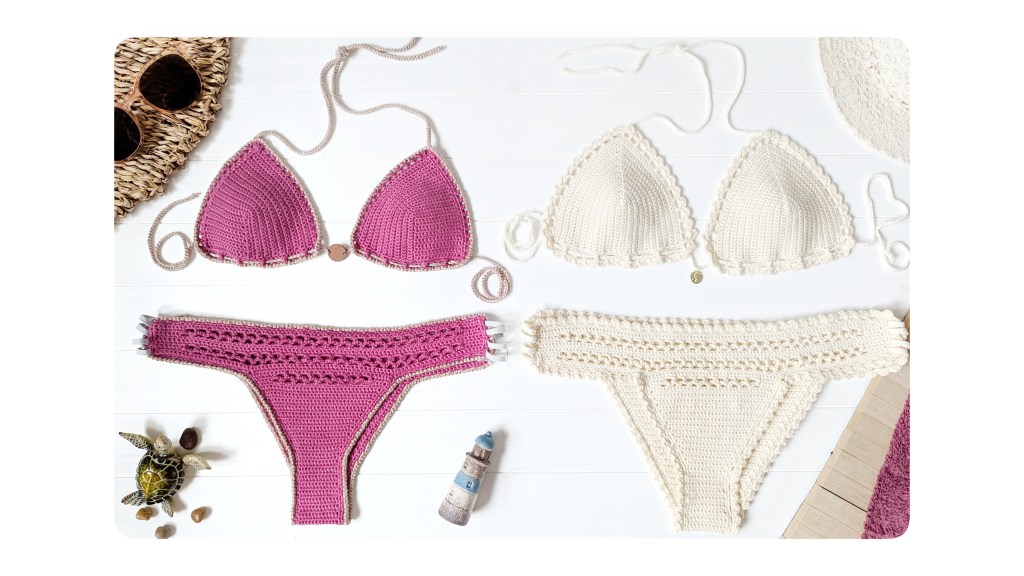
It’s stylish, can be easily combined with a maxi skirt for a stylish evening outfit on hot days, and you can be sure that it’s a true one-of-a-kind crochet piece. Introducing this Sunset Bikini Set – a versatile crochet pattern that lets you mix-and-match for a custom beach-ready look.
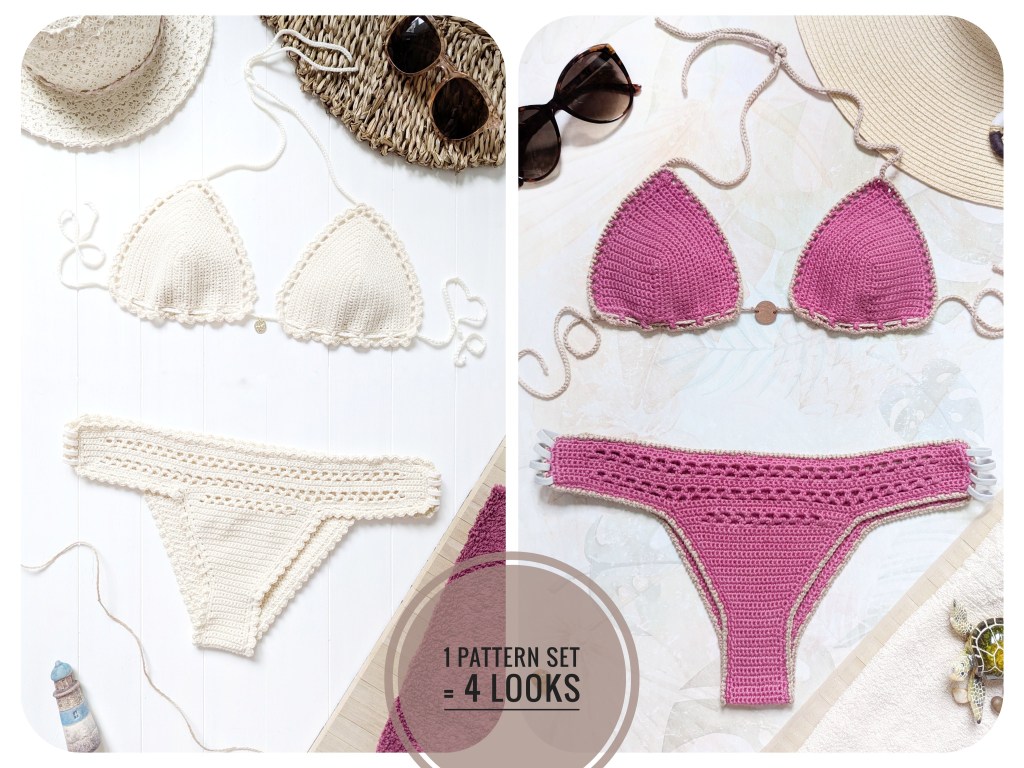
With just one pattern, you can create four unique bikini sets.

This easy-to-follow pattern includes:
- two cup styles – a classic triangle for timeless flair, and a shell option for a modern twist,
- two edging finishes – choose between a subtle trim or a shell border,
- instructions for crocheting a low-rise Brazilian bikini bottom,
- a size guide for sizes S to L resp. EU cup sizes A to C with tips for adjusting the pattern to your individual size,
- recommended yarn composition and tips for swim-ready crochet bikinis,
- many more tips, e.g. for customization, for creating stretchy bikini tops, etc.
Grab your hook and dive in!


What do you need
- Microfiber yarn with elastane content, e.g. Alize Diva Stretch.
- Crochet hook size in the lowest recommended number
- Scissors
- Darning needle for weaving ends in
- Measuring tape
- Elastic band (for the bikini trousers)
Tips for Choosing the Right Yarn
For a crocheted bikini, choosing the right yarn is crucial to ensure that the piece:
- fits well,
- doesn’t stretch out,
- doesn’t become too heavy in water,
- dries quickly, and
- feels comfortable against the skin.
In the following table I listed the recommended yarn composition to create a bikini that is, both comfortable and suitable for swimming:
Recommended Yarn Composition for Swim-Ready Crochet Bikinis
| Fiber | Content | Purpose |
| Polyamide (Nylon), Acrylic | 60–80% | Provides shape retention and durability, repels water for short swims, dries quickly. |
| Elastane / Spandex / Lycra | 5–10% | Adds stretch and elasticity for a snug, body-hugging fit. |
| Cotton (mercerized only) | 0–30% | Feels pleasant on the skin and adds stability, but absorbs water. Best avoided if the bikini is intended for swimming, not just beachwear use. |
Not Recommended Yarn Composition
- 100% Cotton: Absorbs water, becomes heavy and stretches out of shape.
- 100% Acrylic Yarn: Dries quickly but is not breathable and may feel uncomfortable on the skin.
- 100% Wool: Retains warmth, too hot for summer, not resistant to chlorine or saltwater, and becomes heavy when it’s wet.
Recommended Yarns (Examples)
- Alize Diva Stretch (92% microfiber acrylic, 8% elastane)
- Cascade Fixation (98% cotton, 2% elastane)
- Drops Cotton Viscose (suitable for tops only, as it’s rather soft)
- Schöller + Stahl Elastic Yarn (blend with elastane)
- Katia Elastic or Katia Summer Comfort (blend designed specifically for swimwear)
- Valeria Valeria di Roma Verano Elastic (80% viscose, 20% polyamide)
- Hilaturas LM Stretchy (100 % Tactel-polyamide)
- Mondial Brazil (100 % polyamide-microfiber)


Conclusion
If your crochet bikini is intended not only for sunbathing or as beachwear but also for actual swimming, use a microfiber yarn with elastane—Alize Diva Stretch is currently one of the most popular yarn choices for swimwear-ready crochet fashion.
Tips for an elastic Crochet Bikini
My crochet bikini is a lyocell-viscose-mix yarn and, thus, only suitable as a beach wear (for sunbathing or combined with a maxi-skirt for an evening outfit) and less so for swimming.
I wear a cup size 75B or cross-size 80A (in EU size), and my crochet bikini sits comfortable. However, as crochet is typically less stretchy than a bikini fabric or even knitted, it can be more difficult to create a comfortable crochet bikini for higher cup sizes (C and above). Here are some tips with which you can create a crochet bikini that allows for a bit of stretch (specifically recommended for higher cups sizes, C+):
- You can create a more stretchy fit if you use a pattern with more elastic crochet stitches, like (half-)double crochet stitches or a weaving pattern (single crochet and chain stitches), with the risk that the crochet bikini is more see-through than it would be using single crochets that are non-elastic stitches.
- You can increase elasticity in your crochet when you use a nylon-mix yarn or yarn with Lycra (Elasthane)-content. Such yarn is often found in crochet socks or yarn specifically made for swim wear. .
- If you do want to use a simple soft and light-weight cotton yarn (non-elastic) and a non-see-through stitch pattern with single crochet stitches, I recommend that you crochet a larger bikini cup, so it won’t fit too tightly (a size guide is provided in the pattern – you’d choose a cup larger than your usual cup). Additionally, use elastic straps from a fabric bikini (or any elastic fabric straps) instead of crochet straps for your crochet bikini. For some bikinis the straps can be removed, so you can use them on your crochet bikini without permanently damaging your fabric bikini.
Crochet Tips for the Bikini Bottom
- Since the bikini is tied at the sides, an exact hip fit is not mandatory—the ties give flexibility.
- Instead of using yarn ties, you can also sew an elastic band to the finished crochet bottom as a strap for better support while swimming.
- Make sure the back piece is slightly higher/larger than the front for anatomical fit.
- The pattern uses single crochet stitches for more coverage. If you want to use a wider, more elastic stitch (half-double or double crochet) add an inside fabric to your finished crochet bottom for more coverage.
- If possible, fit the bikini bottom during the crochet process to make sure that the bottom fits optimally.
I hope these tips help you create the perfect crochet bikini and that you enjoy wearing it!
Abbreviations
sc = single crochet | hdc = half-double crochet | dc = double crochet | tc = treble crochet | sl st = slip stitch | st, sts = stitch, stitches | ch = chain | ch sp = chain space (= space created by the sts between chain st(s)) | Rd = round | R = row | MR = magic ring | sc2tog = work next 2 sts in a single crochet together | YO = yarn over | rep = repeat
| k sc x t (e.g. 2 sc x 3) | work k number of single crochet stitches in each of the next tstitches (e.g. work 2 sc in each of the next 3 sts, increasing st count by 3) |
| sc2tog x t (e.g. sc2tog x 2) | crochet next 2 stitches in a single crochet together for the next t stitch-pairs (e.g. sc over next 2 st-pairs, decreasing st count by 2) |
| sc3tog x t | crochet next 3 stitches in a single crochet together for the next t stitch-pairs |
| Right, left | Indications as to the positions on the figure are based on the view of the figure, e.g. ‘the right eye’ is the right eye from the amigurumi’s perspective, or ‘on the left border’, again, is the view of the amigurumi |
| k sc-flo (k sc-blo) | work k single crochet stitch(es) in the front-loop (back-loop) only (e.g. (1 sc-flo x 7) means “work 1 sc in the front-loops only of the next 7 sts“ |
Taking Measurements
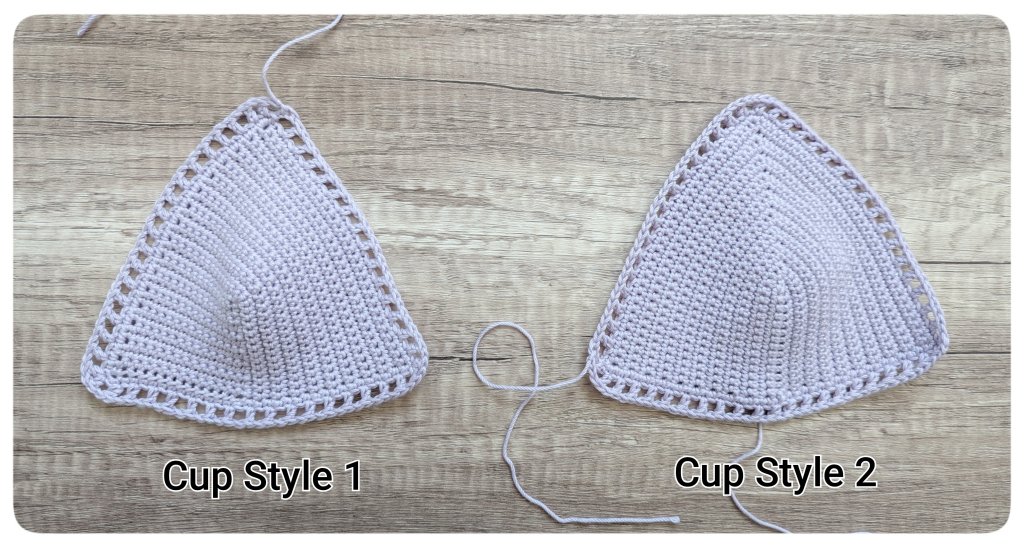
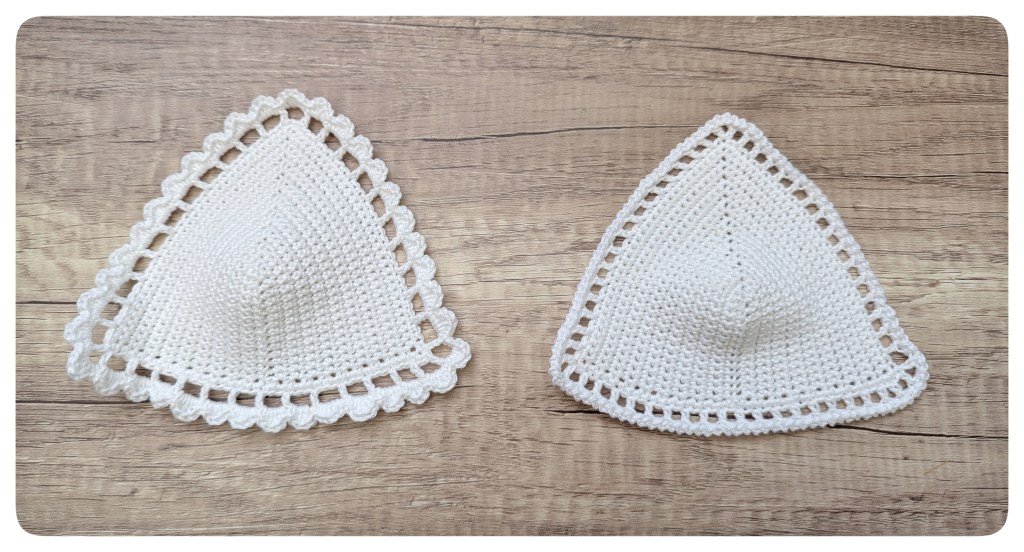
This pattern covers 2 versions of a bikini triangular bra and 1 version of a Brazilian low-cut bikini bottom with two different edging styles. The bras differ in their crochet construction:
- Cup Style 1 – is more pointed in the center than Cup Style 2, making it well-suited for fuller busts or if a retro look is desired.
- Cup Style 2 – is better suited for smaller or flatter busts.

To create the perfect fit and adjust the pattern accordingly, start by taking the required measurements for the bikini top and bottom.
1. Fitting for a Triangle Bikini Top:
To create a fitting bikini top, take the following measures:
(A) underbust circumference – measured around the torso, directly under the bust. This defines the minimum length of the straps for the top’s bottom.
(B) height of the cup – measured from the base of the breast (underbust) up to the point where you want your bikini top to go. This defines the total height of the triangular cup.
(C) cup peak – measured from the base of the breast (underbust) to the middle point of the breast (around nipple level). This measurement defines the number of starting stitches.
(D) width of the cup – measured from the outer edge of one breast to the inner edge of the same breast. This defines the width of the triangular cup.


👉 Alternatively, take the measures from a fabric bikini top as a reference.
Reference Values for a Triangular Bikini Top*
| Cup Size | Cup Height (B) (bottom until peak) | Cup Width (D) (at bottom) |
| A | ~ 14 cm (5.5″) | ~ 15-16 cm (5.9-6.3″) |
| B | ~ 16 cm (6.3″) | ~ 18 cm (7.1″) |
| C | ~ 18 cm (7.1″) | ~ 20 m (7.9″) |
*these reference values are averages used to determine the starting stitches and rows to work. The values include the area where the straps are added resp. the decorative edging. If these reference values do not match the desired dimensions, the pattern might need to be adjusted accordingly.
2. Fitting for a Bikini Bottom
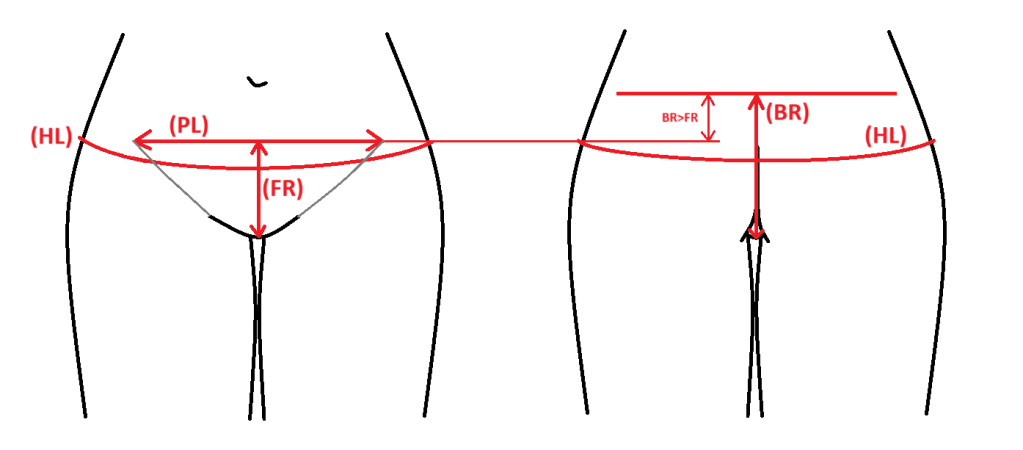
The bikini bottom is of Brazilian style, fits low-rise and contains an elastic side-tie. To create a fitting bikini bottom, take the following measures:
(HL) Hip line circumference: Measured around your body where the top of the bikini bottom will sit. Sometimes also referred to as the high hip or upper hip area. This is usually 5–10 cm above the fullest part of your hips and 5-8 cm below the waist line. In this pattern, the hip line circumference is based on a low-rise bikini bottom. If the reference values do not apply to your bikini bottom (or you want the bikini to be higher-waisted), adjust the starting stitches accordingly. The calculation for determining the ideal number of starting stitches is provided in the instructions for the bikini bottom on page 11.
(PL) Panty line / Bikini line crease: Measured the line from one crease / indentation of the top of the leg to the other leg’s top crease.
(FR) Front Rise: Distance from the front top edge of the bikini bottom down to the beginning of the crotch area.
(BR) Back Rise: Distance from the back top edge of the bikini bottom down to the beginning of the crotch area. BR should be higher than FR.

Reference Values for a Bikini Bottom (Side-Tie Style)**
**these reference values are averages used to determine the starting stitches and rows to work and include the decorative edging. If they do not match the desired dimensions, the starting stitches and the total number of (decrease, increase) rows might need be adjusted accordingly. However, as the bottom is side-tied the reference values don’t need to strictly apply.
Pattern for the BIKINI TOP
Cup Sizes: A, (B, C) – Larger sizes are indicated in parentheses.
Gauge (5 x 5 cm): 13 stitches x 14 rows
- yarn used for the pattern illustrations: Woll Butt Camilla (100% cotton), recommended hook size: 2.5-3.5 mm
Hook size used: 2.5 mm
Yardage: appr. 100 m
Starter Tip and Differences Between Cup Style 1 and Cup Style 2
👉 Both cup styles begin with a foundation single crochet chain. A foundation single crochet chain corresponds to a chain and 1 row of single crochets (sc). If you’re unsure about the correct starting length, you can use a triangle bikini you already own as a reference. The starting row corresponds to the length of the center seam, which typically reaches the center of the bra.

How the foundation lies in the cup differ between the two shapes:
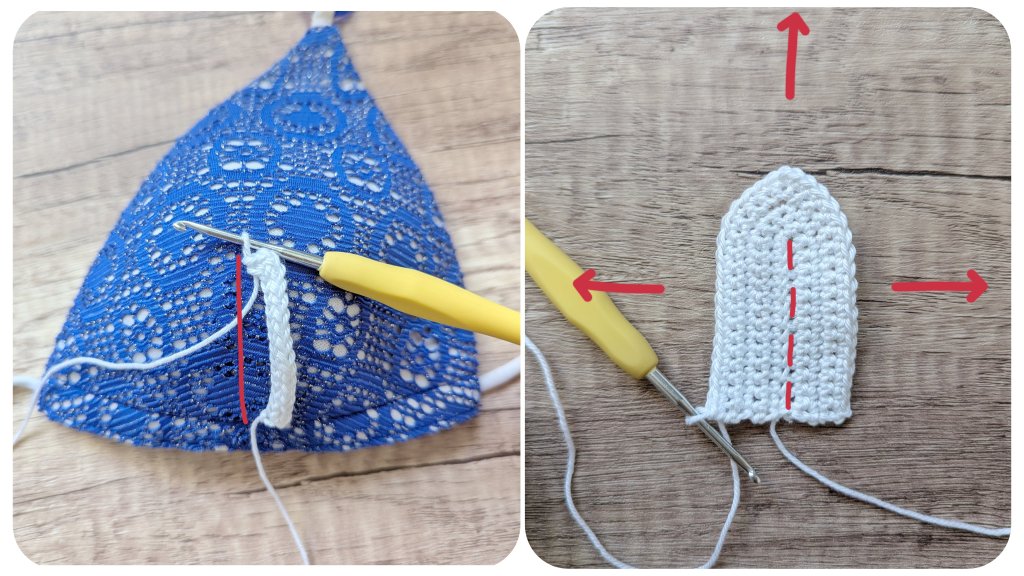
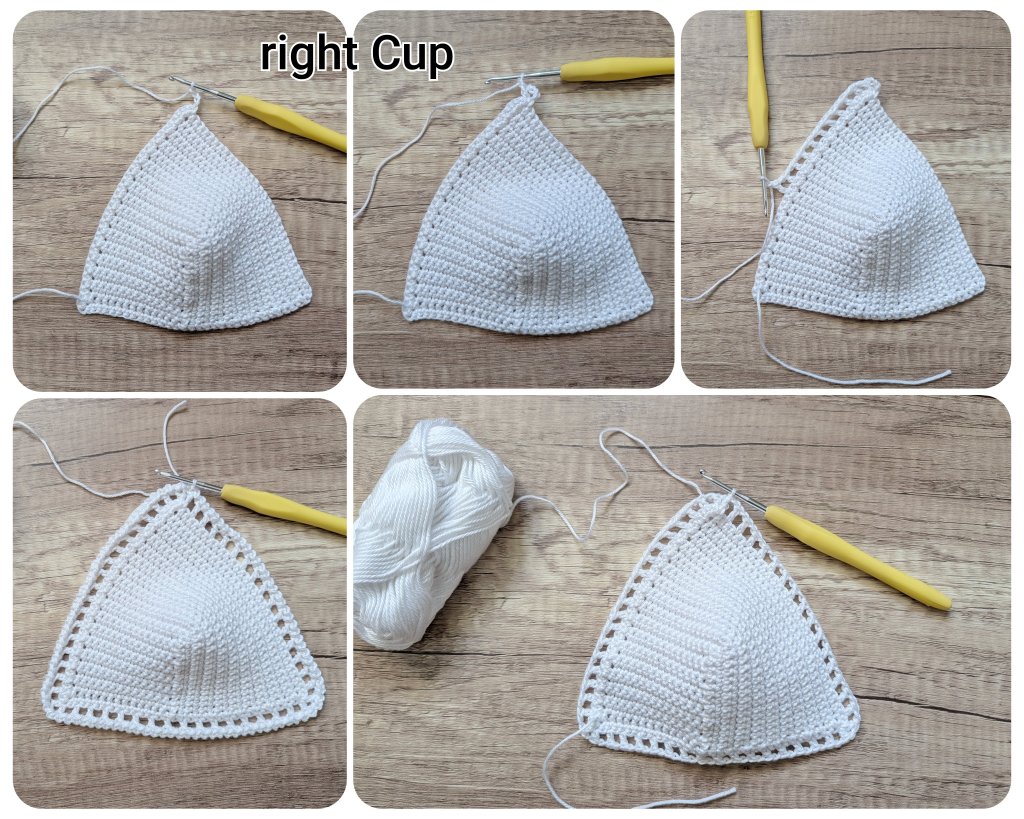
For Cup Style 1, after the foundation chain, you first crochet enough rows to form a square. These square rows lie horizontally across the cup, meaning the chainless foundation forms the bottom edge of the cup. Then, rows are crocheted around two sides of the square until the desired cup size is reached (see reference table on page 2). After that, the edging for the straps is worked in rounds.

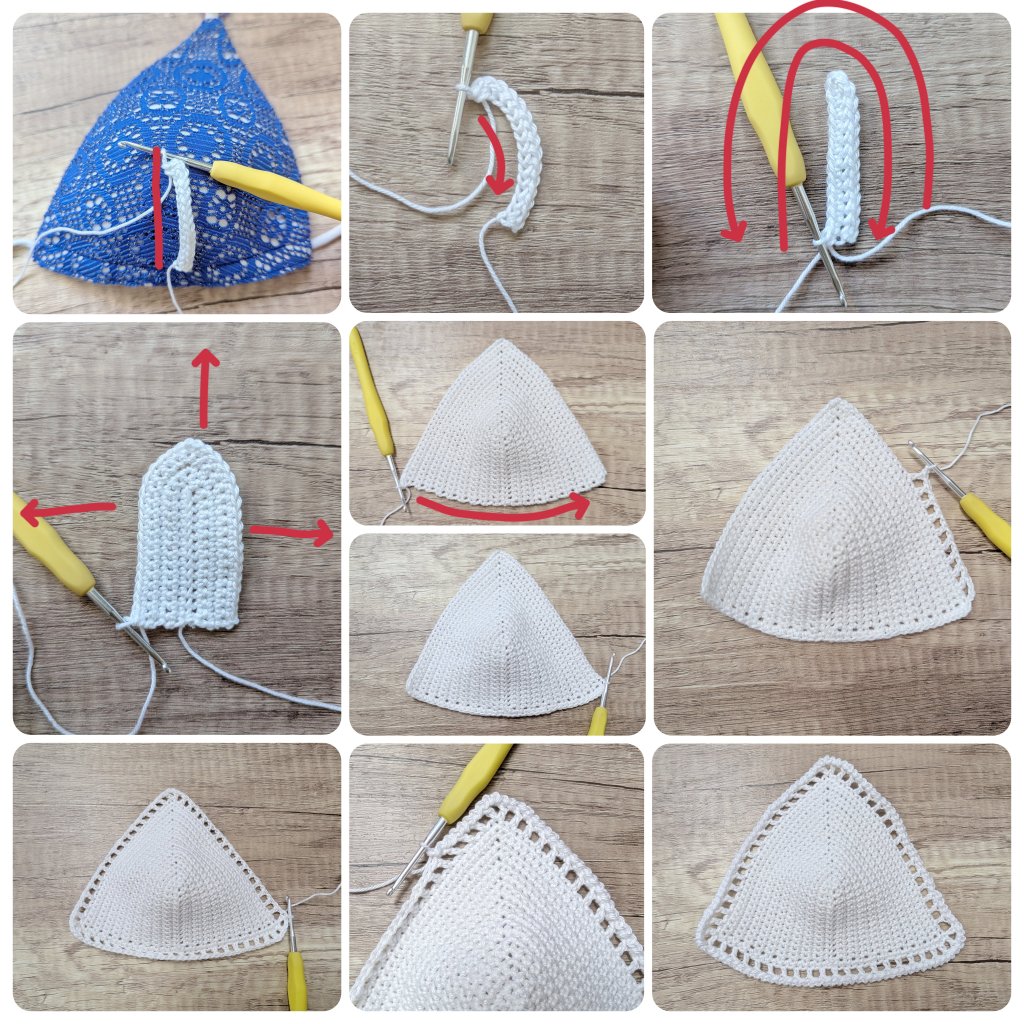
For Cup Style 2, the chainless foundation represents the center seam, and rows are worked outwards on both sides of this foundation in a growing pointy-arch shape. Once the intended cup size is reached (see reference table on page 2), the edging for the straps is added. For this style both cups are crocheted identically.
Triangle Cup Style 1 – Pattern
1. R: Start with a foundation single crochet chain of 14 (17/20) sc (= matches cup peak measurement (C); adjust number of sc as needed), ch 1, turn.
2. – 14. (17./20.) R: 1 sc in each stitch across [14 (17/20) sc], ch 1, turn (13 (16/19) rows total).
15. (18./21.) R: 1 sc in 13 (16/19) stitches, 3 sc in last stitch (corner), 1 sc in 13 (16/19) along the next side, ch 1, turn.
(After this row, your piece should have about the form of a square).
16. (19./22.) R: 1 sc in 14 (17/20) stitches, 3 sc in corner stitch, 1 sc in 14 (17/20), ch 1, turn.
17. (20./23.) – 31. (34./37.) R: 1 sc across 31 (37/43) stitches, ch 1, turn (15 (18/21) rows total).
After the last row, the cup width (measured from one bottom corner to the other) should match your cup width (D) minus 1.5 cm on each side for the edging, and the height from bottom to top corner should match your cup height (B) minus 1.5 cm.
32. (35./38.) R: 1 sc in each st until 1 st is left, 3 sc in the last st. Don’t turn or ch 1.
Continue in rounds:
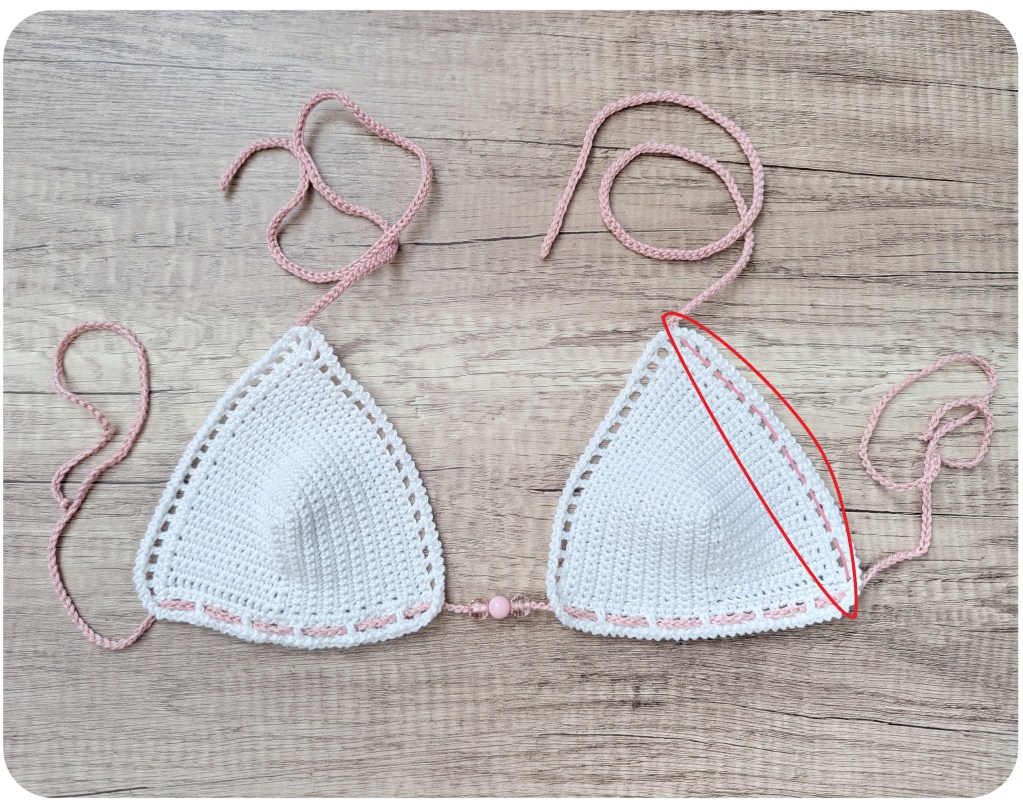
1. Rd: 1 sc in each sts along the bottom edge of the cup, 3 sc in last st, 1 sc in each of the next side sts, 3 sc in the next corner st, sl st into the first st of the next round.
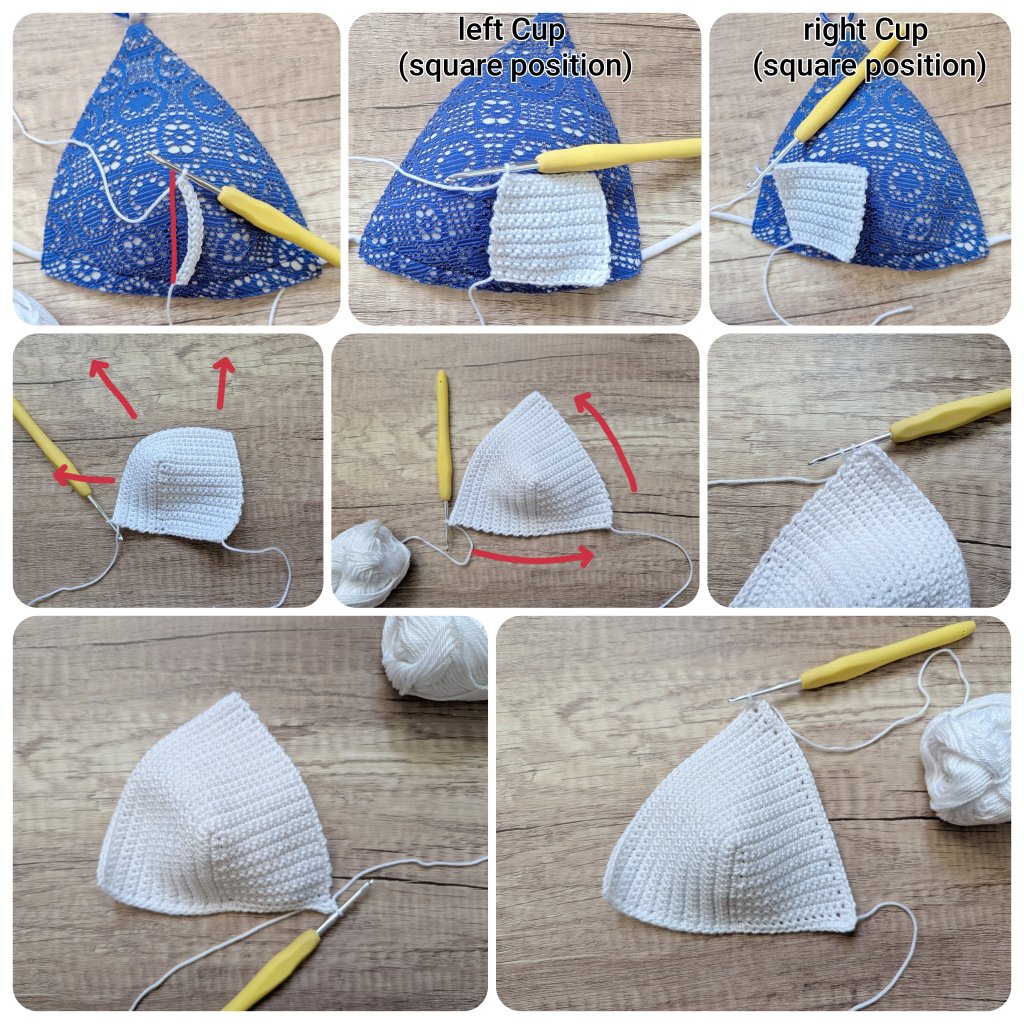
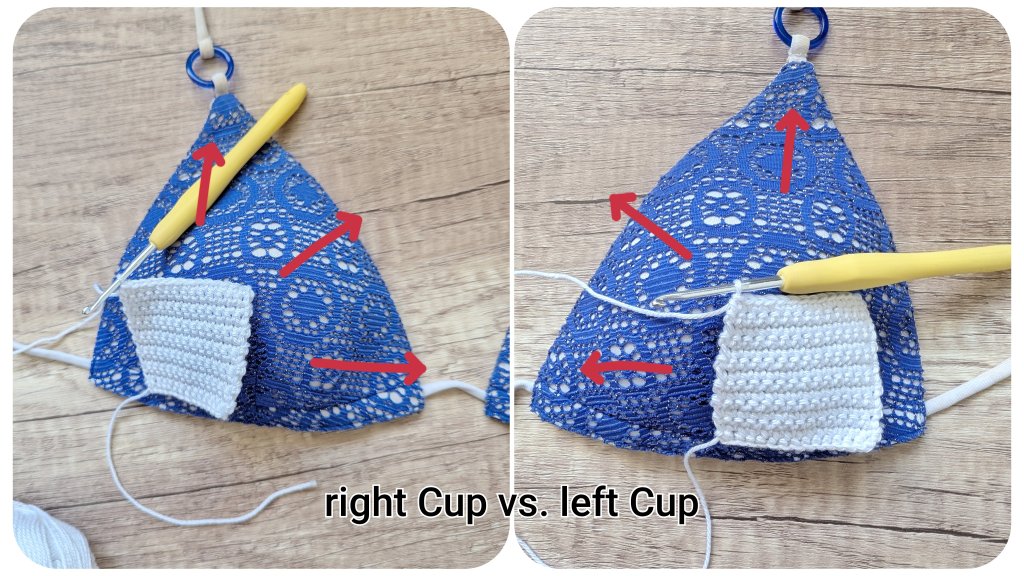
To ensure that the final round is worked with the right side facing outwards, turn the work after 1. Rd before continuing with 2. Rd-right Cup. For the left cup, simply continue directly with 2. Rd- left Cup without turning your work.
For the left cup:
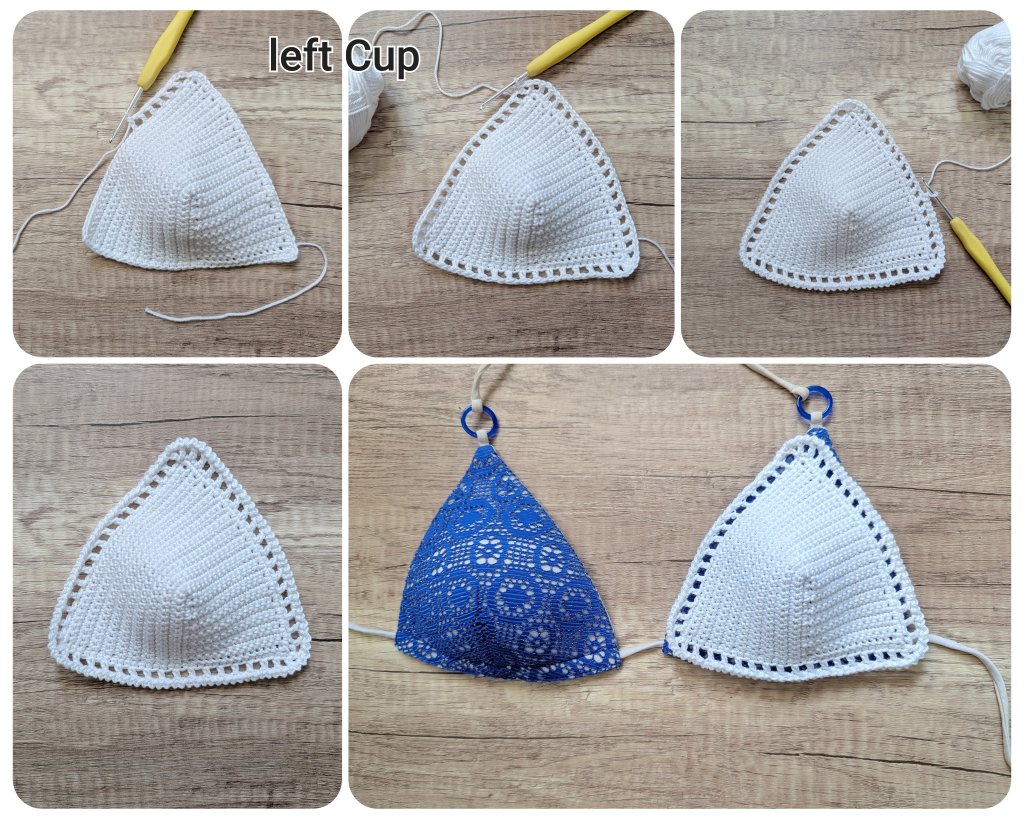
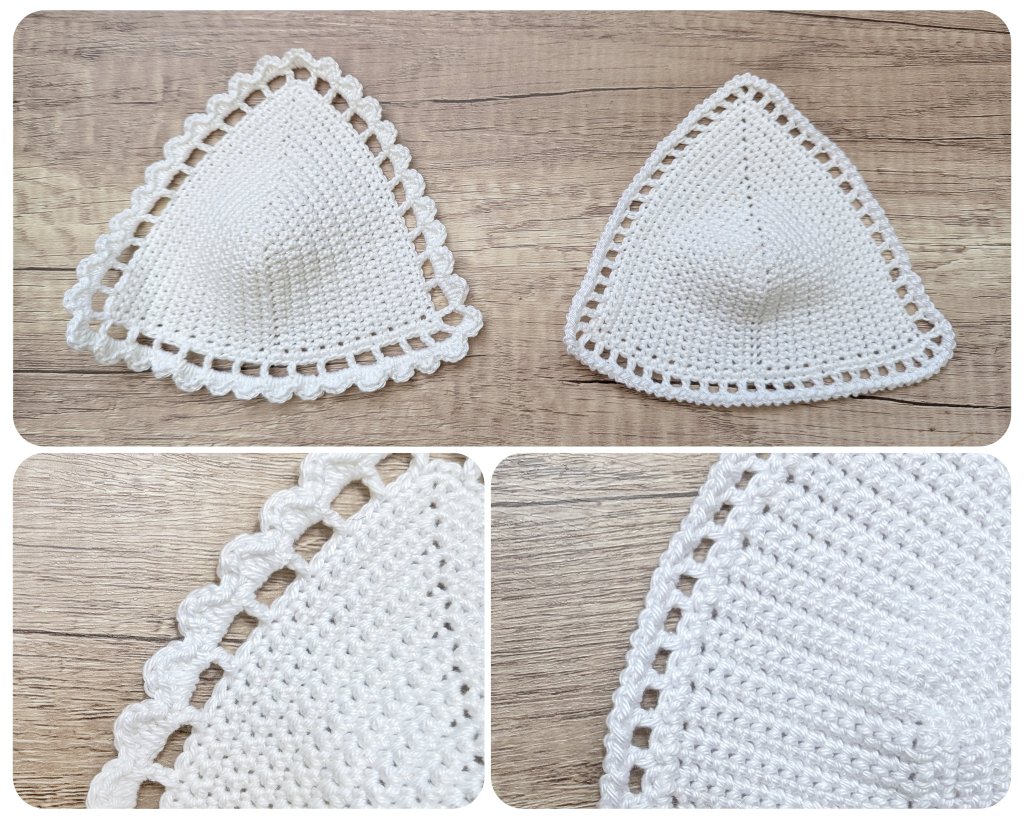
2. Rd (decorative edging): ch 4 (= 1 dc, 1 ch), skip next st, *[1 dc in next st, ch 1, skip next st]* until you reach the corner st, 1 dc in corner st, ch 2, 1 dc in same corner st, ch 1, skip next st, repeat * to next corner, 1 dc in corner st, ch 2, 1 dc in same corner st, ch 1, skip next st, repeat * to next corner, 1 dc in corner st, ch 2, sl st in 3rd ch of beginning ch-4. Don’t turn.

For the right cup:
2. Rd (decorative edging): turn your work (!), ch 5 (= 1 dc, 2 ch), 1 dc in same st as previous sl st, ch 1, skip next st, *[1 dc in next st, ch 1, skip next st]* until you reach the corner st, 1 dc in corner st, ch 2, 1 dc in same corner st, ch 1, skip next st, repeat * to next corner, 1 dc in corner st, ch 2, 1 dc in same corner st, ch 1, skip next st, repeat * until next-to-last st, 1 dc in next-to-last st, ch 1, sl st in 3rd ch of beginning ch-5. Don’t turn.
3. Rd (decorative edging): [ch 1, 1 sl st in next chain-space (=space between 2 dc sts), ch 1, 1 sl st in next dc-st] until Rd-End. Work 2x [ch 1, 1 sl st] in the ch-2-corners. End the Rd with a sl st in the ch-1 from the beginning and weave the ends in.
Alternative edging:
2. Rd: instead of [1 dc, ch 1, skip next st], work [1 dc, ch 2, skip 2 sts] across the round (starting with ch-5 (=1 dc, ch 2)) and 3 ch in each corner instead of ch-2. This time, don’t dc-increase in the corners. That is, you work:
ch 5 (= 1 dc, 2 ch), skip next 2 sts, 1 dc in next st. Repeat *[ch 2, skip next 2 sts, 1 dc in next st]* along the side to the corner st, ch 3 at corner st, skip next 2 sts at corner, 1 dc in next st, repeat * until 1 st to next corner, ch 3 at corner st, skip next 2 sts at corner, 1 dc in next st, repeat * until 1 st to next corner, ch 3, sl st in 3rd ch of beginning ch-5. Don’t turn.
Tip: if you want the holes of the grid-sides to be smaller (less visible) use single crochet or half-double crochet stitches instead of double crochet stitches in 2. Rd.
3. Rd (shell edging): instead of [ch 1, sl st in next ch-sp or dc st], work [1 sc, 1 hdc, 2 dc, 1 hdc, 1 sc] in each ch-sp skipping the dc sts of the previous round. Start with ch 1.
Note: If you want to work the shell stitches only along the top edge (and leave the bottom edge of the cup plain), fasten off after Round 2 and start Round 3 at the rightmost corner of the cup, working across to the leftmost corner.
Triangle Cup Style 2 – Pattern
1. R: Start with a foundation single crochet chain of 13 (16/19) sc and 3 sc in a last foundation chain (= matches cup peak measurement (C); adjust number of sc as needed), continue on the other side: 1 sc in each of the next 13 (16/19), ch 1, turn.
2. R: 1 sc in 14 (17/20) sts, 3 sc in corner st, 1 sc in 14 (17/20) sts, ch 1, turn.
3. R: 1 sc in 15 (18/21), 3 sc in corner st, 1 sc in 15 (18/21), ch 1, turn.
4. R: 1 sc to the corner, 3 sc in the corner st, 1 sc to the last st, ch 1, turn.
Repeat 4th row until row 19 (25/31).
After the last row, the cup width (measured from one bottom corner to the other) should match your cup width (D) minus 1.5 cm (for the edging), and the height from bottom to top corner should match your cup height (B) minus 1.5 cm.
Continue in rounds:
In the last (19. (25./31.)) R (=1. Rd), finish with 3 sc in the last st (=next corner). Continue along the bottom edge of the cup with 1 sc in each stitch, 3 sc in the next corner st, sl st into first sc on the next side, don’t turn.
👉 The cups are intentionally crocheted so that the seam from the foundation chain is visible on the outside. If you prefer the seam to be hidden, simply turn your work after this 1.Rd — this means the back side of Round 1 will then face outwards for the finished cup.

2. Rd: ch 4 (= 1 dc, 1 ch), skip next st, 1 dc in next st. Repeat *[ch 1, skip next st, 1 dc in next st]* along the side to the corner st (1 dc is in corner st), ch 2 at corner st, 1 dc in same st, repeat * to next corner, ch 2 at corner st, 1 dc in same corner st, repeat * to next corner, 1 dc in corner st, ch 2, sl st in 3rd ch of beginning ch-4. Don’t turn.
👉 Each corner of the cup has 2 chain stitches in-between dc-increases. If you don’t land exactly on the corner stitch, simply place the corner double crochet or the 2 chains into the next adjacent stitch — it won’t be noticeable in the end because the straps will cover it.
3. Rd: [ch 1, 1 sl st in next chain-space (=space between 2 dc sts), ch 1, 1 sl st in next dc-st] until Rd-End. Work 2x [ch 1, 1 sl st] in the ch-2-corners. End the Rd with a sl st in the ch-1 from the beginning and weave the ends in.
Repeat for the other cup.
You can use the other edging too instead:

Tips for more elastic cups
Work the pattern using half double crochet (hdc) or double crochet (dc) stitches instead of single crochet (sc). These stitches are less opaque but allow for more stretch. You’ll need to adjust the increases at the top corner (when continuing on the other side of the foundation chain) to prevent the cup from bulging too much, and also adjust the number of turning chains as well as the total number of rows:
For half double crochet (hdc):
Work 4 hdc into the top corner instead of 3 sc. The beginning rows would look like this:
- 1. R: Start with a foundation chain of 13 (16/19) hdc and work 4 hdc into the last foundation chain (= gives you the measurement for cup peak (C); if needed, adjust the number of hdc). Continue on the other side: 1 hdc x 13 (16/19), ch 2, turn.
- 2. R: 1 hdc x 14 (17/20), 4 hdc in corner st, 1 hdc x 14 (17/20), ch 2, turn.
- 3. R: 1 hdc x 15 (18/21), 4 hdc in corner st, 1 hdc x 15 (18/21), ch 2, turn.
For double crochet (dc):
Work 6 dc into the top corner instead of 3 sc and use ch 3 as your turning chain.
Underbust Ties
Using a contrasting yarn colour, crochet a chain equal to your underbust circumference (A) + 30 cm (the extra 30 cm is for tying). Thread the underbust strap through the grid base of both cups. Use a safety pin to help weaving in the strap through the cup grid. Knot the ends of the strap and glue them additionally (with waterproof glue) so they won’t come off.
Tip: you can add a nice touch to your bikini bra when you add a perl or other gems on the underbust strap between the cups. Make sure that these gems are waterproof (sweat-proof).
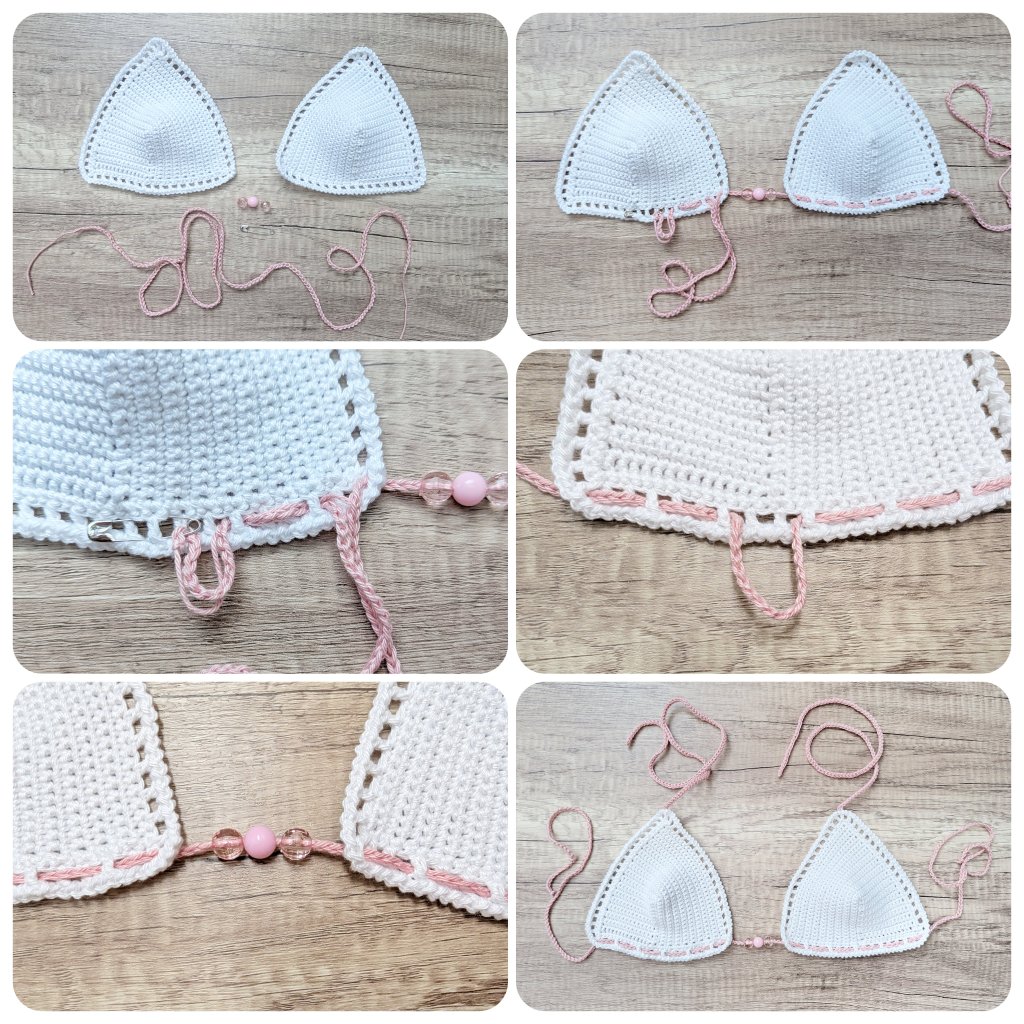
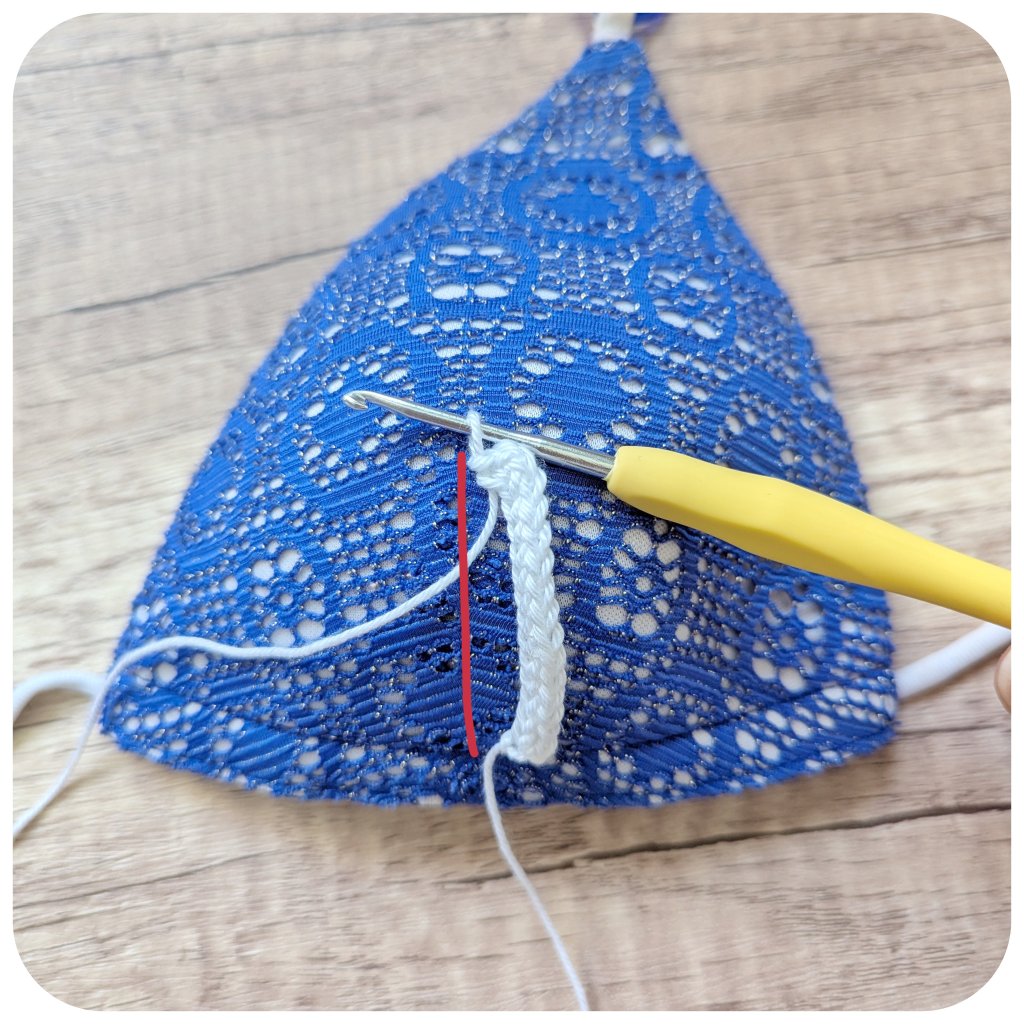
Neckholder Ties
Using a new yarn, crochet two chains, each appr. 50 cm long. Start from the top corner of each cup in the back-loop of the middle st or around the post of the middle stitch. Then, crochet the chain in loose sl sts back to the start.
Crocheting the row back in sl sts (or another stitch pattern) is important as it gives the chain more stability. In case the bra gets soaked with water, the neckholder tie won’t then stretch out so easily). Check the fit of the length and adjust if needed.
Knot the ends together and glue them with waterproof glue.
Alternatively, you can start the neckholder ties from the outermost corner of each cup, weaving it along the side grid. In that case, each tie must be at least 75 (77/79) cm long. Make sure to sl st back in the chains (before weaving them through the side grid) to make the chains less stretchy.

Pattern for the BRAZILIAN BIKINI BOTTOM
Sizes: S, (M, L)
Larger sizes are indicated in parentheses.
Gauge (5 x 5 cm): 13 stitches x 14 rows
- yarn used for the pattern illustrations: Woll Butt Camilla (100% cotton), recommended hook size: 2.5-3.5 mm
Hook size used: 2.5 mm
Yardage: appr. 250 m
Details
- The bikini bottom is worked in rows in one piece from the back, down to the crotch, and up to the front. The bottom can be closed to the sides with an elastic band, therefore the length of the top edge for the front and the back are together lower than the hip line circumference.
- The bikini bottom has a decorative edging. We need to deduct the edging from the measures of the reference table. I used a reduction of 1.5 cm on each side for the edging.
- The number of stitches depends on the gauge of the yarn used.
Stitch calculation
- Hip line circumference for size S (M/L): 84 (87/90) cm.
- As we work the slip in rows and not across the entire hip line, we need half the length of the hip line circumference: 42 (46/50) cm (rounded).
- Correction for the edging of 1.5 cm on each side of the front resp. back: 42 (46/50) cm – 2*1.5 cm = 39 (43/47) cm length for the top edge of the front resp. of the back.
- Gauge of the yarn used: 13 stitches per 5 cm and 14 rows per 5 cm.
- For 39 cm length, we therefore need: (39 cm × 13 sts) / 5 cm ≈ 101 starting stitches.
- When the pattern states that you work the next 4 cm in rows of 1 sc, you need to work (4 cm × 14 rows) / 5 cm ≈ 11 rows of 1 sc in each st.

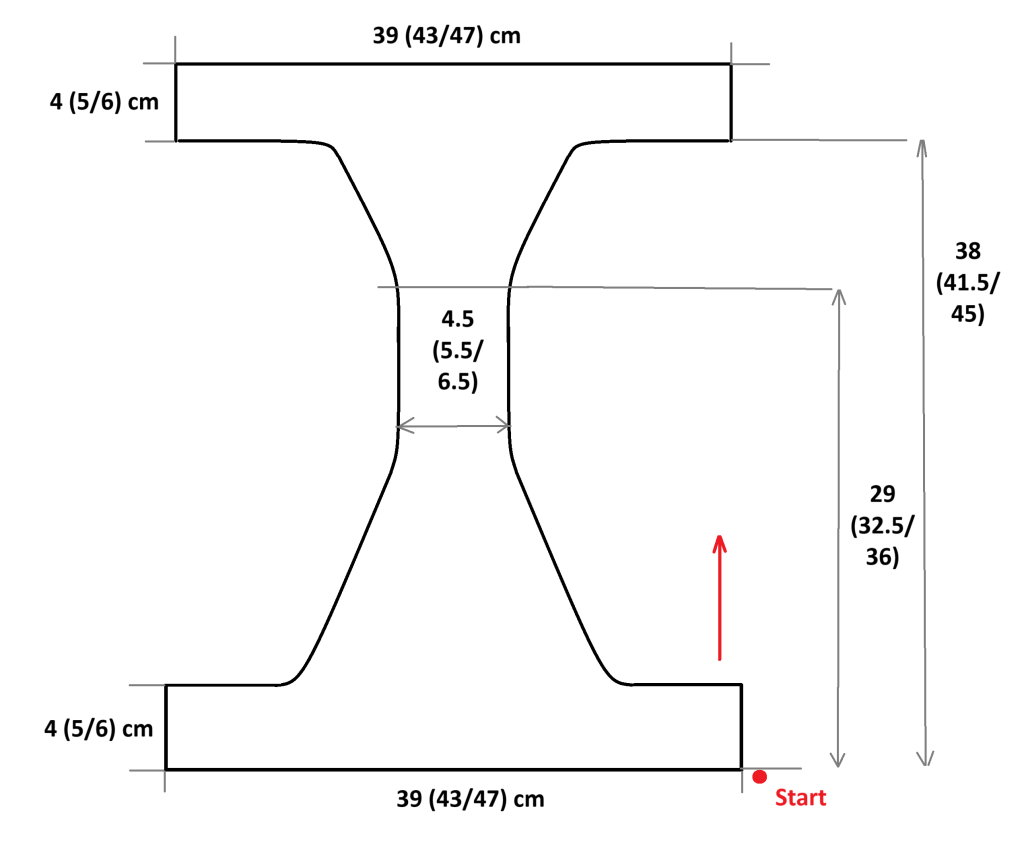
Start
You start at the top edge of the back with the back side band. The back is crocheted in a straight line from one side of the hip (line) to the other hip, down to the crotch area and up again to the front. You finish with the front side band in the same length as for the back.
(Back Side Band:)
- Start with 101 (112/122) single crochet in a foundation single crochet chain. Ch 1, turn your work. You start with the backside Side Band.
👉 Check if this length of your foundation chain fits the desired length from one hip to the next hip, whereby the length should reach 2-4 cm before the center of the hip (this middle hip length is reserved for the elastic band).
- Continue working 1 sc rows (1 sc in each st around) until you reach a width of 4 (5/6) cm measured from top edge. At the end of the last R, fasten off.
- Given my gauge, it’s 10 (13/16) rows of 1 sc sts excl. the foundation ch.
(Back Rise:)
- Start with a new yarn 8 (10/12) cm from the beginning of the next row
- you skip the first 20 (25/30) sts of the new row (from where you fastened off, to continue in the right working direction), therefore starting in the 21st (26th/31st) st).
👉 Tip: for a narrower back coverage (similar to a thong), start the Back Rise closer to the center – about 12-14 cm inwards from the side.
Ch 1 and continue working the Back Rise area by decreasing on each side in every 2nd row. That is:
1. R: sc2tog the first 2 sts (start the dec st in the st you started in), 1 sc along the R until 22 (27/32) sts are left, sc2tog the next 2 sts tog., ch 1, turn.
2. R: 1 sc in each st, ch 1, turn.
3. R: sc2tog in first 2 sts, 1 sc in each st until 2 sts are left, sc2tog, ch 1, turn
4. R: 1 sc in each st, ch 1, turn
Repeat R 3 + 4 until you reach a row length of 4.5 (5.5/6.5) cm (corresponds to 11 – 16 sts in the last row).
Continue working 1 sc rows until you reach the length of your Back Rise (BR) minus 1.5 cm (edge correction) measurement (so, measured from top edge to last row: 21.5 (24/26) cm).
(Crotch area:)
Now, continue working the crotch as 1 sc rows until you reach – from top of Back Rise to last row – 29 (32.5/36) cm.
(Front Rise:)
Continue working the Front Rise (FR) by increasing every 2nd row, starting with the increase (inc) row, so:
1. R: 2 sc in first st, 1 sc in each st until last st is left, 2 sc in last st, ch 1, turn
2. R: 1 sc in each st, ch 1, turn
Repeat R 1 + 2 until you reach the length of about 38 (41.5/45) cm (measured from top edge of Back Rise to last R).
- The number of sts in the last R should be dividable by 2 (in my case, it was 38 sts).
- The last R (before starting the lace, see below) should be an increase R.
Start working a lace pattern:
1. R: Work 1 sc in the first 4 sts, then [ch 4, skip next 2 sts, 1 sc in st thereafter] until only 3 more sts are left, 1 sc in last 3 sts, ch 1, turn.
2. R: 2 sc in first st, 1 sc in next 3 sts, ch 2, 1 sc in ch-4-space, [ch 4, 1 sc in next ch-4-space] through each ch-4-space, ch 2, 1 sc in next sc st, 1 sc until last st is left, 2 sc in last st, ch 1, turn.
3. R: 1 sc until you reach the first ch-2-space, 1 sc in ch-2-space, 3 sc in every ch-4-space (skipping the sc sts in-between), 1 sc in last ch-2- space, 1 sc until R-end, fasten off.
- (you should get the same number of stitches as prior to R 1 plus 2 sts)
(Front Side Band:)
Start with a new yarn… chain as many stitches to the side until you reach the hip side. You can calculate the required number of chain sts as follows (based on size S):
- (starting foundation chain sts – sts in last R) / 2 = (101 – (38 + 2)) / 2 ≈ 31 LM
1. R: So, ch 31 ch sts, then connect to the side (where you fastened off, to continue in the right working direction), continue 1 sc sts, after the last st, chain again the number of calculated sts (31), 1 turning ch, turn.
2. R: Work 1 R of 1 sc (working in the ch sts, then in the sc sts, then in the ch sts on the other side), ch 1, turn.
(Do again rows of the lace pattern:)
1. R: Work 1 sc in the first 5 sts, then [ch 4, skip next 2 sts, 1 sc in st thereafter] until 4 sts are left, 1 sc in last 3 sts, ch 1, turn.
2. R: 1 sc in first 5 sts, ch 2, 1 sc in ch-4-space, [ch 4, 1 sc in next ch-4-space] through each ch-4-space, ch 2, 1 sc in next sc st, 1 sc until last st is left, 1 sc in last st, ch 1, turn.
3. R: 1 sc until you reach the ch-2-space, 1 sc in ch-2-space, 3 sc in every ch-4-space (skipping the sc sts in-between), 1 sc in last ch-2- space, 1 sc until R-end, ch 1, turn.
4 + 5. R: 1 sc in each st, ch 1, turn (2 rows).
Repeat R 1-5 until you have – in total – the same number of rows for the Band as on the back).
- Measured from top edge of Back Rise to last row of Front Rise: 42 – 51 cm for S-L.
(Edging:)
1. Rd: In the last st work 3 sc, don’t turn but continue working all across the sides until we are back at the last R:
- 1 sc in each turning st and end-st on the sides,
- 3 sc in the (7) “outer” corners (see “o” in the next illustration),
- 1 hdc in the (4) “inner” corners (see “i” in the next illustration),
- 1 sc in each st of the Foundation R of the Back Rise,
- all across the sts of the other side,
- sl st in the 1st sc st of the last R of the Front Rise (don’t work the last R).
Continue working the chain edging (the grid is smaller than for the cups):
2. Rd: ch 3 (=1 sc, ch 2), skip next 2 sts, *[1 sc in next st, ch 2, skip next 2 sts]* all around the bottom (incl. the last R), sl st in the 1st sc.


Version 1 (with shell sts):
3. Rd (shell edging): ch 1, work [1 sc, 1 hdc, 1dc, 1 hdc, 1 sc] in each ch-sp skipping the sc sts of the previous round. Sl st in the ch-1 from the beginning to close the round.


Version 2 (with sl sts and ch1):
3. Rd: [ch 1, 1 sl st in next ch-space, ch 1, 1 sl st in same ch-space] until Rd-End. So, you sl st and ch 1 in each ch-space twice! End the Rd with a sl st in the ch-1 from the beginning and weave the ends in.

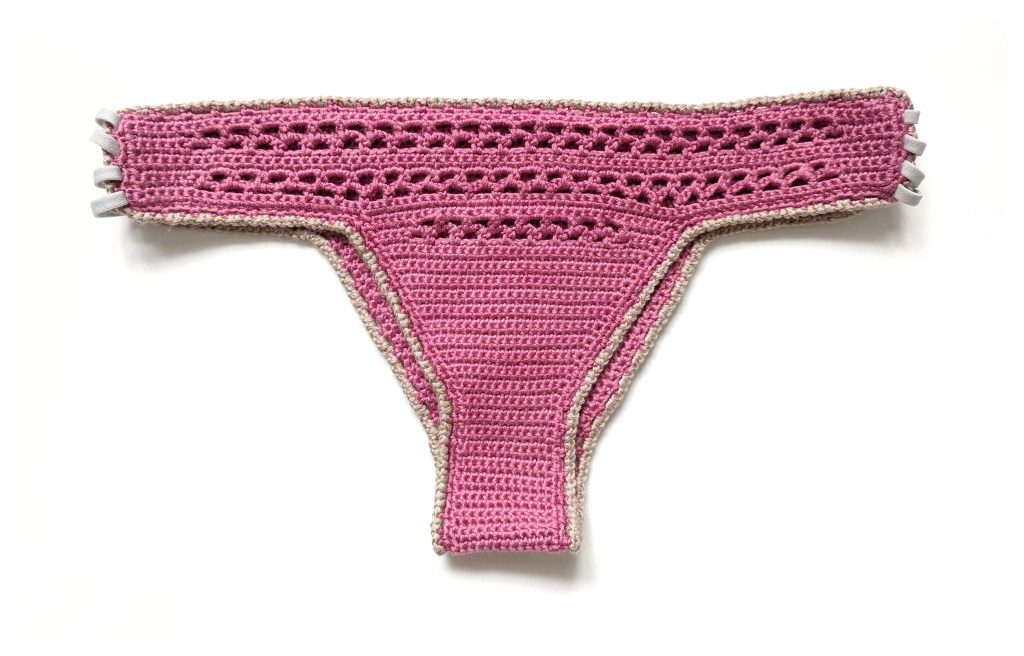
Side Ties:
To create the best fit in the longterm, the side ties for the bikini bottom should be adjustable or, preferably, elastic. Examples for suitable elastic ties:
- elastic cord,
- a chain crocheted with an elastic thread,
- elastic lace trim or a simple elastic lace band.
Thread the elastic band through the ch-spaces of the side band on both sides of the bottom and sew the ends on the inside (sew through the outer loops of the stitches only, so that the sewing is not seen on the outside).
Your Crochet Bikini is finished!
Don’t forget to block the bikini top and bottom before use to set the desired shape of your pieces, reduce the stiffness and improve the drape of your pieces.

