


Another summer top, another free pattern!
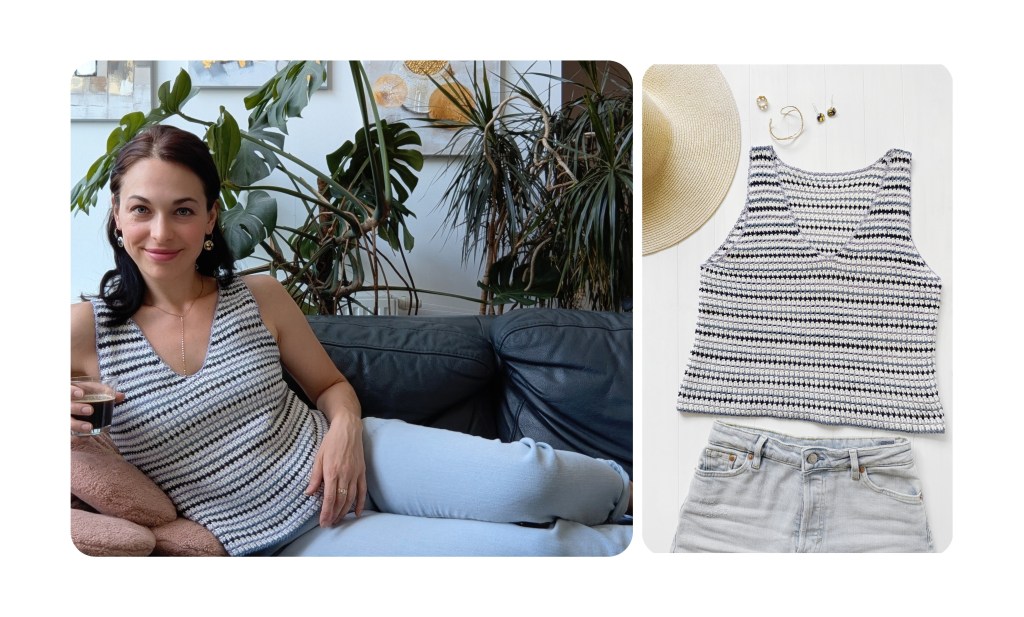
Say hello to my latest crochet piece – a breezy summer top that’s as fast to make as it is fun to wear. 🌊
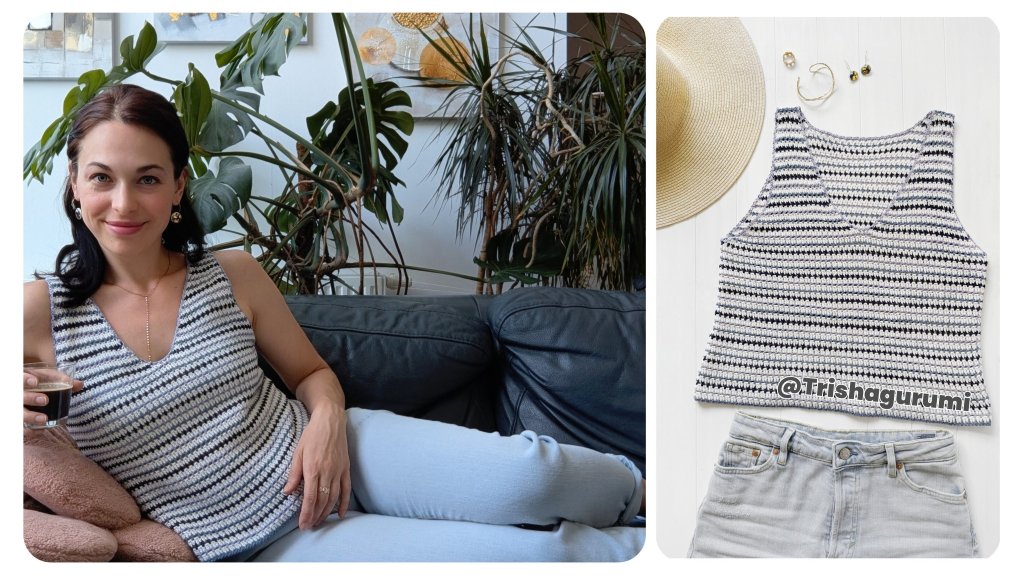
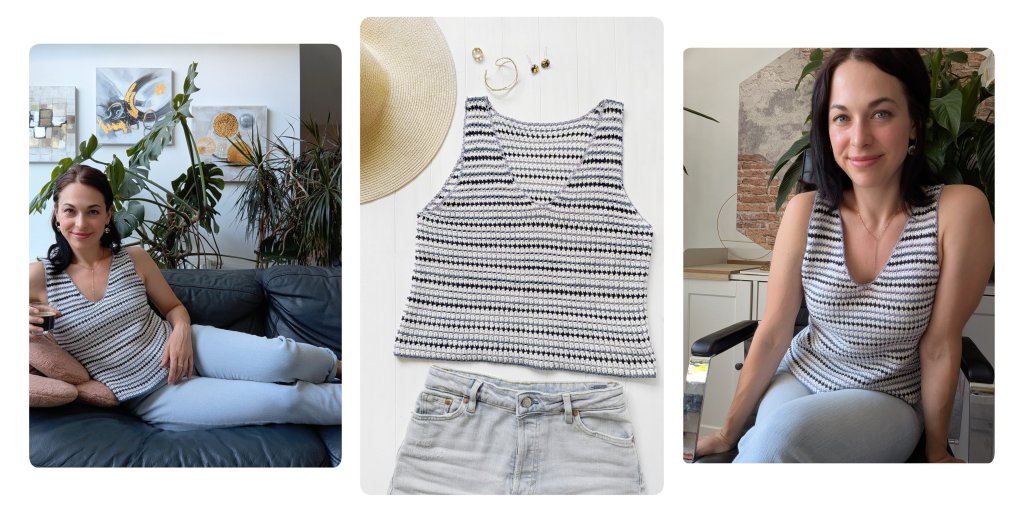
This is only the second crochet top I’ve ever created, but I’ve already learned so much from it! While my first crochet top had a firmer, more structured feel (thanks to single crochet stitches that made it completely opaque), this one goes in a different direction: it features a softer, more flexible woven stitch pattern – light, breathable, and perfect for warm summer days.
The colour palette is inspired by the sea: crisp white, deep navy, soft sky blue, and a touch of lavender. Together, they create a subtle striped look that reminds me of ocean waves rolling on the shore. It’s fresh, calming, and just the right amount of playful.
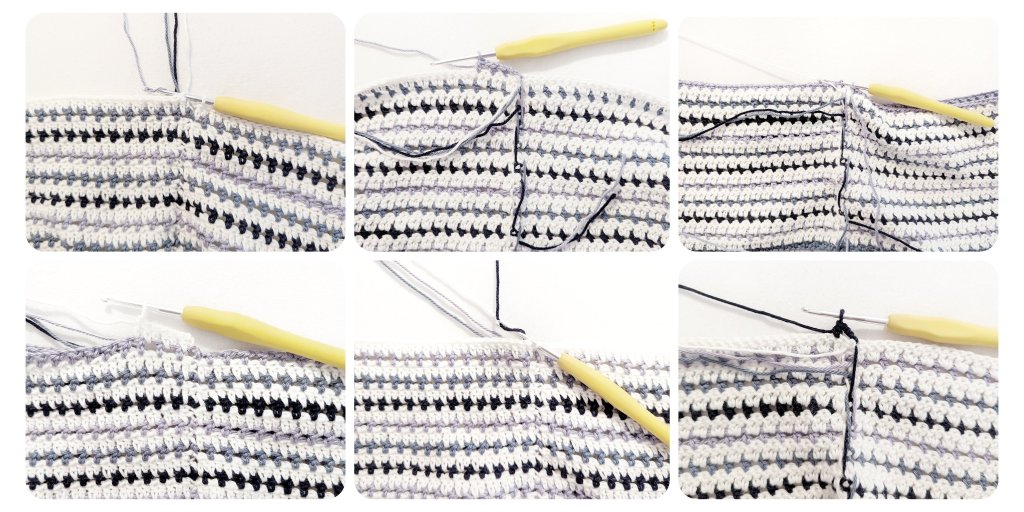
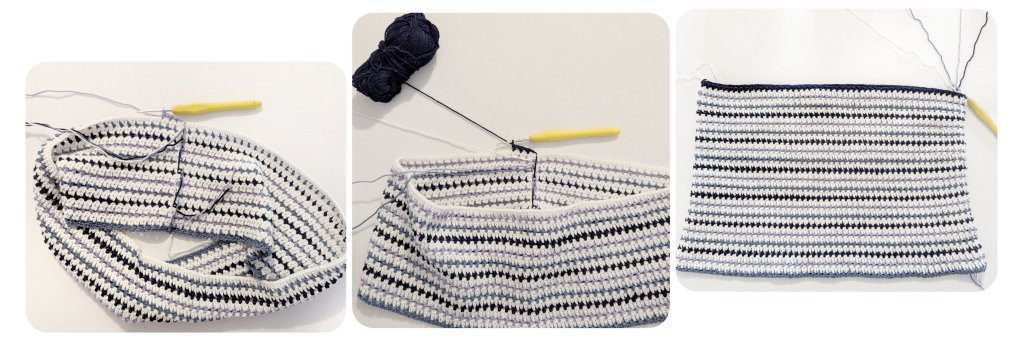
I also wanted to make the actual crocheting as smooth as possible – especially with all those colour changes! So I’ve designed this pattern to minimize loose ends by working the top as much as possible in one piece from the bottom up, starting as a seamless tube up to the armholes. From there, the front and back are worked separately.
If you’d like to give this crochet summer top a try, you’ll find the free pattern below. I’d love to hear how your version turns out – tag me or leave a comment. Happy hooking and happy summer! ☀️


Material needed
- yarn and yardage:
- Schachenmayr Catania (100 % cotton, 10 cm x 10 cm = 36 R and 26 sts): in the colours greyblue (269) in 115 m (50 gr), marine (124) in 110 m, lavender (422) in 125 m, white (106) in 250 m
- crochet hook in 2.5 mm
- scissors
- wool needle
- measuring tape
Abbreviations
ch = chain | ch sp = chain space (the space created by a chain between stitches) | dc = double crochet | dc2tog = double crochet 2 sts together | dc3tog = double crochet 3 sts together | decr = decrease | hdc = half-double crochet | r = row | rd = round | sl st = slip stitch | st(s) = stitch(es) |
How the Summer Top is made
- The top is crocheted from bottom-up, the front and back side of the top are started in one piece, but finished separately after reaching the outlines for the arms.
- The “right” side of the white round / row should face outwards (the clear pattern of the double crochet stitches should face outwards in the finished top). The right side of the coloured rounds / rows should face the inside of the top (resp. the wrong side of the coloured rounds / rows face outwards).
- The top follows a linear colour pattern:
- darkblue (C) – white (W) – lilac (C) – white (W) – greyblue (C) – white (W)
- “W” refers to “white” round or row, “C” refers to “coloured” round or row
- Size: S, M, and L. The instructions for sizes M and L are given in parentheses, separated by a slash. If only one number is given, it applies to all sizes.
Useful tips
- Stitch loosely to make the weaving pattern softer
- When working the front and back in one piece (in closed rounds), don’t cut the yarn ends when changing colour as we will go back to the colour. Just drop the colour and resume it after a couple of rows. Make sure, though, that the yarn changes are positioned on the wrong side of the top, so they are not visible by considering the following:
- the C-yarn end should be placed on the right side of the top (as opposed to “wrong” side), because the “wrong” side of the coloured stitches will face outwards in the finished top.at each end of a coloured (C) round, bring the white (W) yarn to the “right” side. Then turn your work.
- “right” and “wrong” (“left”) side describes the side of the crochet stitch. The “right” side shows a front side of a crochet pattern where the stitch structure is cleaner, whereas the “left” side (“wrong” side) shows the backside of a crochet pattern.
- the W-yarn end should be placed on the wrong side of the top, as the right side of the white stitches will be facing outwards.
- at each end of a W-round place the W-yarn to the “wrong” side, then turn your work.
- at each end of a C-round place the C-yarn to the “right” side, then turn your work.
- When you continue working the front resp. back separately, you cannot resume a yarn colour later on, but you have to cut the unused yarn colour away after every row. I recommend to hide the yarn ends by crocheting around them for a few stitches of the new row. Make sure, though, that the ends are not visible from the “right” side of the top. Otherwise, weave them in through inside the top at the very end.

Top Schematic and Crochet Diagram
Top Schematic:

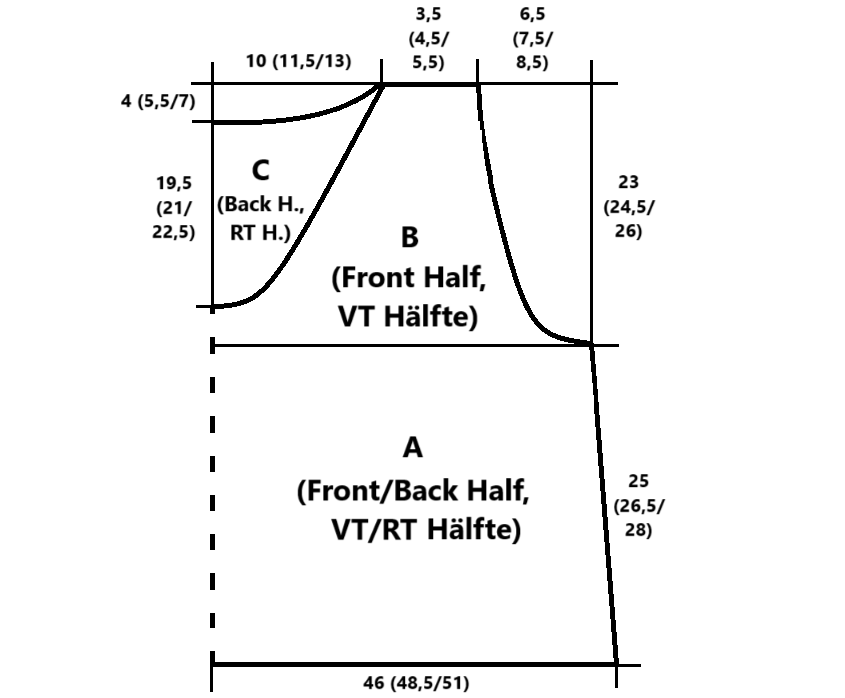
Size: S, M, and L. Instructions for sizes M and L are given in parentheses and separated by a slash. If only one number is given, it applies to all sizes.
The top suits casually around the stomach but is form-fitting around the bust and it is designed for average height. For a taller fit, you can follow a larger size and repeat the initial decrease rows from Stitch Diagram A as many times as needed until you reach the desired width for your size.
Gauge following the Crochet Pattern:
The stitch pattern is a 2-row repeat:
C-row (colored row, wrong side facing outward):
[1 hdc, ch 1, skip next st]
W-row (white row, right side facing outward):
1 dc in each ch-space and in each hdc stitch of the row
This special stitch pattern creates the following gauge using a 2.5 mm crochet hook:
24 stitches and 16 rows = 10 x 10 cm (4 x 4 in)
Legend:


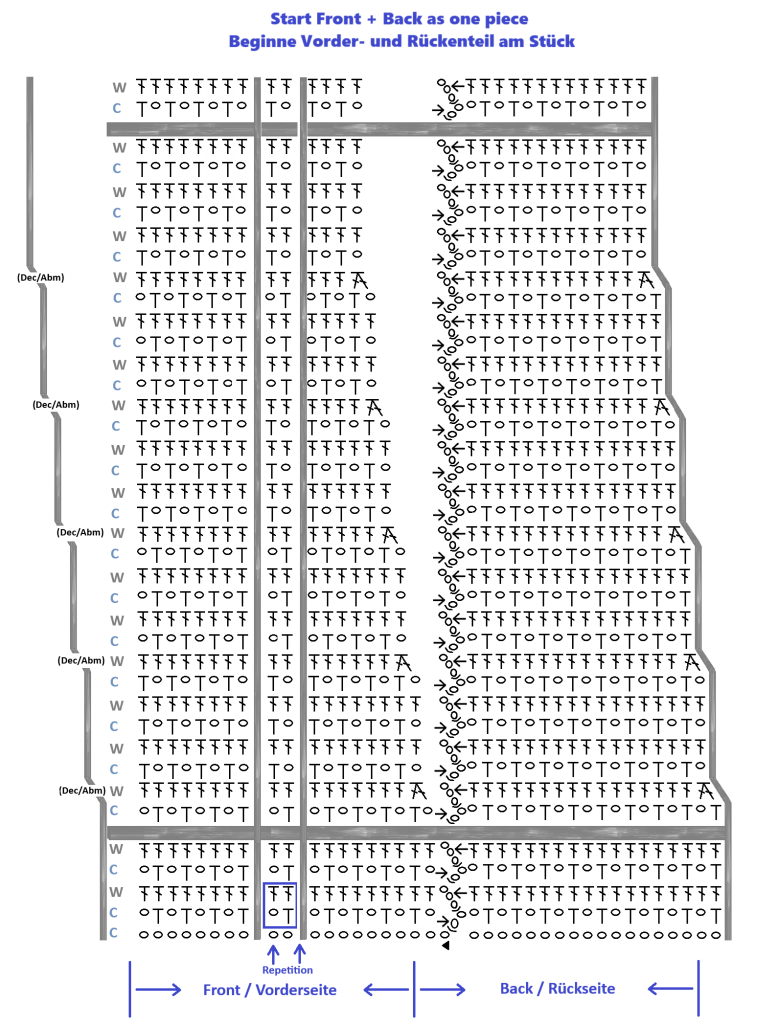
Stitch Diagram A:
Stitch Diagram A is worked in closed rows (join each row with a sl st into the turning chains from the beginning, then turn your work).
The chart includes both right-side and wrong-side rows (the grey areas indicate: continue the stitch pattern).
Read the right-side rows from right to left, and the wrong-side rows from left to right.
Row 1 is a wrong-side row (the wrong side of the stitches is facing outward).
Each row begins with 2 turning chains for the first hdc and with 3 turning chains for the first dc.
- The dc row is joined with a sl st into the top of the starting ch-3.
- The (1 hdc, ch 1) row is joined with a sl st into the 2nd chain of the starting ch-3.

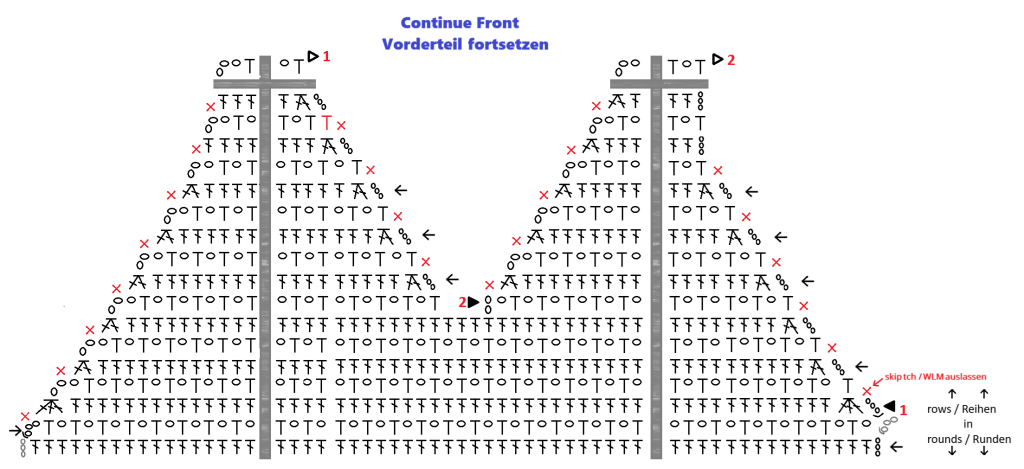
Stitch Diagram B:
In Stitch Diagram B, the front part is completed separately.
Special note:
For the armhole and V-neck shaping, in addition to explicit decreases, subtle shaping is achieved by not working into the turning chains.
However, if the last stitch of the row is a chain stitch, the turning chain is completed with a hdc (see blue boxes in Stitch Diagram C below) to ensure an even edge finish.

Stitch Diagram C:
In Stitch Diagram C, the back piece is completed separately.
Special note:
For shaping the armholes and neckline, subtle decreases are made in addition to explicit ones by not working into the turning chains.
However, if the last stitch of the row is a chain stitch, complete the turning chain with a hdc (see blue boxes in Diagram below) to ensure an even edge finish.


Crochet Pattern
Begin with front and back together (Chart A):
Start with the medium-dark color, grey-blue:
Ch 206 (218/230) + 2 turning ch for the first hdc + 1 ch for the first ch-sp in the 1. WS-R (WS=wrong-side) = 208 (220/232) ch total.
(The stitch count – excluding turning chains – should be divisible by 2.)
Join the ch into a round with a sl st into the first ch.
Work Chart A in closed rounds (at the end of each round, join with a sl st into the turning chains, then turn your work).
- 1. R (in C – grey-blue): Ch 3 (= 1 hdc, 1 ch), skip next ch, 1 hdc in next ch, [ch 1, skip next ch, 1 hdc in next ch] repeat to end of round. End with ch 1, sl st in 2nd ch of beginning ch-3, change colour to W (white), turn.
- 2. R (in W – white): Ch 3 (= 1 dc), 1 dc in each ch-sp and each hdc around. The last dc is worked into the last ch-sp. Join with a sl st into the top ch of the starting ch-3, change colour to lavender, turn.
- 3. R (in C – lavender): Ch 3 (= 1 hdc, 1 ch), 1 hdc in 3rd dc (skip the stitch where the sl st was placed and the next dc), [ch 1, skip next st, 1 hdc in next st] repeat to end of round until 1 dc remains. Ch 1, sl st in 2nd ch of starting ch-3, change colour back to W (pick up white yarn from 2. R from the RS (right-side row), drop coloured yarn to the RS), turn.
- 4. R (in W – white): Repeat 2. R.
- 5. R (in C – marine): Repeat 3. R.
- Repeat iteratively 2. + 3. R.
Shaping the sides:
- After approx. 7 cm (last round in colour), decrease 1 stitch on each side of the top (i.e., halfway around the round).
Decreases are always made in white rounds (W). Continue in pattern without decreasing in coloured rounds. - After another 3 cm (approx. 5 rounds), decrease again in the next W round, 1 st per side.
- Repeat 3 more times after every 3 cm, always in white rounds, each time decreasing 1 st on each side (so 2 M per decr-R).
- Total: 5 W decr. rounds × 2 sts decreased = 10 sts decreased.
- After 26 (27.5 / 29) cm [= approx. 41 (43 / 45) rounds] begin shaping the armholes.
- From here, the front and back are worked separately in rows. Continue with the front piece first.

Continue with the Front Piece (Chart B):
- The front piece is worked over half of the total stitch count from the previous rounds:
99 (105/111) sts. Work in rows across one side of the top, then turn the work and crochet back across the return row using turning chains. - In the next white (W) row, decrease 2 sts on each side by working 3 dc together at both edges of the row.
- In every following W-row, decrease 1 stitch on each side by working the [1 hdc, ch 1] pattern together and skipping the turning chain in the coloured rows (i.e., reduce 2 sts total per W row).
- In each coloured (C) row, only skip the turning chain (reduce by 1 st total).
- After 4 (5.5/7.5) cm (5/7/11 rows) from the start of the armhole shaping, begin the V-neck. To do this, skip the center 3 stitches, and complete the front piece in two separate halves for the straps.
- To continue the first half, work [1 hdc, ch 1, skip 1 st] across the row until 2 sts before the center, then turn and work back.
- In every white row, decrease 1 stitch on each side (for both the armhole and the V-neck shaping) by skipping the turning chains.
- After 7.5 (9/10.5) cm (11 (13/15) rows) from the start of the armhole, stop shaping the armhole (but continue skipping the turning chain).
- From now on, continue decreasing 1 stitch only at the center edge (V-neck) in the white rows.
- After 22.5 (24/25.5) cm from the start of the armhole, finish the first (right) half of the front piece. Weave in all yarn ends.

- Now, turn the top and join the coloured yarn (C) into a dc 3 stitches after the beginning of the first front piece half.
- Work the second half the same way, following Chart B.
- Weave in all yarn ends.


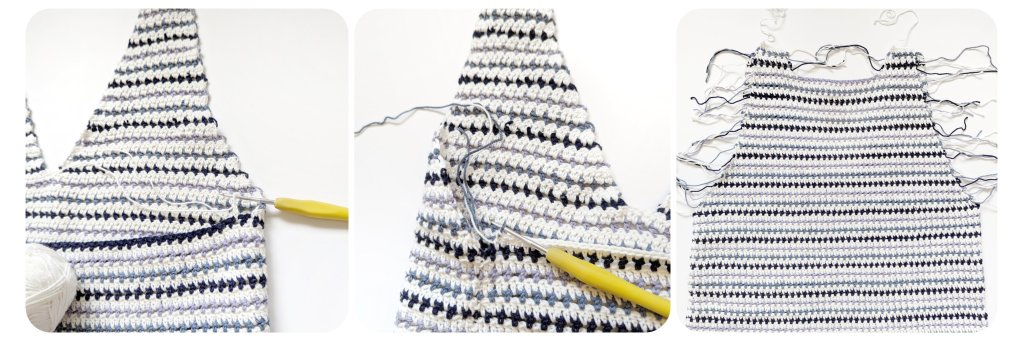
Continue with the Back Piece (Chart C):
The back piece continues directly from the end of Chart A – see Chart C.
Start the back piece in W (white) from the front side, 2 stitches after the right armhole of the front piece (i.e. the right armhole includes 2 skipped coloured stitches). End the first W-row of the back piece 2 stitches before the left armhole of the front piece. This results in the back piece having 99 (105/111) – 4 stitches, which is 4 sts fewer than the front.
The back is worked in the same pattern as the front piece, but without the V-neck. Work the same number of rows as for the front. Begin shaping the neckline 4 rows before finishing.
The right side of the neckline is worked as part of the continuation of the back piece:
- In the 4th-to-last row (W): ch 3, dc in next 12 (14/16) sts, dc2tog, change color, turn.
- In the 3rd-to-last row (C): ch 3, [hdc, ch 1, skip next st] repeat to end, hdc in last, skip turning ch, change color, turn.
- In the 2nd-to-last row (W): ch 3, dc in next 9 (11/13) sts, dc2tog, change color, turn.
- In the last row (C): ch 3, [hdc, ch 1, skip next st] repeat to end, hdc in last, skip turning ch, change color, turn.
- Work one additional row in W: ch 3, dc in next 9 (11/13) sts.
→ You’ll now have 10 (12/14) stitches. The back piece is now one row longer than the front.
For the left side of the neckline, start 14 (16/18) stitches + 3 ch from the left edge. Work symmetrically to the right neckline according to Chart C.
Weave in all loose ends. Use the last W yarn tail to seam the shoulder.
Finish and Edging
Block the finished top by gently stretching, moistening, and letting it dry completely.
For a neat and decorative finish, crochet an edging around the armholes and neckline/V-neck as follows:
Work along the edges using the lightest C-colour with the pattern:
[sl st in a side stitch or turning chain, ch 1, sl st in the next side stitch or turning chain]
Repeat this pattern all around the armholes and neckline.


Your crochet summer top is finished!
